Addovation Admin Portal Administrator Guide
Last Updated: 2026-10-01
Introduction
The Addovation Admin Portal provides administrators with a central place to manage customers, subscriptions, products, users, reports, and other administrative functions.
This guide explains the main areas of the Admin Portal and provides step-by-step instructions for common administrative tasks. Each section describes the purpose of the page, the information and controls available, and the actions that administrators can perform.
Use the menu on the left side of the Admin Portal to navigate between the different areas.
The guide covers:
- Home — Overview of the Admin Portal.
- Customers — Manage customers, tenants, and account managers.
- Subscriptions — Create and manage customer subscriptions and related settings.
- Products — Manage products, APIs, and customer access.
- Documentation — Access Addovation product documentation.
- User Management — Manage administrator accounts, roles, and access.
- Audit Logs — Review and export administrative activity.
- Peppol Directory — Manage Peppol recipients associated with subscriptions.
- Reports — Create, manage, and assign reporting templates.
- Chat AI Assistant — Get guidance and answers about using the Admin Portal.
Navigating the Admin Portal
The left-hand navigation pane provides access to the main areas of the Admin Portal. It remains visible across the portal, allowing administrators to move between areas at any time.
The menu items appear in the following order:
| Menu item | Purpose |
|---|---|
| Home | The Admin Portal's landing page and starting point for an overview of the platform. |
| Customers | Manage enterprise customer records, including key account managers and reference details. |
| Subscriptions | View and maintain customer subscription information. |
| Products | Manage the product catalog available for customer subscriptions, including published products. |
| Documentation | Opens Addovation's documentation website, providing general information about Addovation's services. |
| User Management | Manage platform access, user roles, and administrative permissions. |
| Audit Logs | Review a system-wide history of activity across subscriptions, products, and users. |
| Peppol Directory | Select a subscription and manage the Peppol recipients linked to it for electronic invoicing. |
| Reports | Create, assign, and manage reporting templates made available to customers. |
| Chat AI Assistant | Provides quick answers and step-by-step guidance on using the Admin Portal. |
The currently selected menu item is highlighted, making it easy to identify the area of the portal currently being viewed.
User Details and Logout
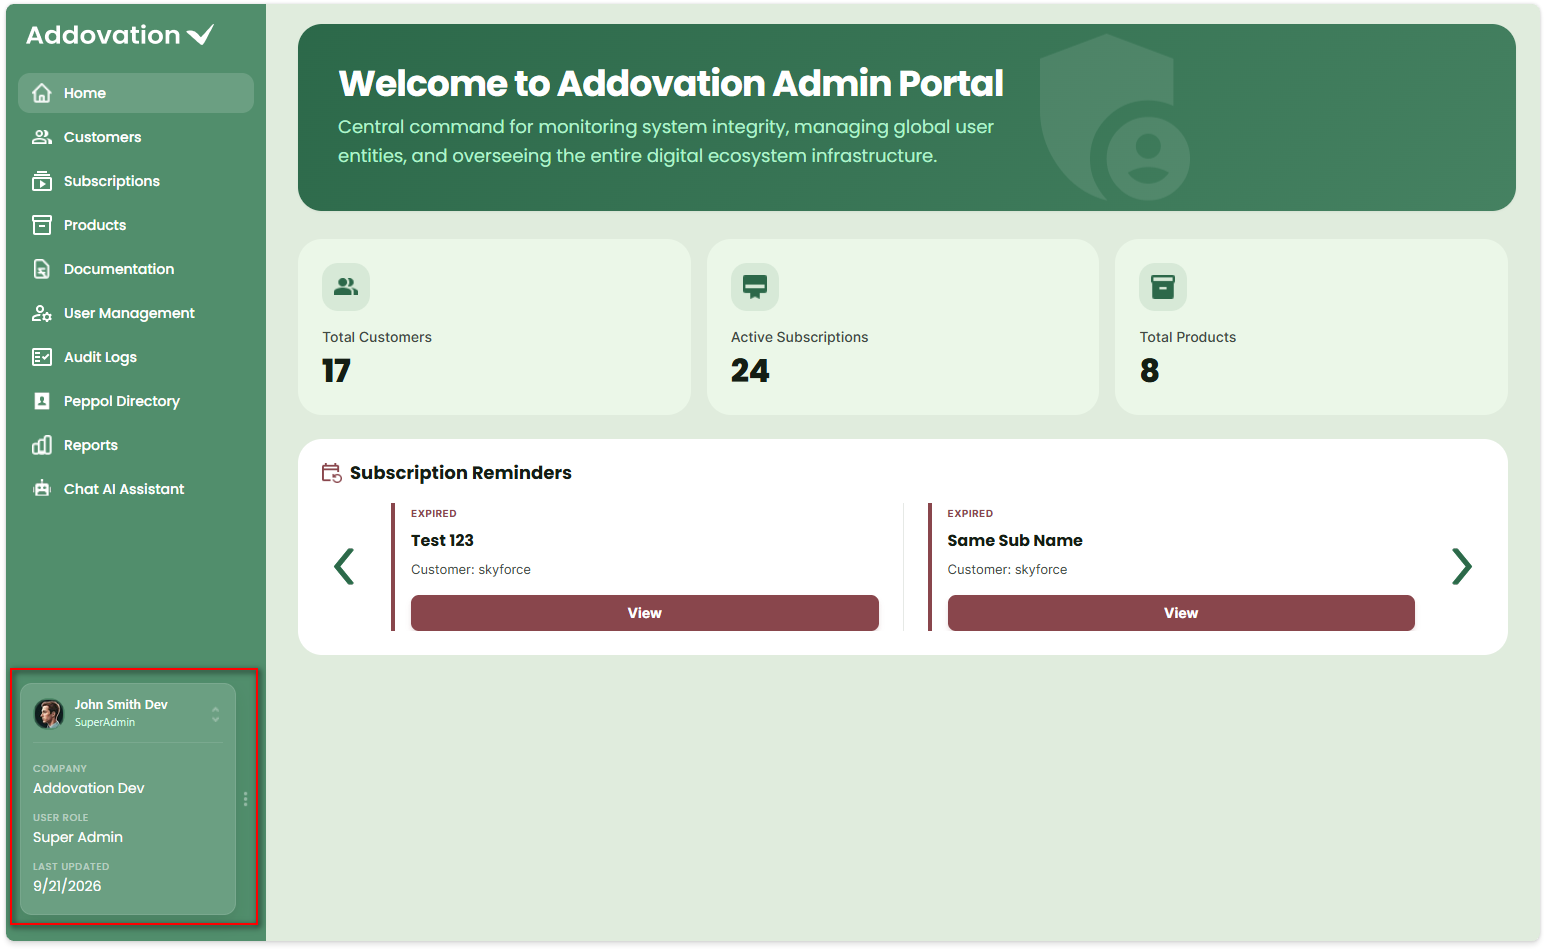
At the bottom of the navigation pane, the current user's account information is displayed, including the user's name, role, and profile picture.
Select the chevron next to the user's name to expand the account details panel. The panel displays:
- Company — the tenant the administrator belongs to.
- User Role — the administrator's assigned role.
- Last Updated — the date the account details were last updated.
The account details panel is for viewing information only and does not provide options to edit these details.
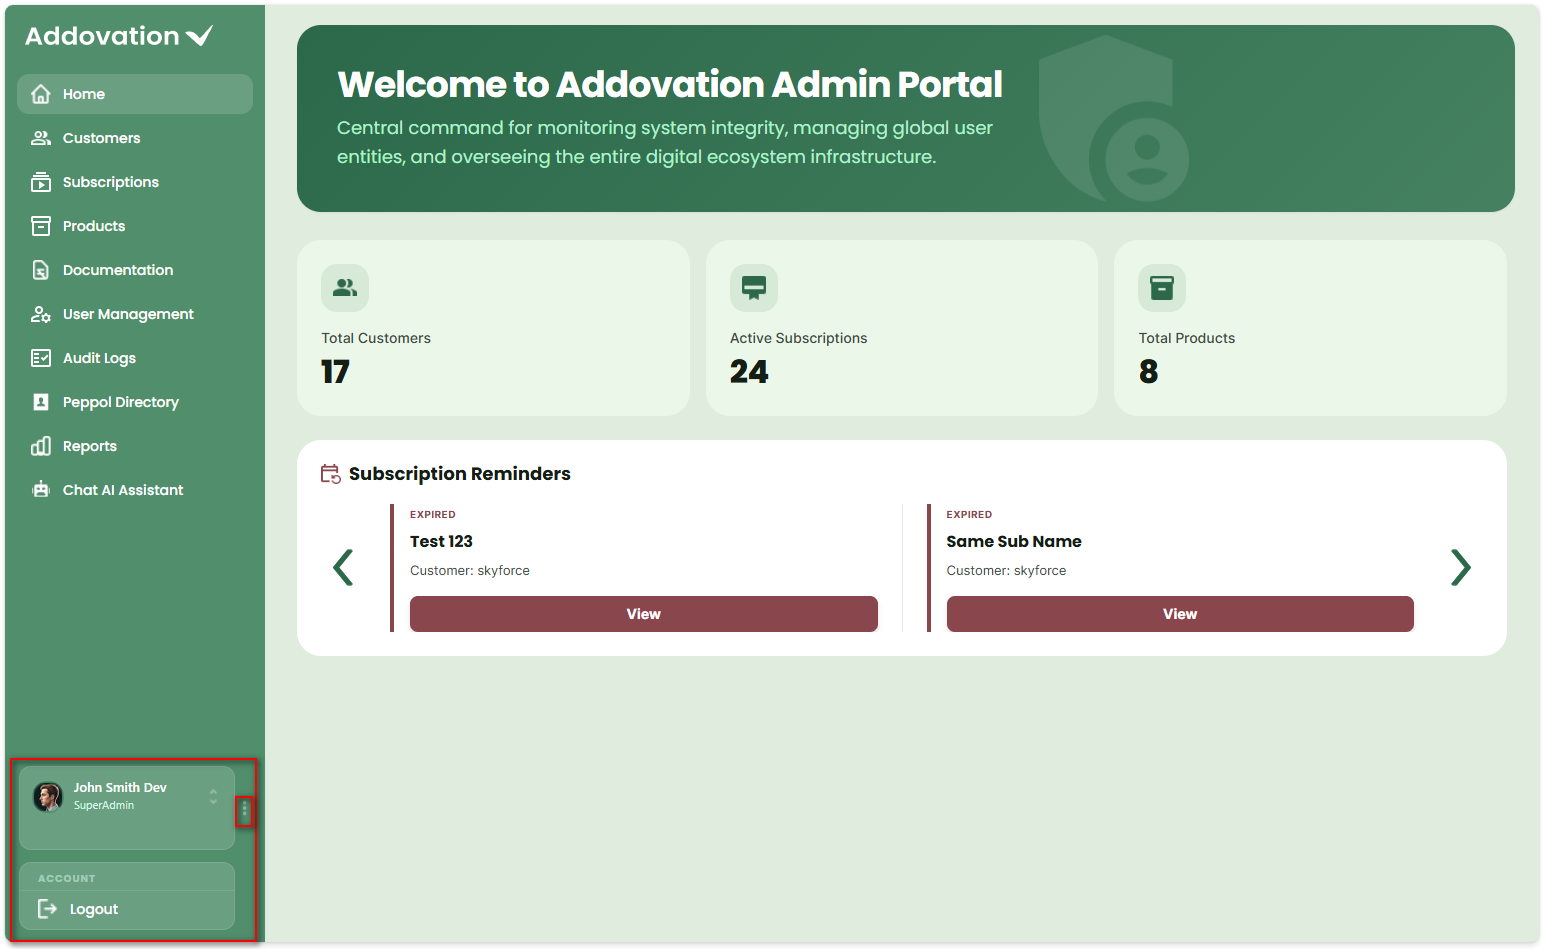
Select the ⋮ icon next to the chevron to open the Account menu.
The Account menu provides the following option:
- Logout — signs the current administrator out of the Admin Portal.
Home
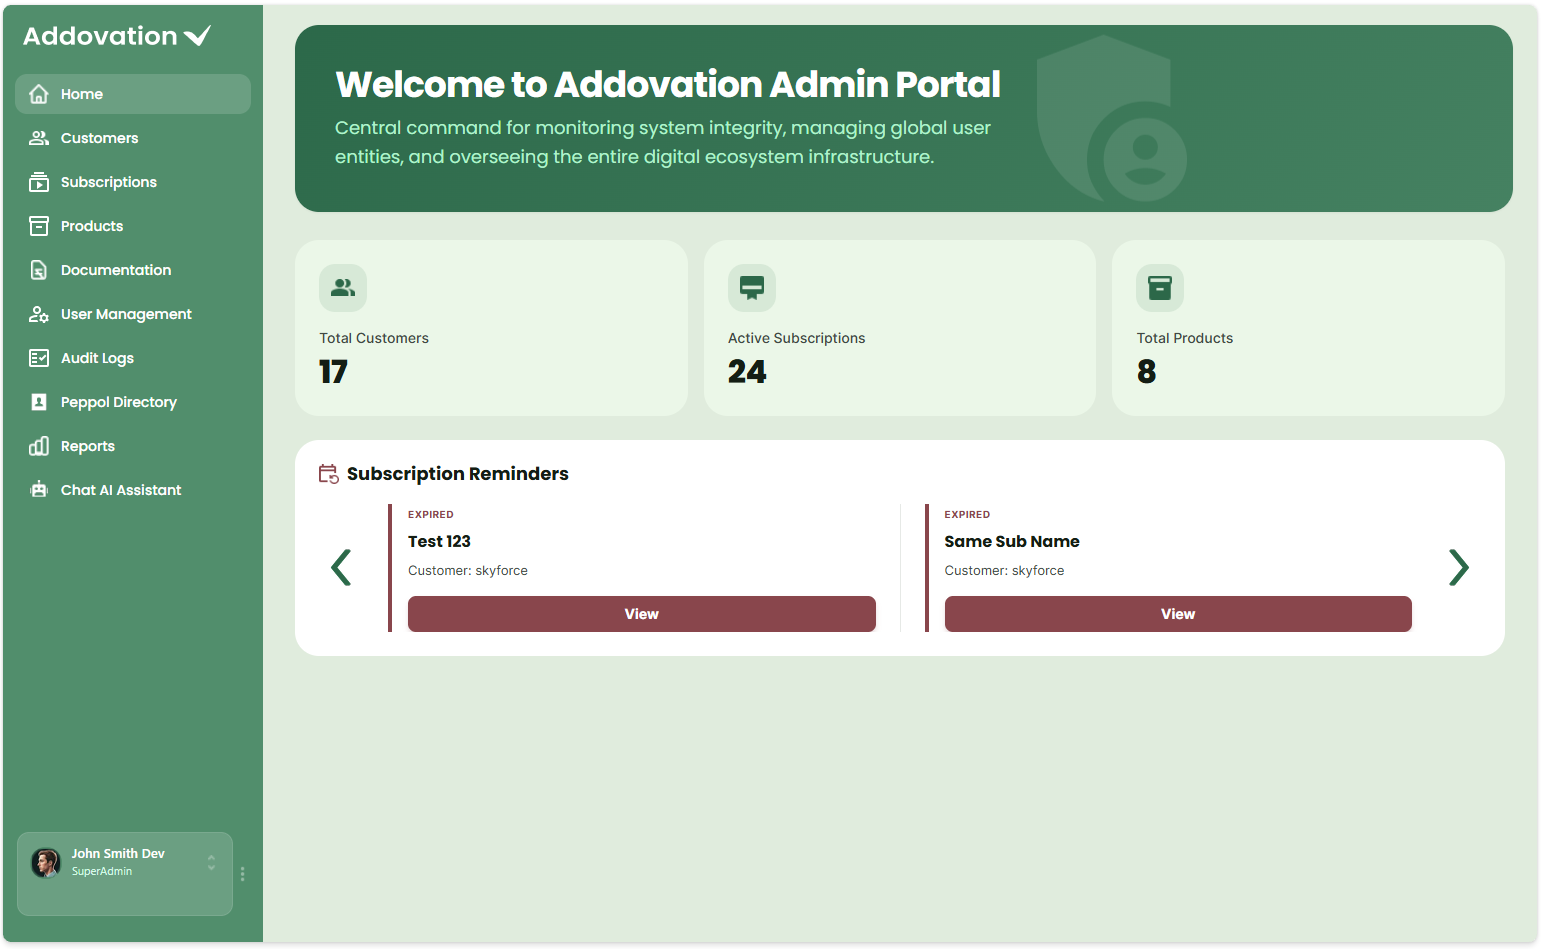
The Home page is the landing page of the Admin Portal. It provides administrators with a quick overview of the portal, including key information and subscriptions that may require attention.
Customers
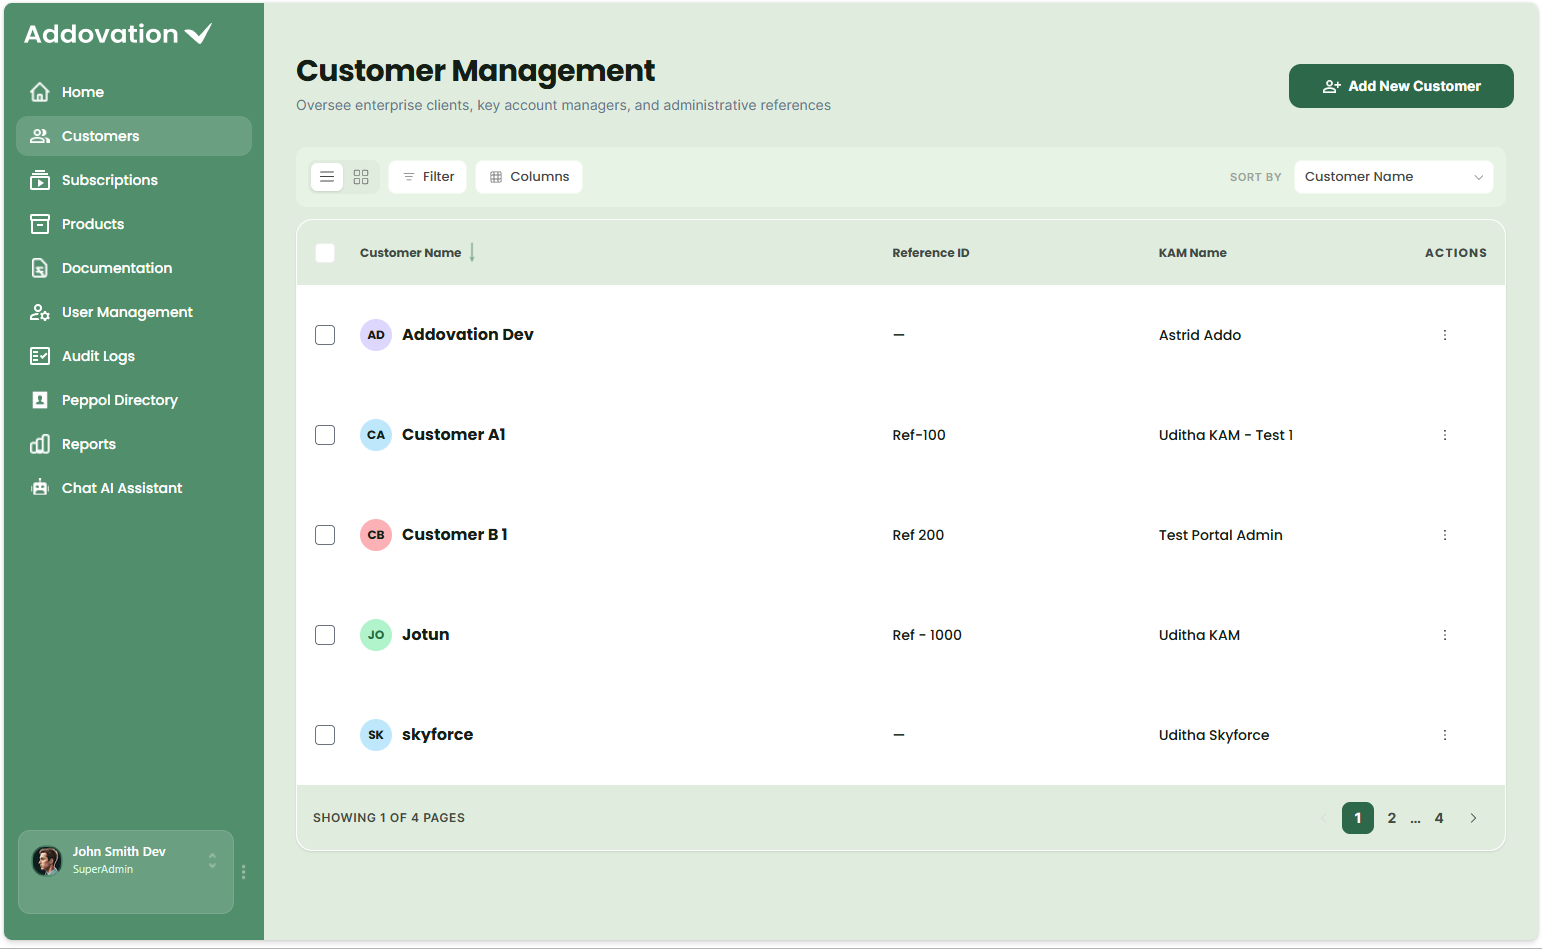
The Customers page allows administrators to manage enterprise customers, their associated tenants, Key Account Managers (KAMs), Engagement Managers (EMs), and customer information.
The customer list displays the Customer Name, Reference ID, KAM Name, and available Actions.
Customers can be viewed in List view or Grid view.
In List view:
- Select Filters to enable filtering options for the table columns and narrow the customer list.
- Use Columns to choose which information is displayed.
Select the checkbox next to one or more customers to display the bulk action bar. From the bulk action bar, you can Edit or Delete the selected customers.
The ⋮ actions menu for each customer also provides the options to Edit Customer or Delete Customer.
Add a Customer
Use Add New Customer to create a new customer and associate the required tenants and account managers.
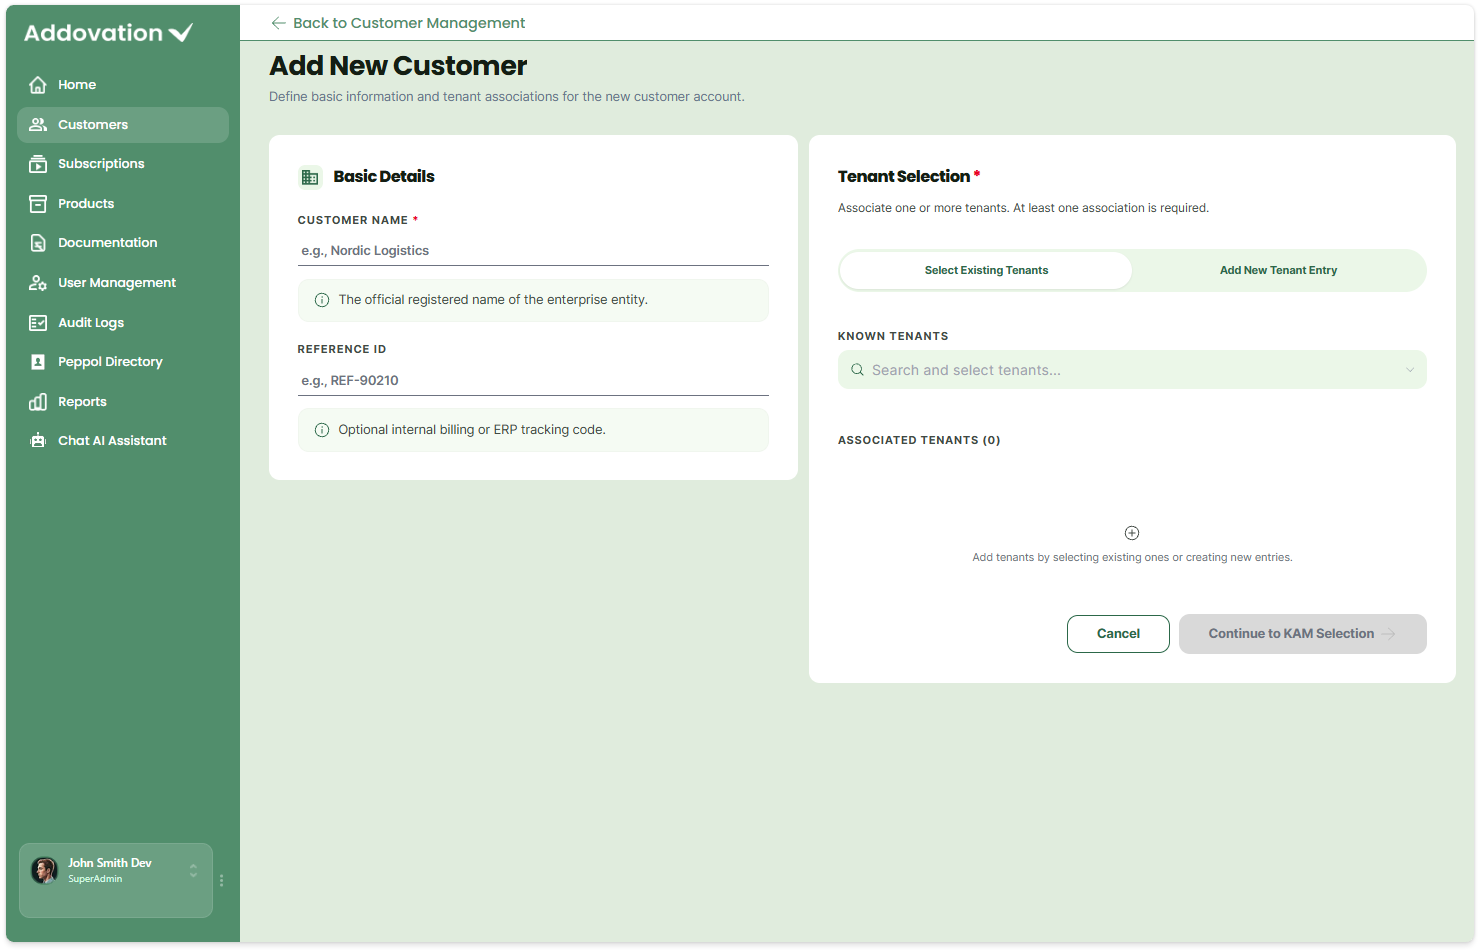
Step 1 — Basic Details & Tenant Selection
- Enter the Customer Name.
- Optionally enter a Reference ID for internal billing or ERP tracking.
- Associate at least one tenant with the customer:
- Use Select Existing Tenants to search for and select existing tenants.
- Use Add New Tenant Entry to register a new tenant by entering the Tenant Display Name and Tenant ID.
- Multiple tenants can be associated with the same customer. Remove an associated tenant using the ✕ control.
- Select Continue to KAM Selection.
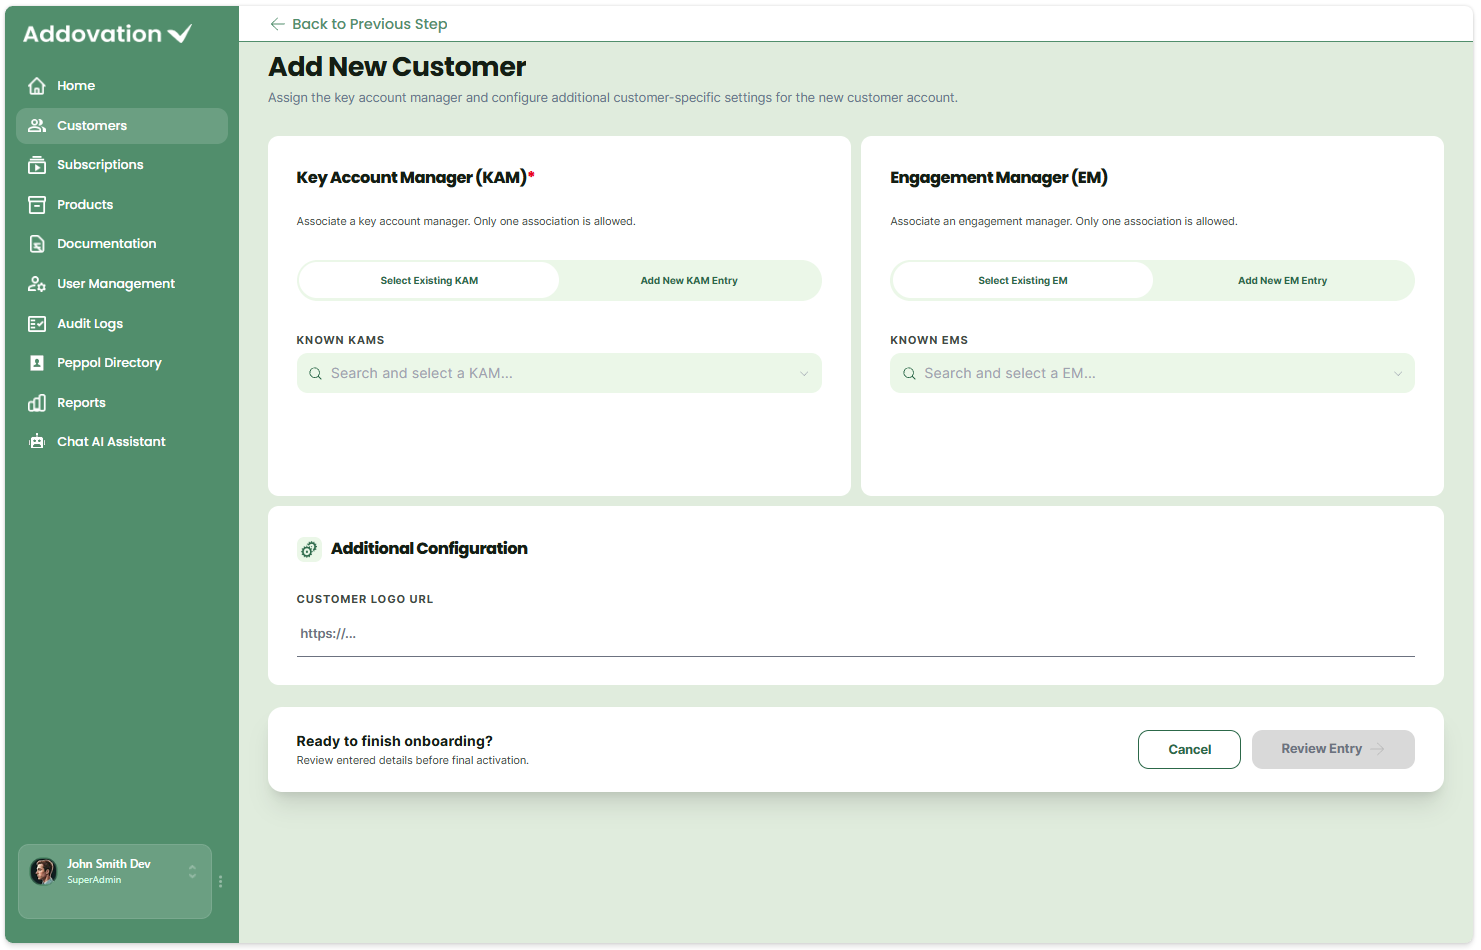
Step 2 — KAM, EM & Additional Configuration
- Select a Key Account Manager (KAM). A KAM is required and only one KAM can be associated with a customer.
- Select an existing KAM, or
- Use Add New KAM Entry to create a new KAM by entering the Account, Name, Email, and Phone.
- Optionally select an Engagement Manager (EM).
- Select an existing EM, or
- Use Add New EM Entry to create a new EM.
- Optionally enter a Customer Logo URL.
- Select Review Entry.
Step 3 — Review & Create
Review the customer information, including:
- Customer Name and Reference ID
- Customer Logo
- Associated Tenants
- Key Account Manager
- Engagement Manager
When the information is correct, select Create Customer Account to create the customer.
Edit a Customer
To update an existing customer:
- Find the customer in the Customer Management list.
- Open the ⋮ actions menu for the customer.
- Select Edit Customer.
- Update the required information. You can change:
- Customer Name
- Reference ID
- Associated Tenants
- Key Account Manager
- Engagement Manager
- Customer Logo
- Move through the steps to review the changes.
- Select Update & Save to save the changes.
To leave the customer unchanged, select Discard Changes.
Delete a Customer
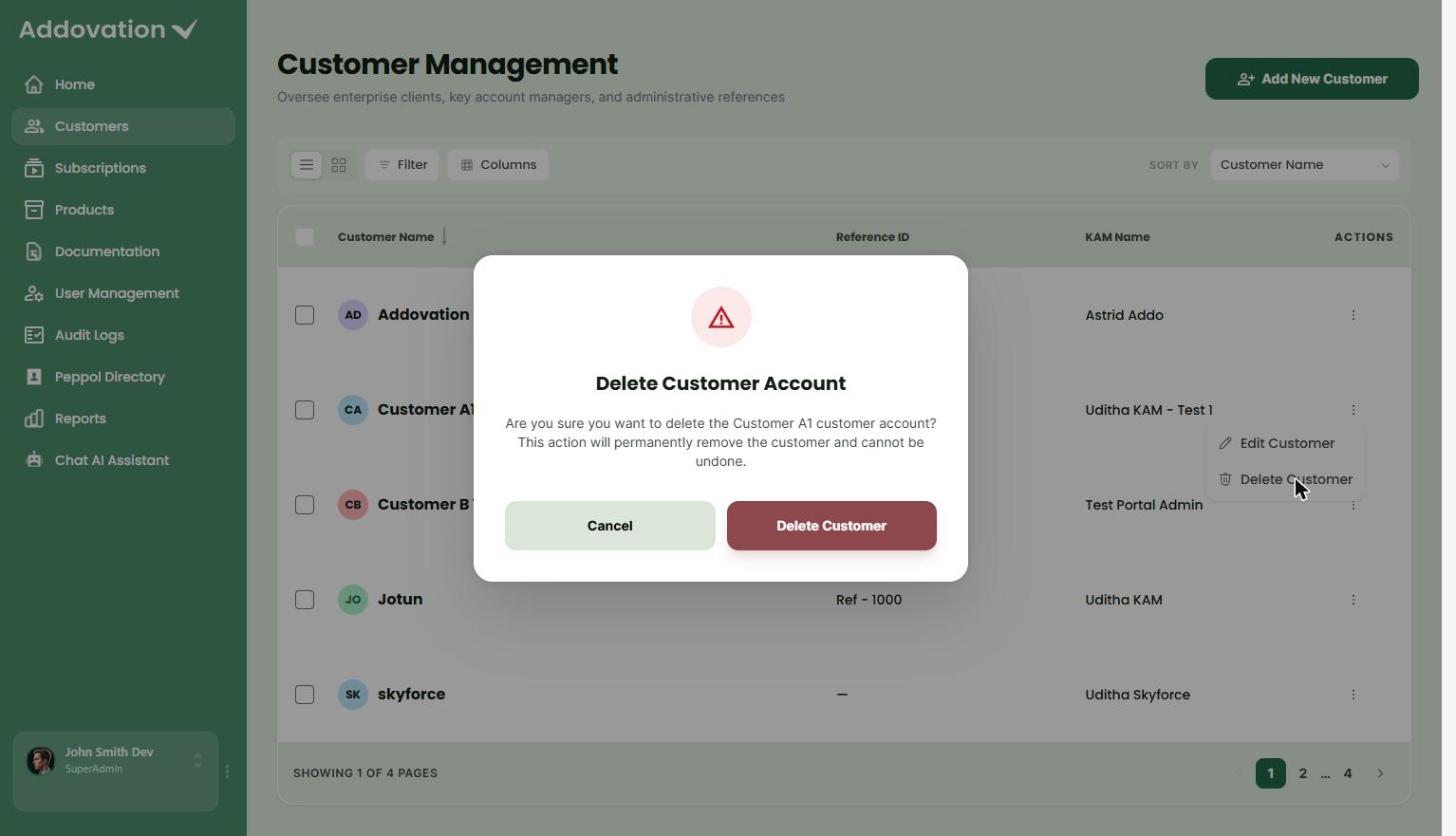
To delete an existing customer:
- Find the customer in the Customer Management list.
- Open the ⋮ actions menu.
- Select Delete Customer.
- Review the warning in the confirmation dialog.
- Select Delete Customer to permanently remove the customer, or Cancel to keep the customer.
Subscriptions
The Subscriptions page allows administrators to manage the subscriptions that connect customers to Addovation products. Use this page to view subscription details, manage subscription periods and plans, configure customer settings, and create, update, or remove subscriptions.
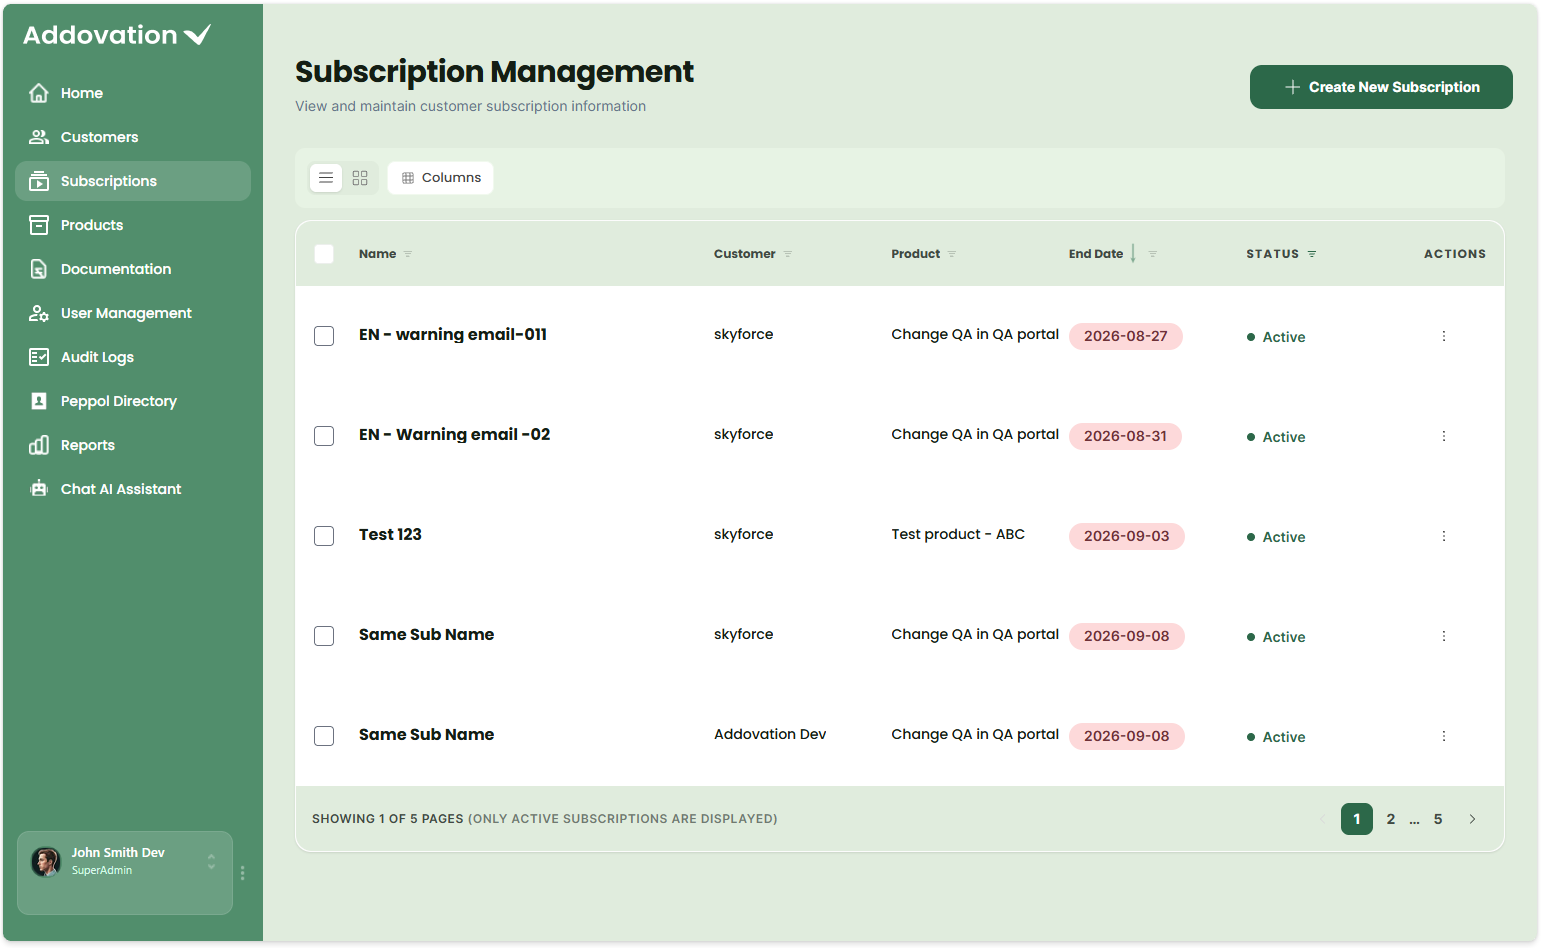
The subscription list displays the Name, Customer, Product, End Date, Status, and available Actions.
By default, only Active subscriptions are displayed. Use the filters to search by Name, Customer, Product, End Date, or Status.
The Status filter can be used to view:
- Active
- Inactive
- All subscriptions
Customers can be viewed in List view or Grid view. Use Columns to choose which information is displayed.
Select the checkbox next to one or more subscription to display the bulk action bar. From the bulk action bar, you can Edit or Delete the selected subscriptions.
The ⋮ actions menu for each subscription also provides the options to Edit Subscription, Customer Settings, and Delete Subscription.
Add a Subscription
Use Create New Subscription to create a subscription for a customer and product.
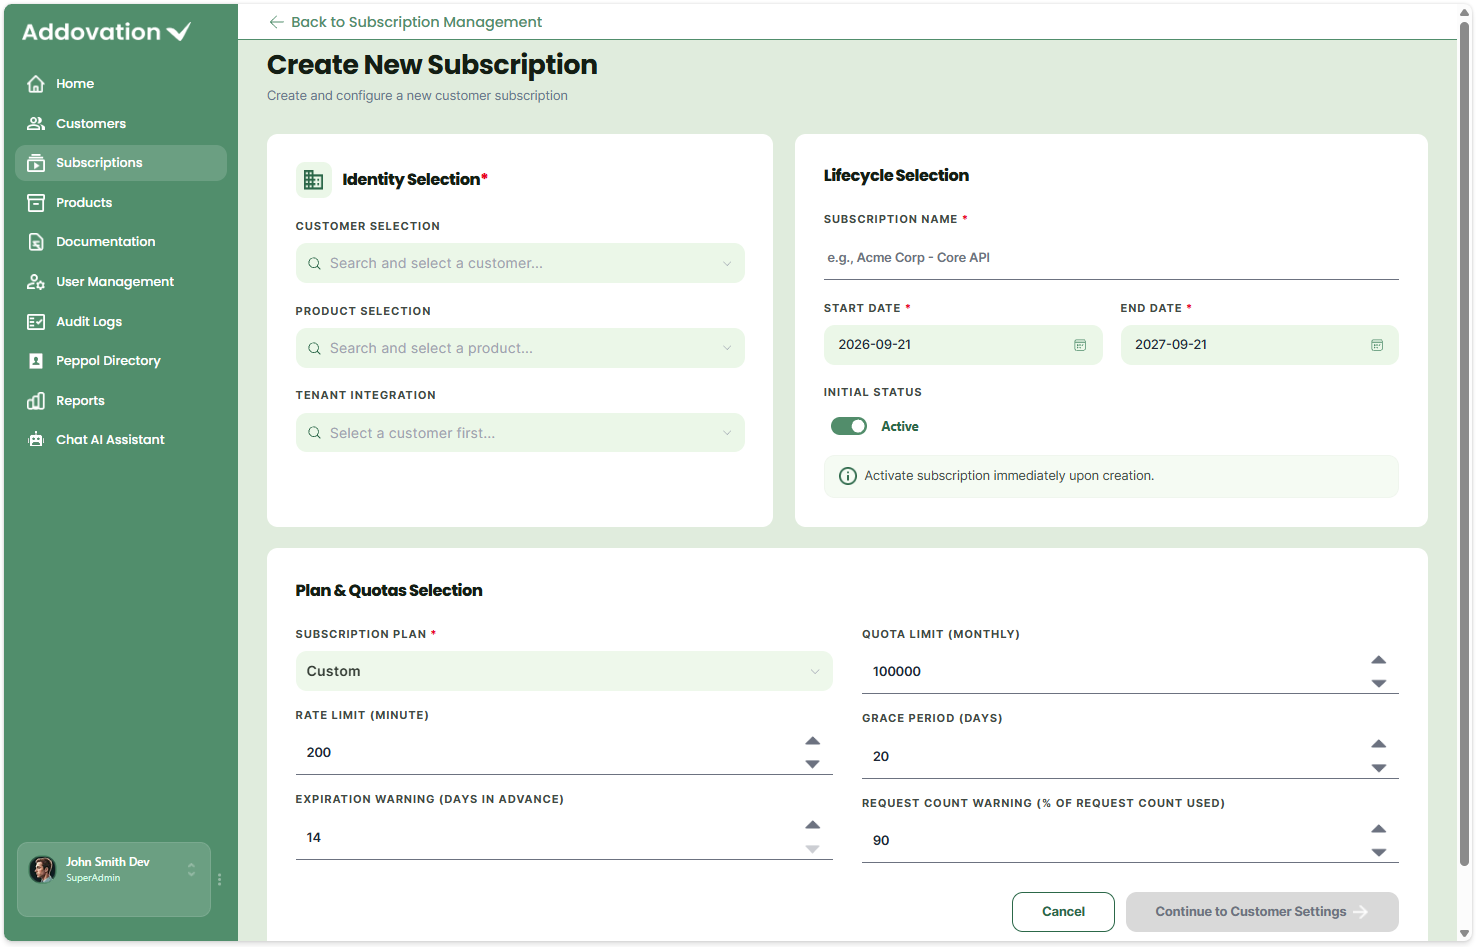
Step 1 — Select Customer, Product & Tenant
- Select the Customer for the subscription.
- Select the Product being subscribed to.
- Select the Tenant Integration. The available tenants are based on the selected customer.
Step 2 — Define Subscription Details
Enter the subscription information:
- Subscription Name — enter a name to identify the subscription.
- Start Date — select when the subscription begins.
- End Date — select when the subscription ends.
- Initial Status — choose whether the subscription should be created as Active or Inactive.
Step 3 — Configure Plan & Quotas
Select the Subscription Plan and review the available usage limits, including:
- Quota Limit (Monthly)
- Rate Limit (Minute)
- Grace Period (Days)
- Expiration Warning (Days in Advance)
- Request Count Warning (% of Request Count Used)
Adjust the values if different limits are required for the subscription.
Select Continue to Customer Settings.
Step 4 — Configure Customer Settings
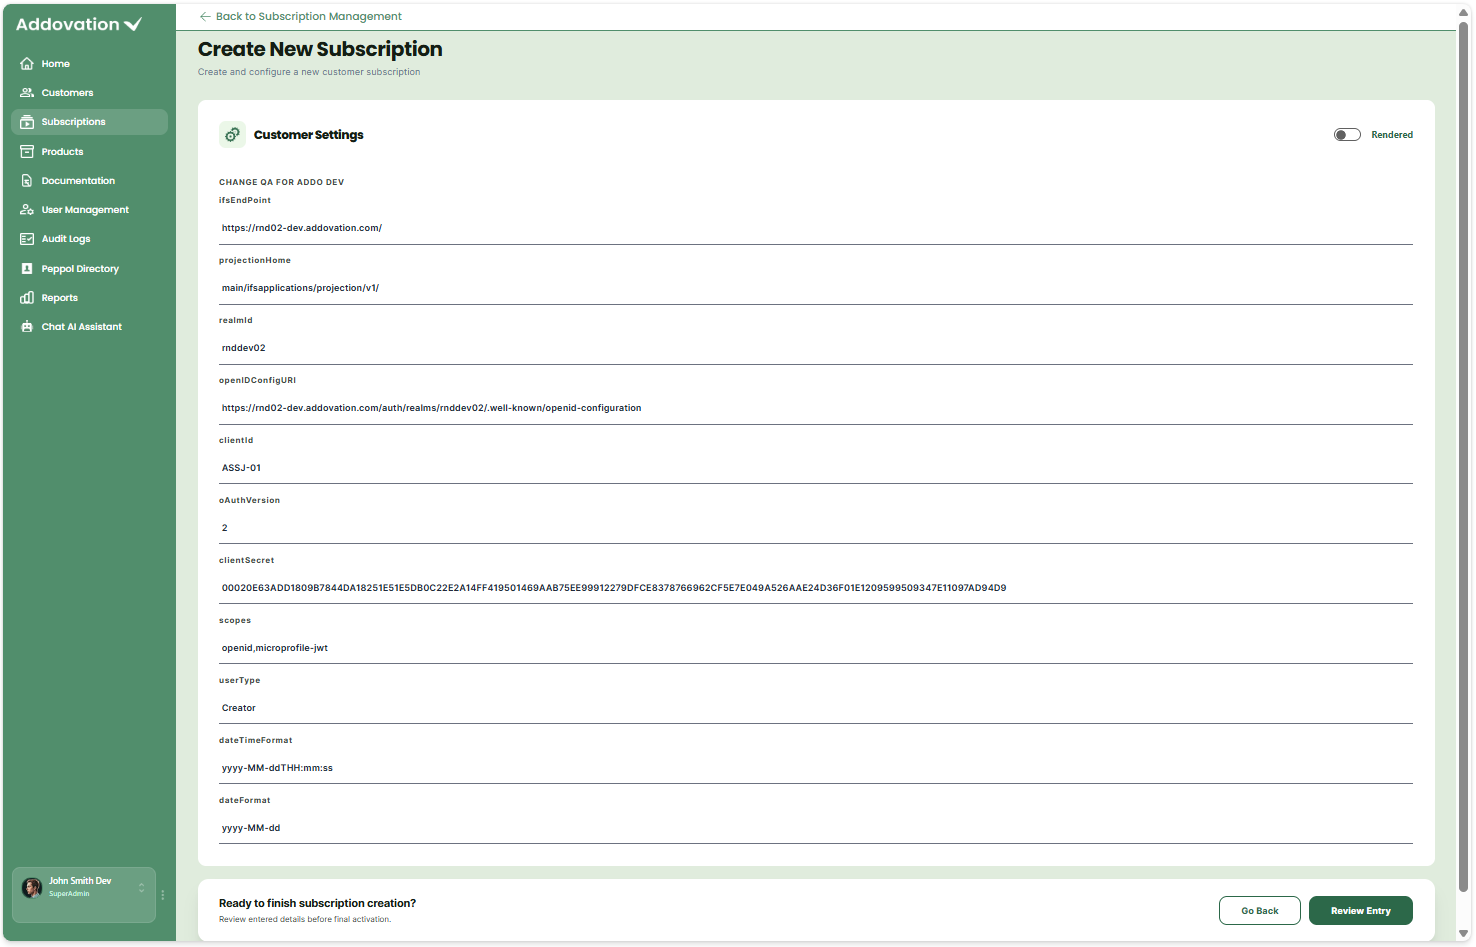
Review the customer integration settings associated with the selected product and tenant.
These settings cover areas such as channel, email and attachment handling, backend services, and other integration configuration.
Expand the relevant sections to review or update the settings.
Select Review Entry when the configuration is complete.
Step 5 — Review & Create
Review the subscription details, including:
- Identity Selection
- Lifecycle Selection
- Plan & Quotas
- Customer Settings
Use Review Next Step to review the Customer Settings summary.
When everything is correct, select Create Subscription to create the subscription.
Select Cancel at any point to leave the process without creating the subscription.
Edit a Subscription
Use Edit Subscription to update an existing subscription.
- Find the subscription in the Subscriptions list.
- Open the ⋮ actions menu.
- Select Edit Subscription.
- Update the required subscription information. The existing details are pre-filled.
- Update the Identity Selection, Lifecycle Selection, or Plan & Quotas as required.
- Select Continue to Customer Settings to review or update the customer integration settings.
- Select Review Entry.
- Review the updated subscription information and use Review Next Step to review the Customer Settings.
- Select Update & Save to save the changes.
To leave the subscription unchanged, select Discard Changes.
Manage Customer Settings
The Customer Settings option in the subscription's ⋮ actions menu allows administrators to access the technical integration settings for an existing subscription.
These settings control how the subscribed product connects with the customer's systems, including areas such as channels, email and attachment handling, and backend services.
Delete a Subscription
A subscription must be Inactive before it can be deleted.
- Find the subscription in the Subscriptions list.
- If the subscription is Active, edit the subscription and change its status to Inactive.
- Open the ⋮ actions menu for the subscription.
- Select Delete Subscription.
- Review the deletion confirmation message.
- Select Delete to permanently remove the subscription, or Cancel to keep it.
Products
The Products page allows administrators to manage the product catalog available for customer subscriptions. Use this page to create and maintain products, associate APIs, configure product integrations, and control which customers can access a product.
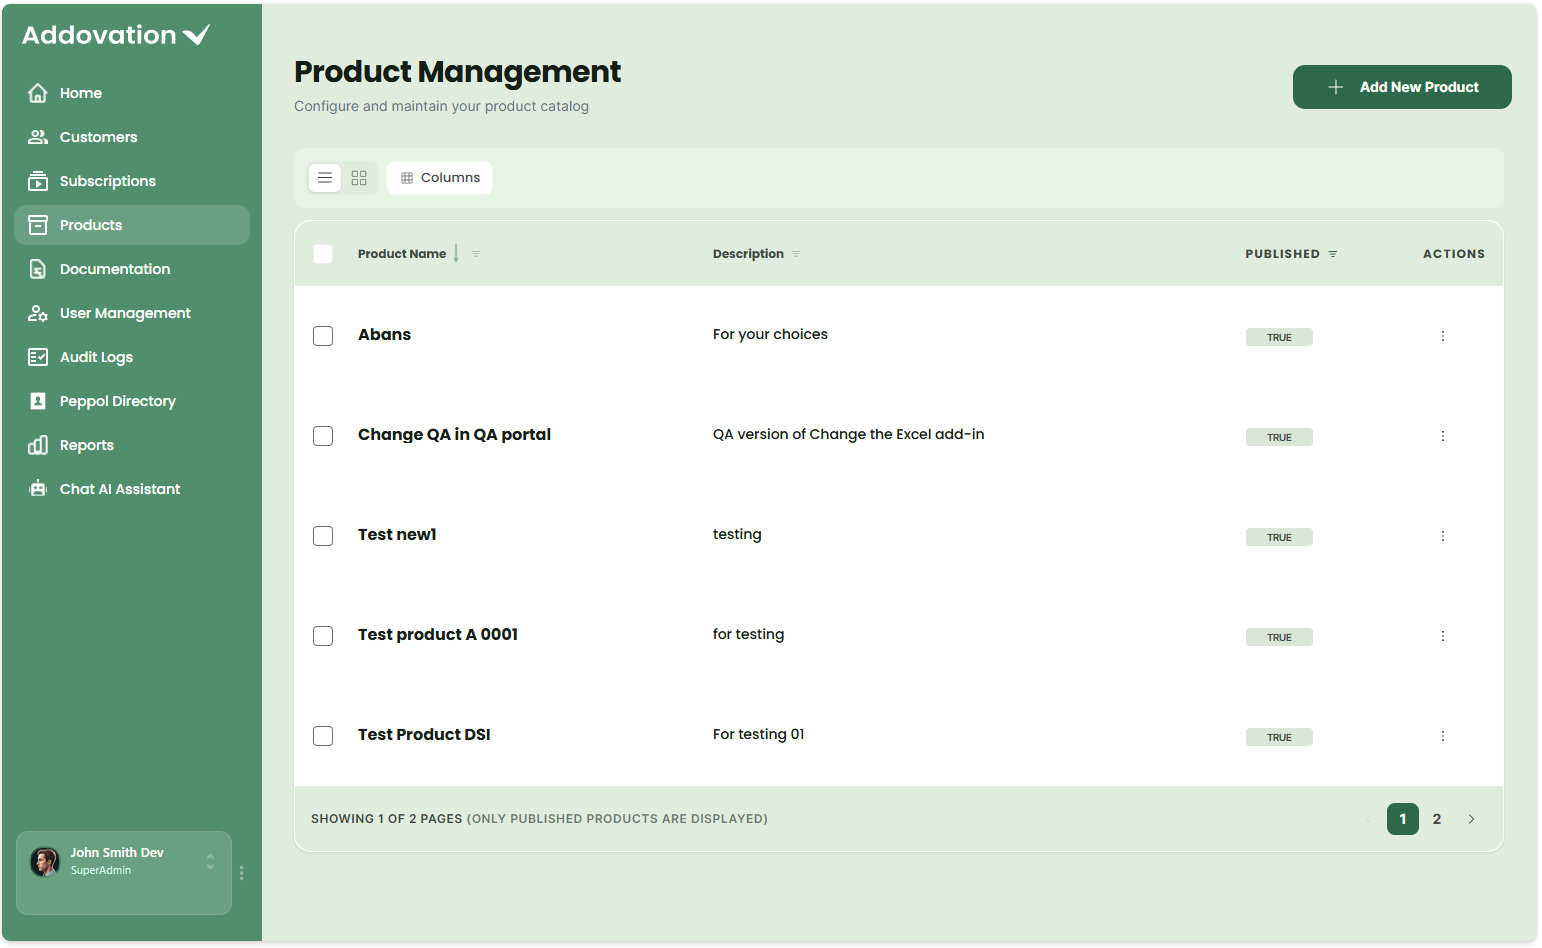
The product list displays the Product Name, Description, Published status, and available Actions.
By default, only Published products are displayed. Use the filters to search by Product Name, Description, or Published status.
The Published filter can be used to view:
- Published
- Unpublished
- All products
Products can be viewed in List view or Grid view. Use Columns to choose which information is displayed.
Select the checkbox next to one or more products to display the bulk action bar. From the bulk action bar, you can Edit or Delete the selected products.
The ⋮ actions menu for each product also provides the options to Edit Product or Delete Product.
Important: A product must be Unpublished before it can be deleted. A product with active subscriptions cannot be deleted.
Add a Product
Use Add New Product to create a product and configure the APIs and customers associated with it.
Step 1 — Enter Product Details
Enter the general product information:
- Product Logo (optional) — upload an image to represent the product.
- Product Name (required) — enter the product name.
- Description (required) — enter a description of the product.
- Published Status — choose whether the product should be Published or Unpublished when it is created.
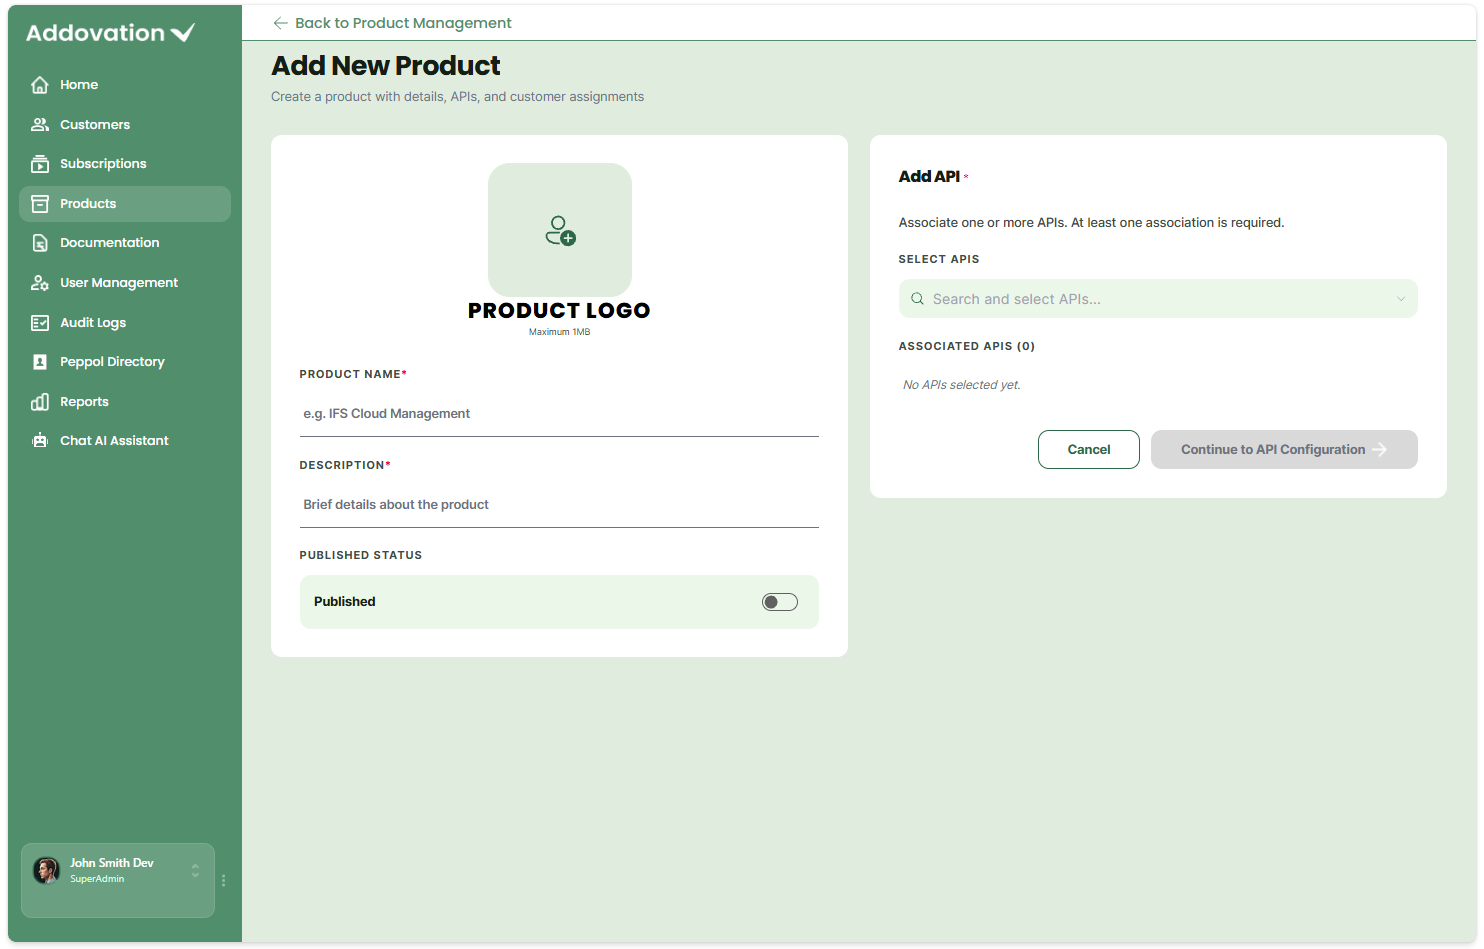
Step 2 — Add APIs
Associate at least one API with the product.
- Select Search and select APIs.
- Search for and select one or more APIs.
- Select Add Selected APIs.
- Review the associated APIs and remove any unwanted API using the ✕ control.
- Select Continue to API Configuration.
Step 3 — Configure APIs
Review the APIs associated with the product.
Select Configure next to an API when technical database connection settings need to be provided. API configuration can also be completed later if required.
Select Continue to Customer Selection when finished.
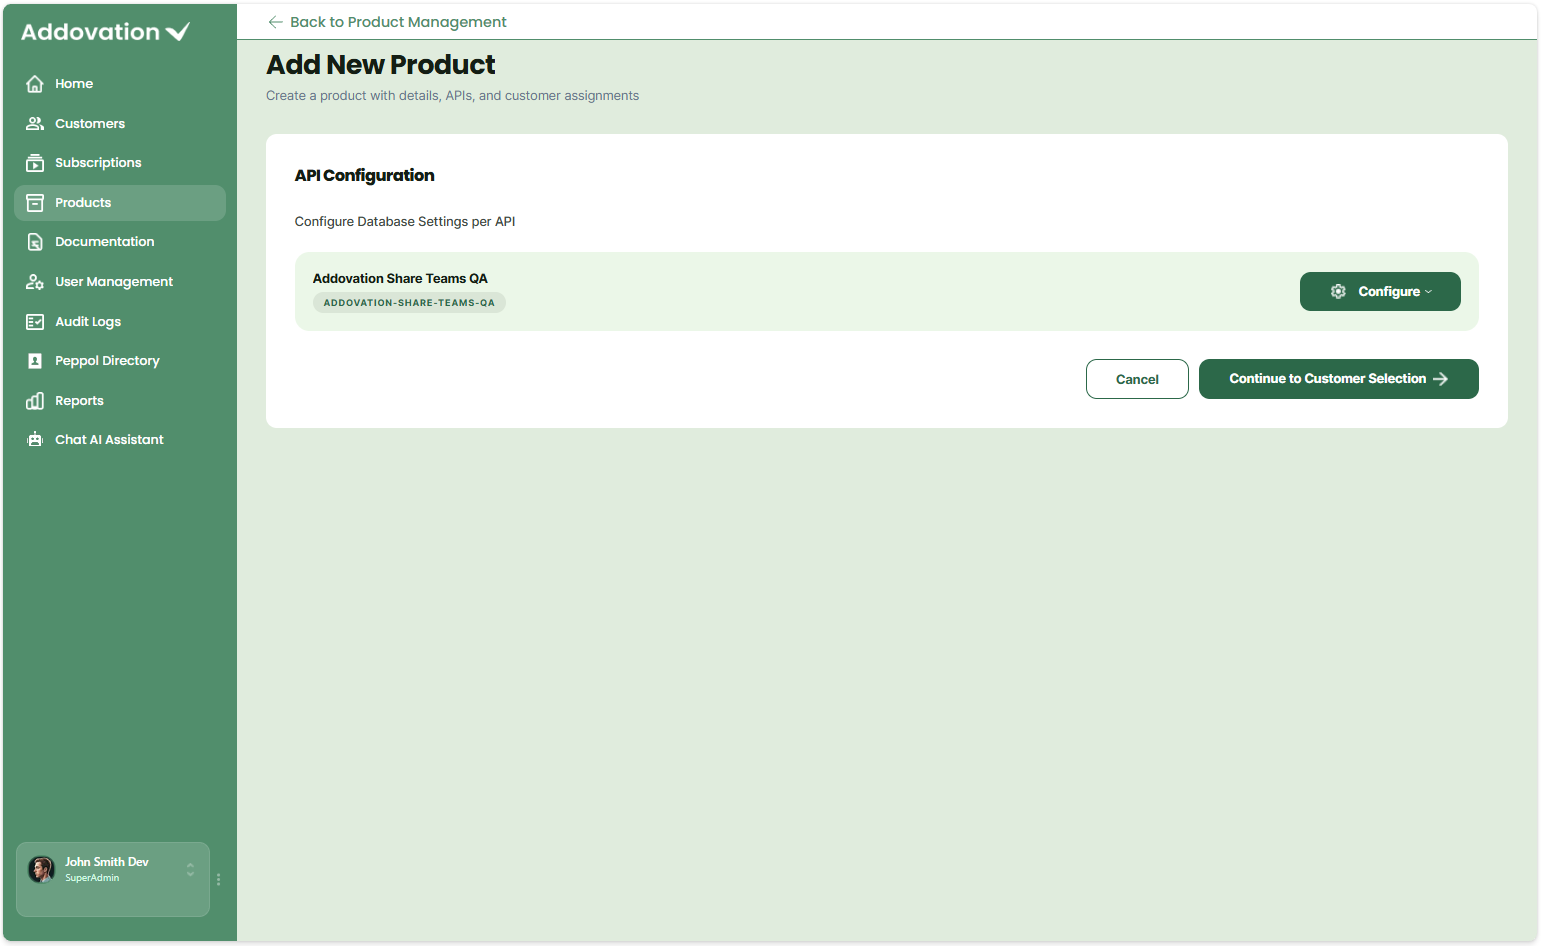
Step 4 — Select Exclusive Customers
Use Add Exclusive Customers when the product should be available only to specific customers.
Search for and select the customers who should have access to the product. This step can be skipped if the product should be available to all customers.
Select Review Entry.
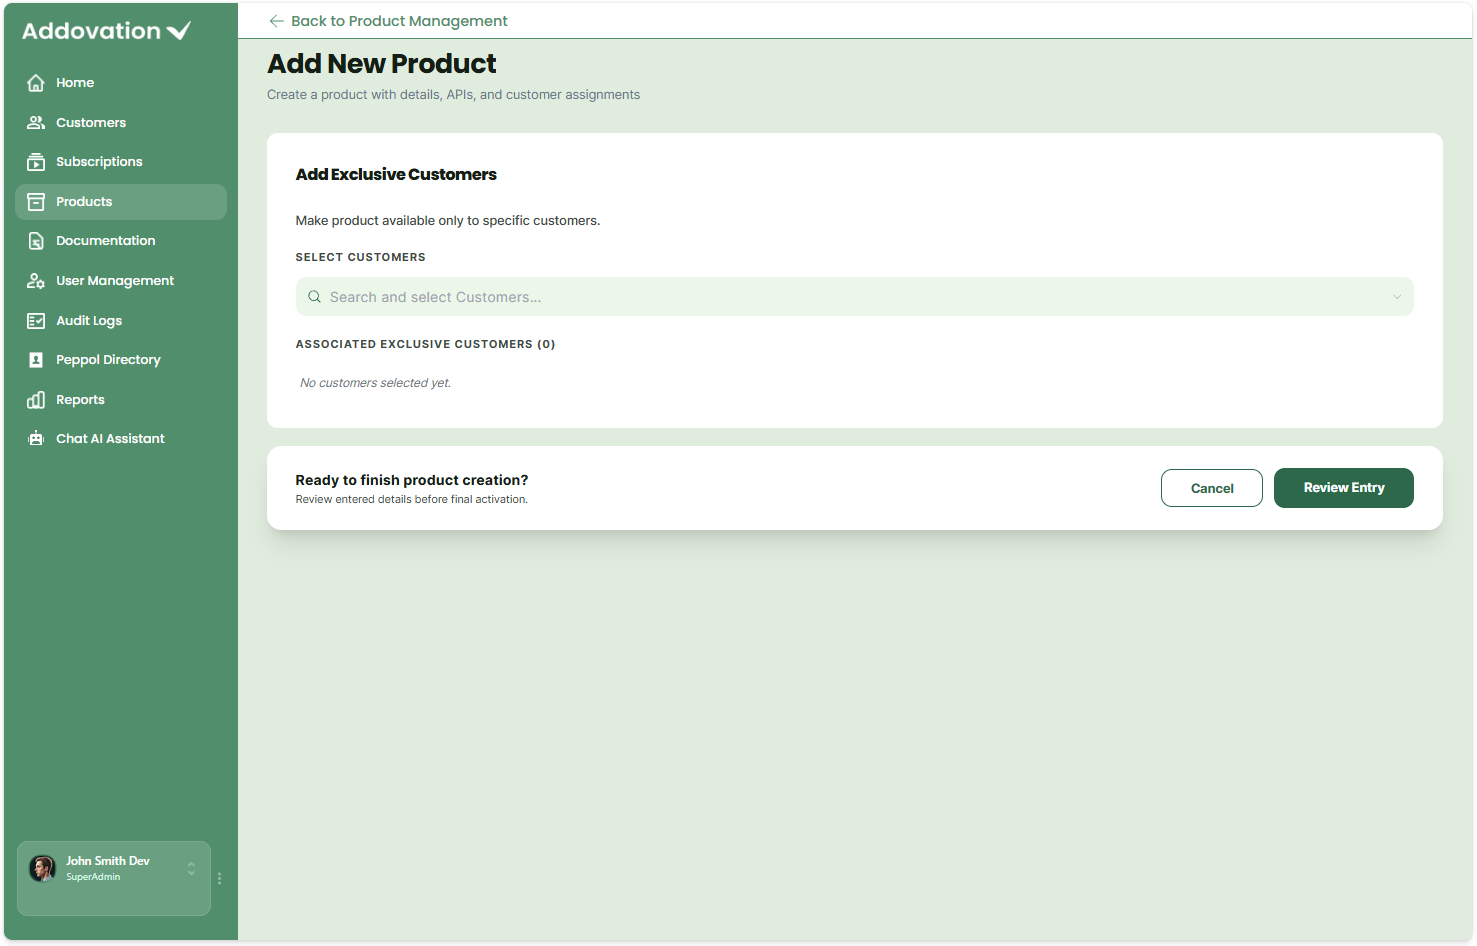
Step 5 — Review & Create
Review the product information and associated APIs.
When everything is correct, select Create Product to add the product to the catalog.
Select Cancel at any point to leave the process without creating the product.
Edit a Product
Use Edit Product to update an existing product.
- Find the product in the Products list.
- Open the ⋮ actions menu.
- Select Edit Product.
- Update the product information as required, including:
- Product Logo
- Product Name
- Description
- Published Status
- Associated APIs
- API Configuration
- Exclusive Customers
- Move through the steps to review the API configuration and customer selection.
- Select Review Updates.
- Review the updated product information.
- Select Update & Save to save the changes.
To leave the product unchanged, select Discard Changes.
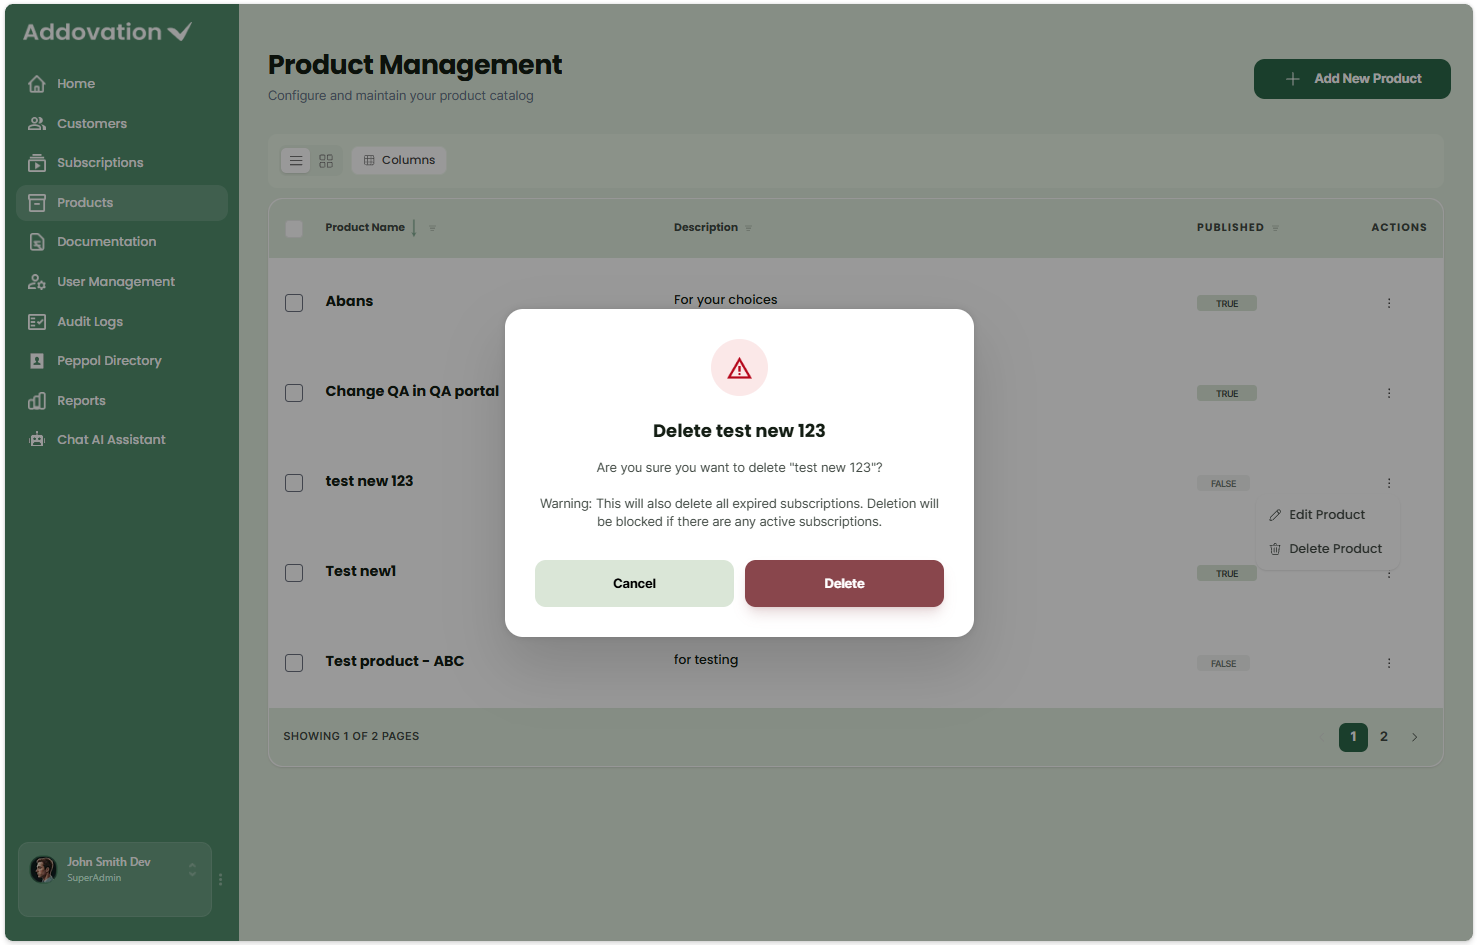
Delete a Product
A product must be Unpublished and must not have any active subscriptions before it can be deleted.
- Find the product in the Products list.
- If the product is Published, edit the product and change its status to Unpublished.
- Open the ⋮ actions menu.
- Select Delete Product.
- Review the deletion confirmation message.
- Select Delete to permanently remove the product, or Cancel to keep it.
Warning: Deleting a product also removes its expired subscriptions. Products with active subscriptions cannot be deleted.
Documentation
Select Documentation from the left-hand menu to open the Addovation Documentation website.
The documentation website opens in a new browser tab, allowing you to keep the Admin Portal open and switch between the two as needed.
The site provides information about Addovation's digital services, including a Getting Started section and documentation for the available services.
User Management
The User Management page allows administrators to manage access to the Admin Portal, including user details, roles, account status, and customer associations.
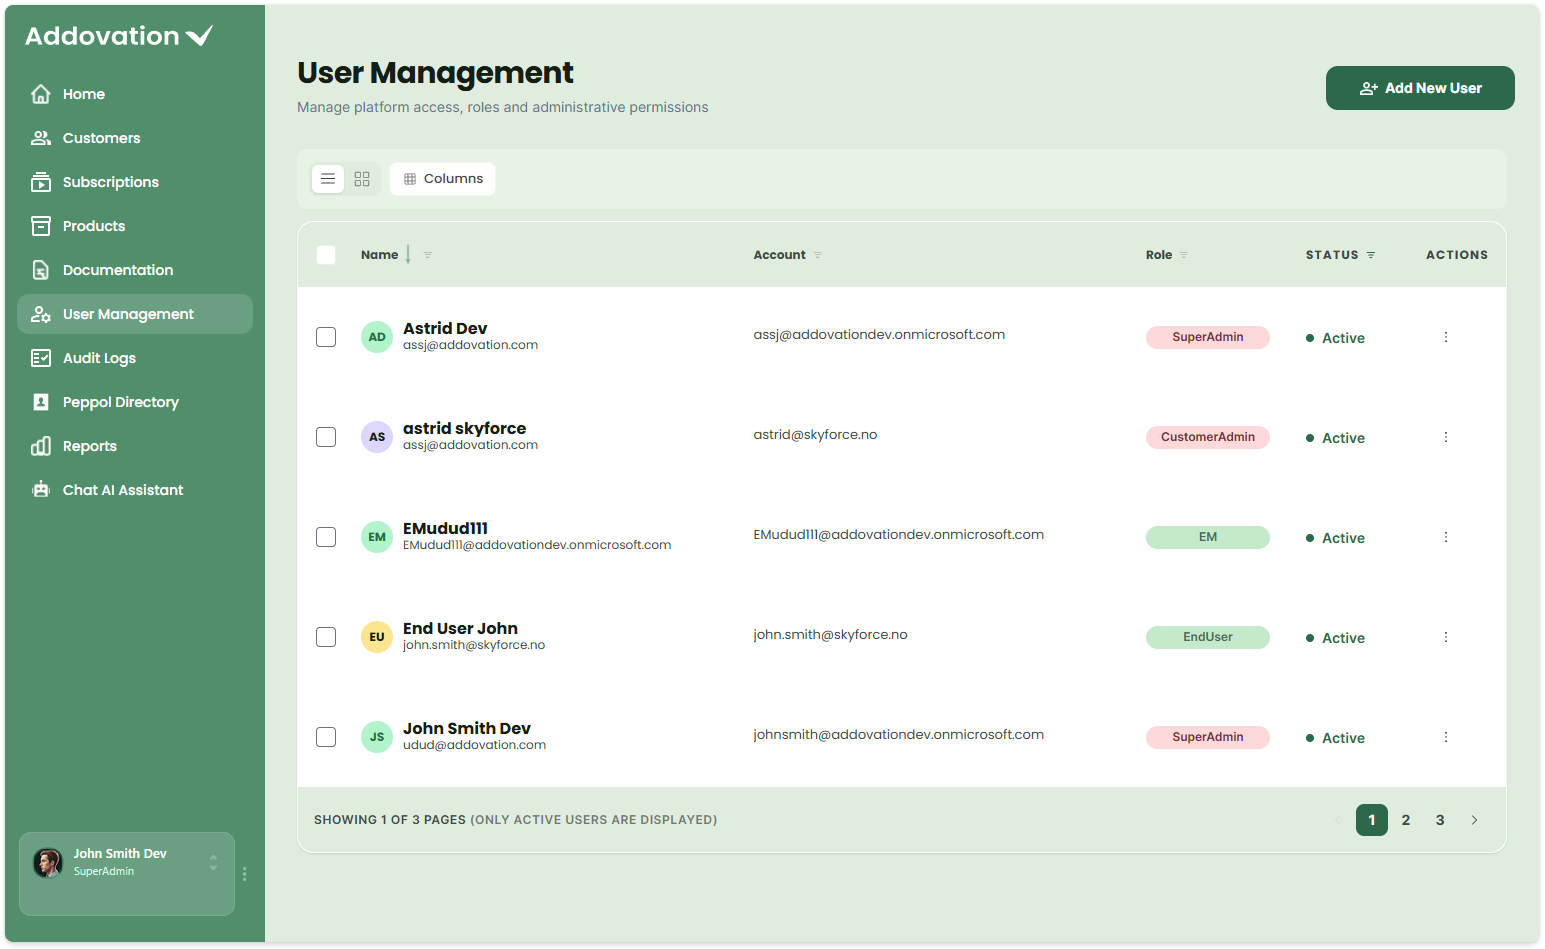
The user list displays the Name, Account, Role, Status, and available Actions.
By default, only Active users are displayed. Use the Status filter to view:
- Active
- Inactive
- All users
You can also filter by Name, Account, or Role, and sort the list by Name.
Users can be viewed in List view or Grid view. Use Columns to choose which information is displayed.
Select the checkbox next to one or more user to display the bulk action bar. From the bulk action bar, you can Edit or Delete the selected users.
The ⋮ actions menu for each user also provides the options to Edit User or Delete User. A user's Active/Inactive status is managed from the Edit User screen.
Add a User
Use Add New User to create an account for someone who needs access to the Admin Portal.
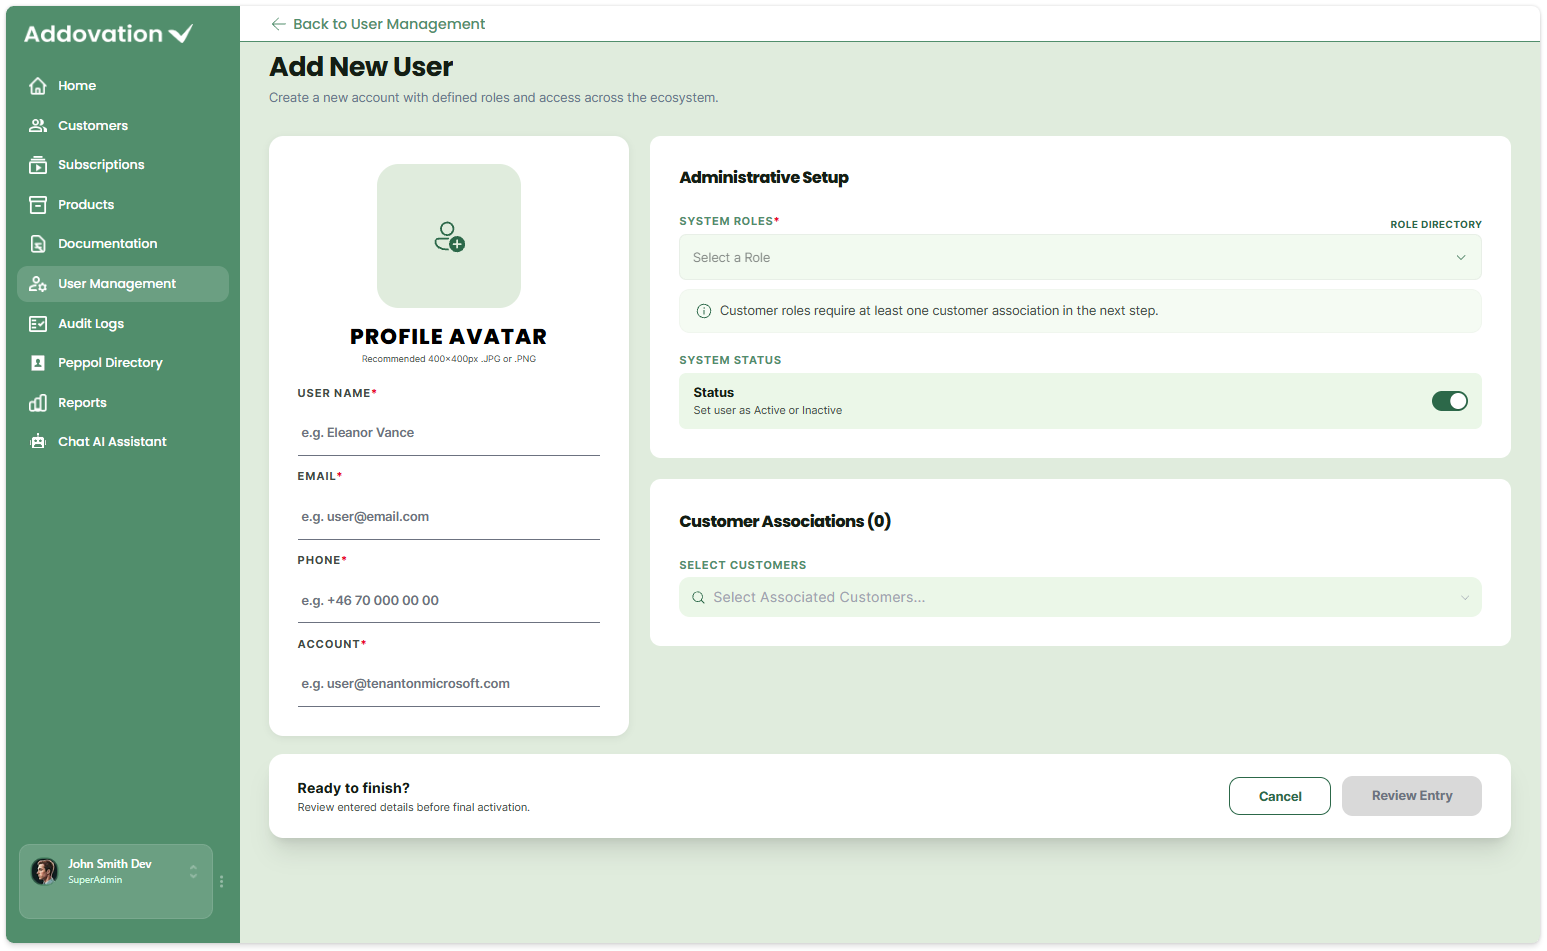
Step 1 — Enter User Details
Enter the user's profile information:
- Profile Avatar (optional) — upload a JPG or PNG image for the user.
- User Name (required) — enter the user's full name.
- Email (required) — enter the user's email address.
- Phone (required) — enter the user's phone number.
- Account (required) — enter the Microsoft tenant account associated with the user.
Step 2 — Configure Access
Under Administrative Setup:
- System Roles (required) — select the role that defines the user's access and permissions in the Admin Portal.
- Status — leave the toggle enabled to create the user as Active, or disable it to create the user as Inactive.
- Use Role Directory to view information about the available roles.
Under Customer Associations, search for and select the customer or customers associated with the user where required.
Step 3 — Review & Create
- Select Review Entry.
- Review the user's profile details, role, status, and customer associations.
- Select Create User Account to create the user.
- Select Cancel at any point to leave the process without creating the user.
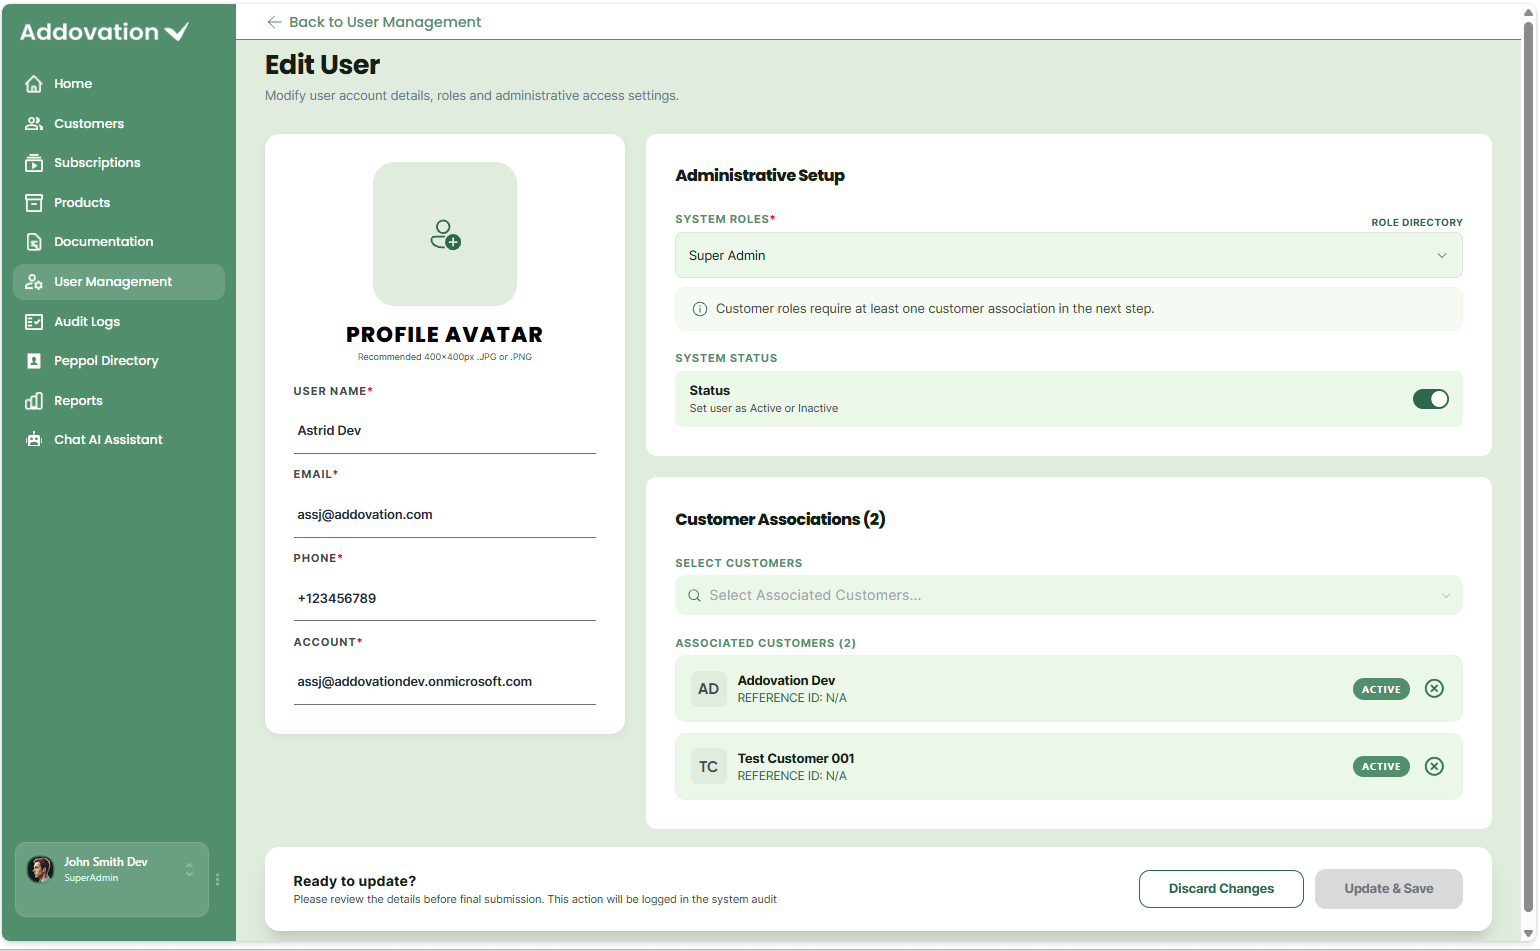
Edit a User
Use Edit User to update an existing user's details, access, status, or customer associations.
- Find the user in the User Management list.
- Open the ⋮ actions menu.
- Select Edit User.
- Update the required information. The existing user details are pre-filled.
- Use the Status toggle to activate or deactivate the account.
- Update the user's profile details, System Roles, or Customer Associations as required.
- Select Update & Save to save the changes.
To leave the user unchanged, select Discard Changes.
Delete a User
Use Delete User to permanently remove a user account and its access to the Admin Portal.
- Find the user in the User Management list.
- Open the ⋮ actions menu.
- Select Delete User.
- Review the deletion confirmation message.
- Select Delete User to permanently remove the account, or Cancel to keep it.
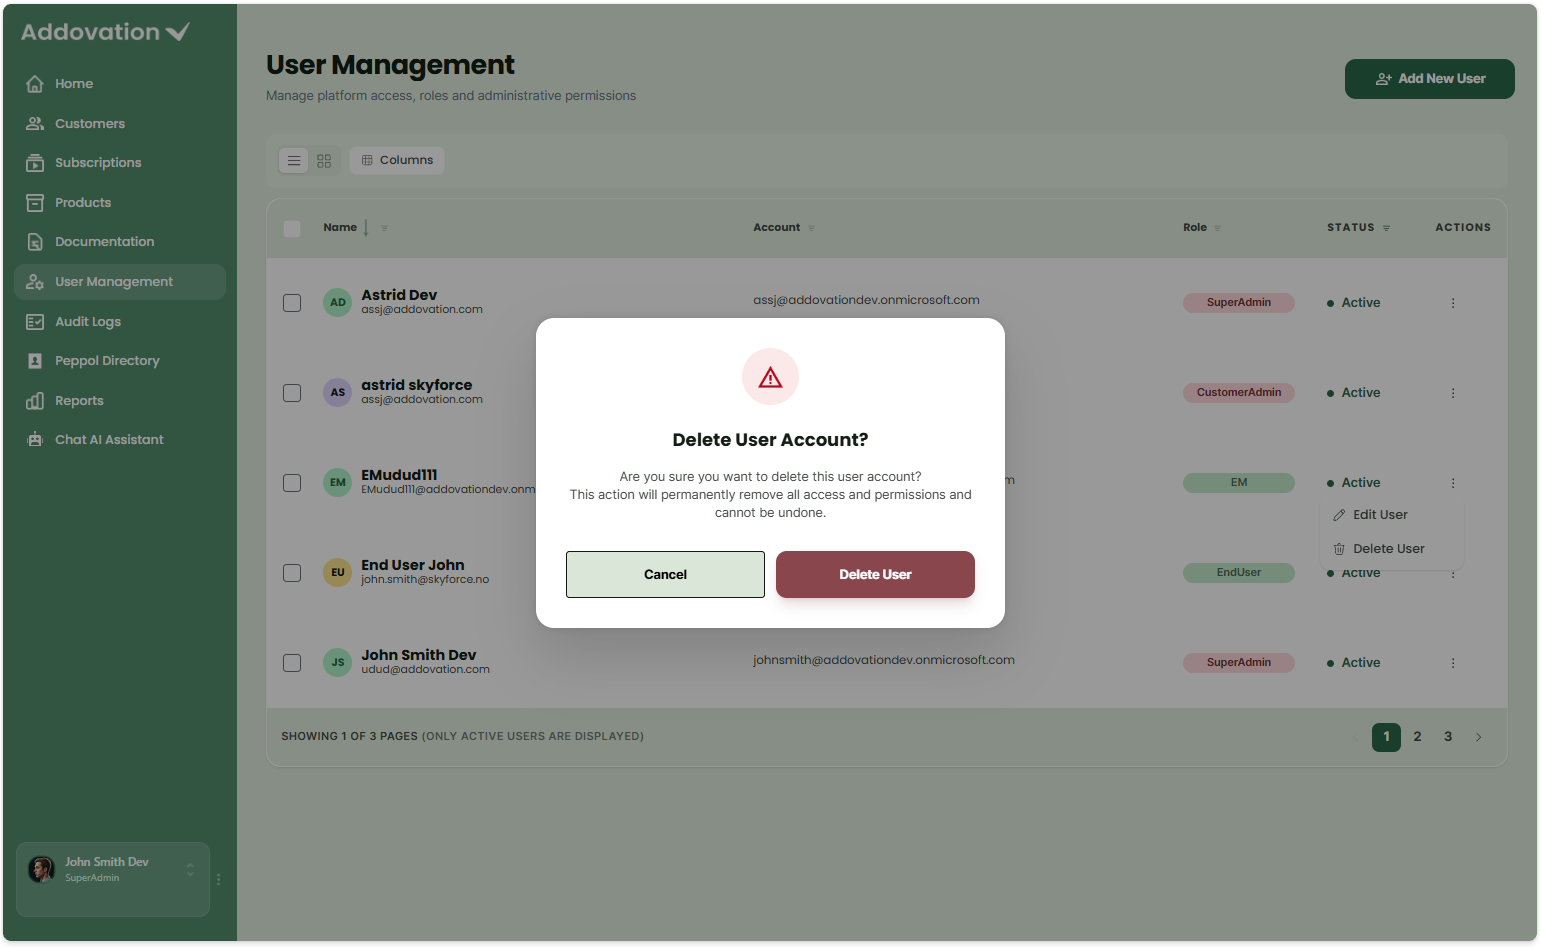
Warning: Deleting a user permanently removes their access and permissions and cannot be undone.
Audit Logs
The Audit Logs page provides a record of activities performed across the Admin Portal, including changes to subscriptions, products, and users. Use it to review activity, identify who performed an action, and export audit records for reporting or further review.
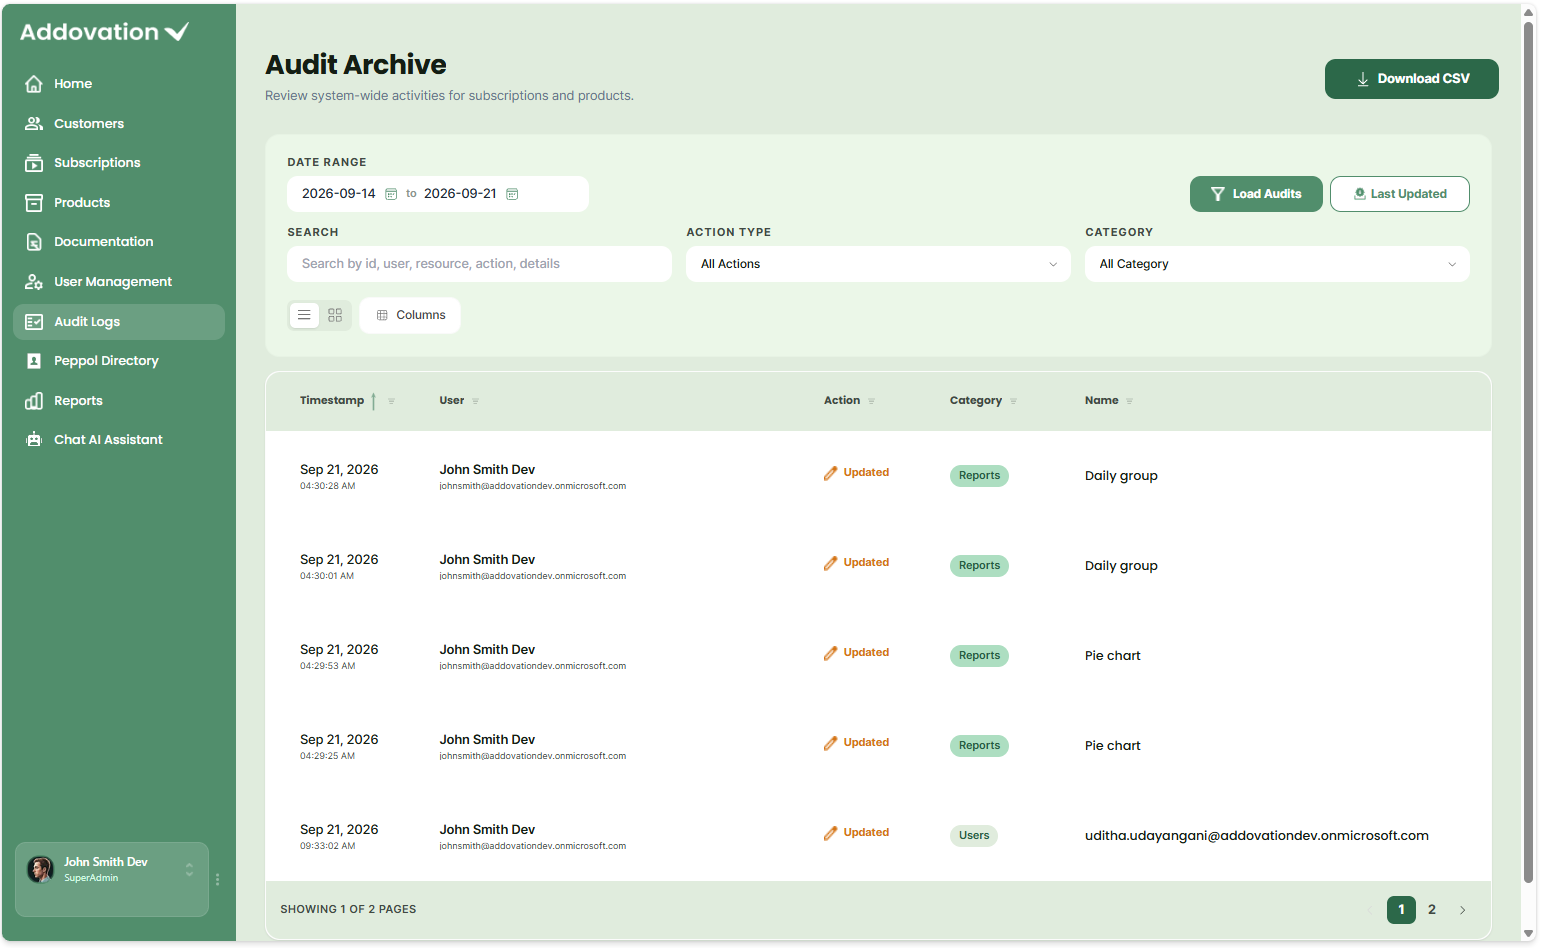
The audit log displays the Timestamp, User, Action, Category, and Name for each activity. Additional information such as Status and Audit Id can be displayed using Columns.
Filter Audit Logs
Use the filters to find specific audit records:
- Date Range — selects the period for which audit records are retrieved. By default, the range is set to the last 7 days up to today. The calendar picker also provides Clear and Today shortcuts.
- Search — searches the currently loaded results by keyword, such as a user's name.
- Action Type — filters results by the type of action performed, such as Create or Update.
- Category — filters results by the area of the system affected.
The Date Range determines which audit records are retrieved from the system. After changing the Date Range, select Load Audits to retrieve the records for the new period.
The Search, Action Type, and Category filters are applied to the records that have already been loaded and do not retrieve new data.
Important: Loading a new Date Range resets the Action Type and Category filters to their default All values.
Load and Refresh Results
- Load Audits — retrieves audit records for the selected Date Range.
- Last Updated — Loads the last 10 audit records.
View Audit Details
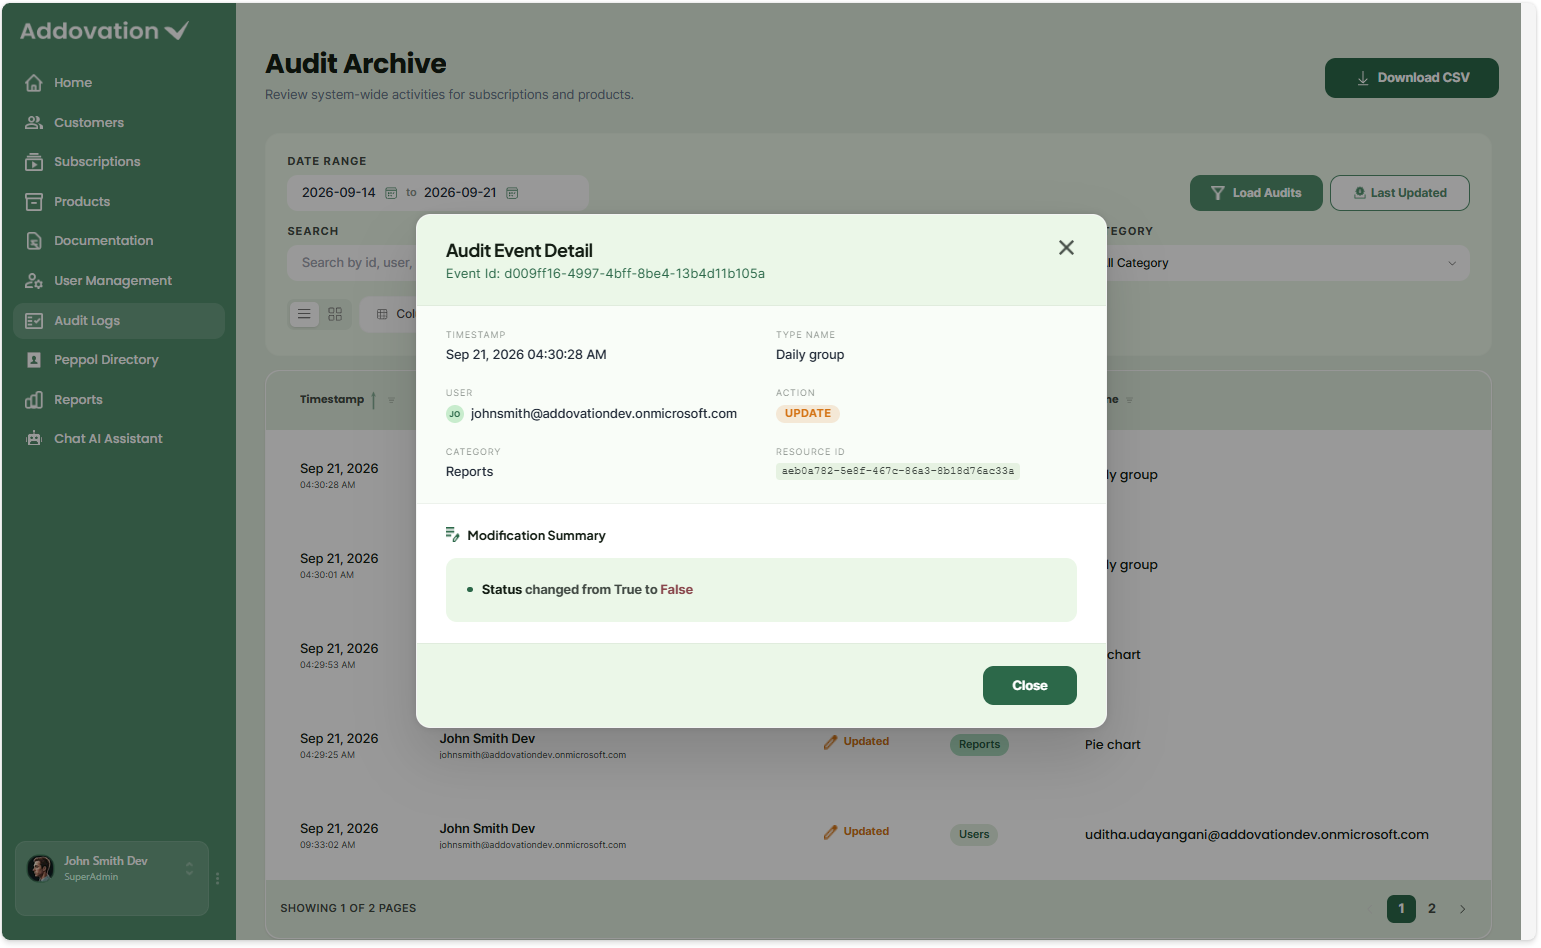
Each audit record shows:
- Timestamp — date and time the activity occurred.
- User — person who performed the activity.
- Action — type of activity performed.
- Category — area of the system affected.
- Name — name of the affected record.
Use Columns to display additional information:
- Status — outcome of the activity.
- Audit Id — unique identifier for the audit record.
The results are displayed in a paged table. Use the pagination controls at the bottom of the table to move between pages.
Download Audit Logs
Use Download CSV to export the audit results.
- Set the required Date Range.
- Select Load Audits to retrieve the records.
- Apply Search, Action Type, or Category filters if required.
- Select Download CSV.
The exported CSV contains the currently displayed, filtered results.
Peppol Directory
The Peppol Directory page allows administrators to manage the Peppol recipients associated with a customer's subscription.
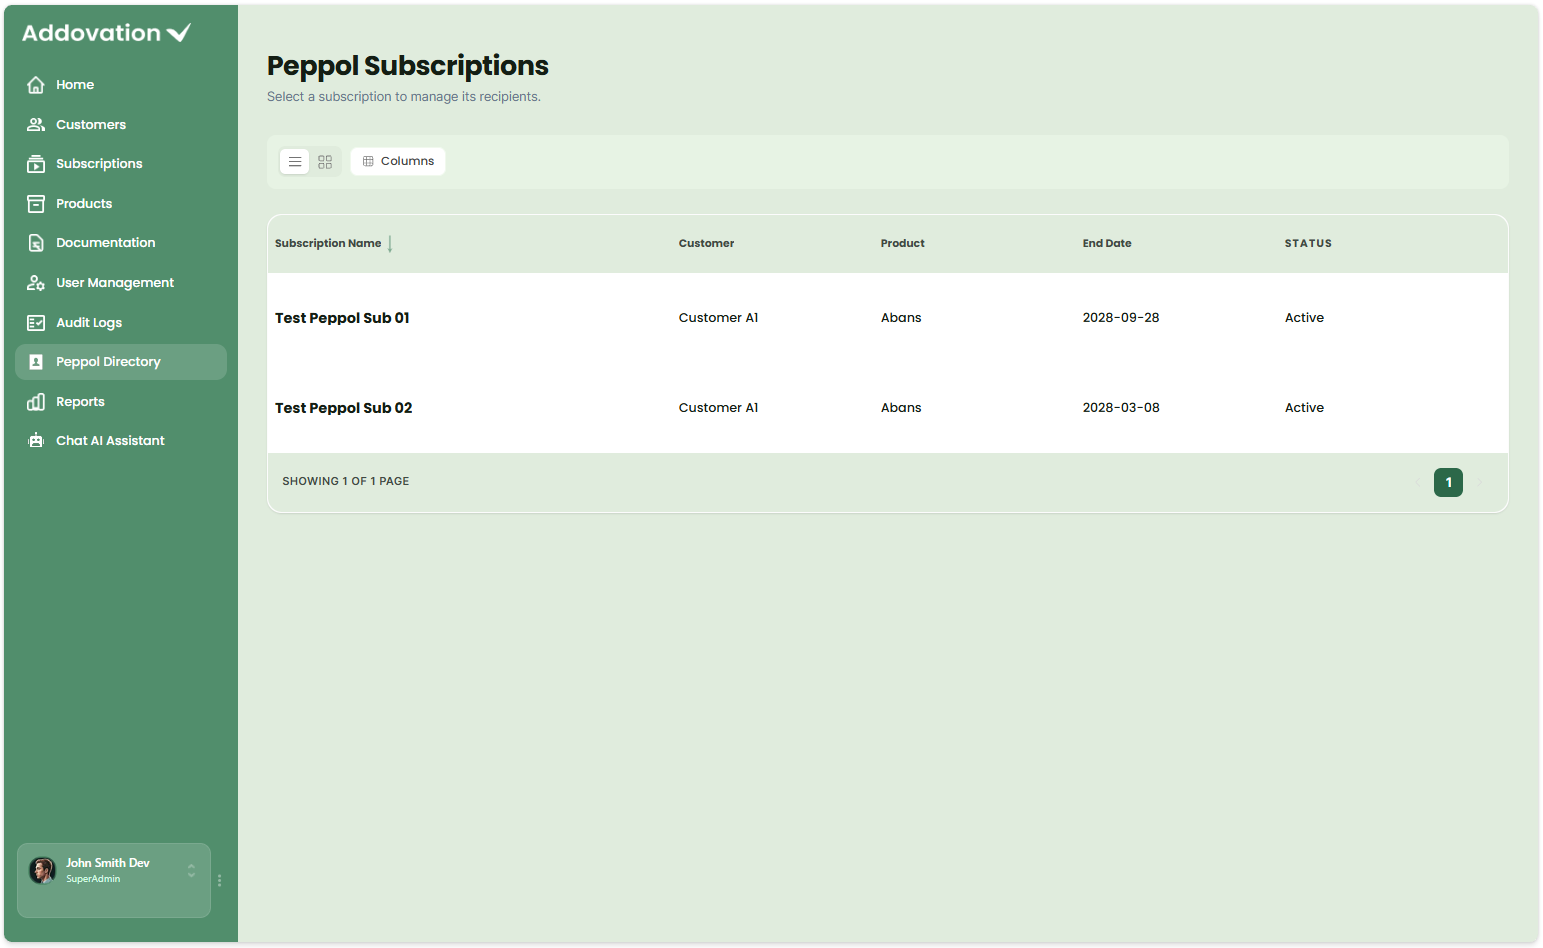
The landing page displays the list of Peppol subscriptions and the subscription list shows the Subscription Name, Customer, Product, End Date, and Status.
Subscriptions can be viewed in List view or Grid view. Use Columns to choose which information is displayed.
Select a subscription to open its recipient management page, where you can view, add, edit, or remove Peppol recipients.
Manage Recipients
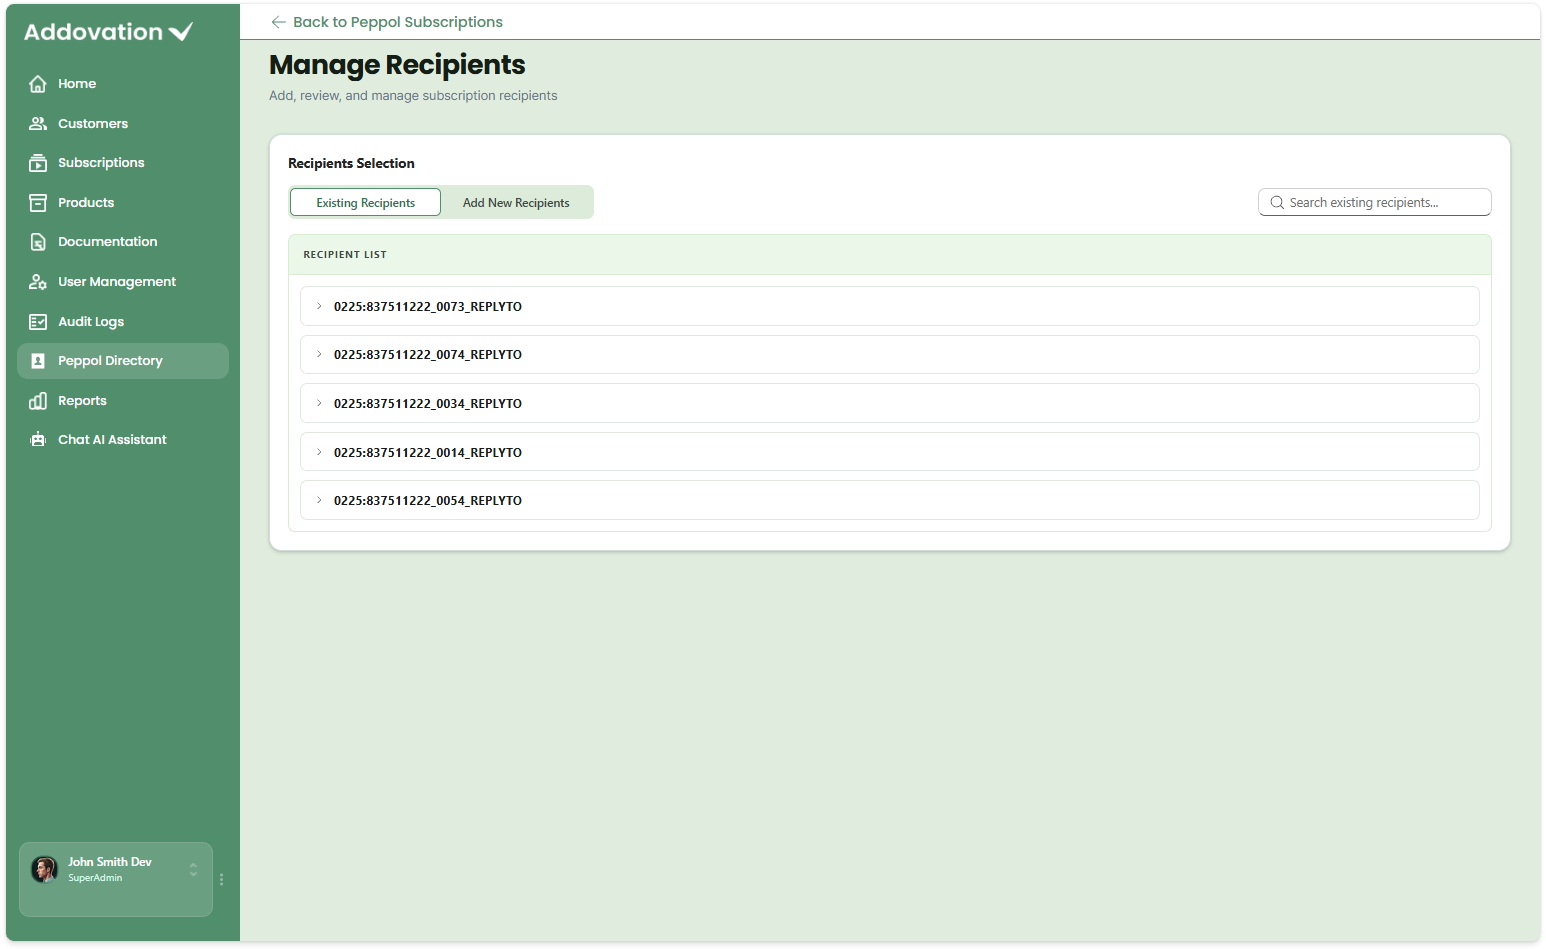
Selecting a subscription opens the Manage Recipients page.
Use Back to Peppol Subscriptions to return to the subscription list.
The Manage Recipients page has two tabs:
- Existing Recipients — view and manage recipients already associated with the subscription.
- Add New Recipients — search the Peppol Directory and add a new recipient to the subscription.
If no recipients have been added, the Existing Recipients tab displays No recipients registered for this subscription.
View Recipient Details
On the Existing Recipients tab:
- Select a recipient to expand its details.
- Review the Country Code and Identifier for the recipient.
Edit a Recipient
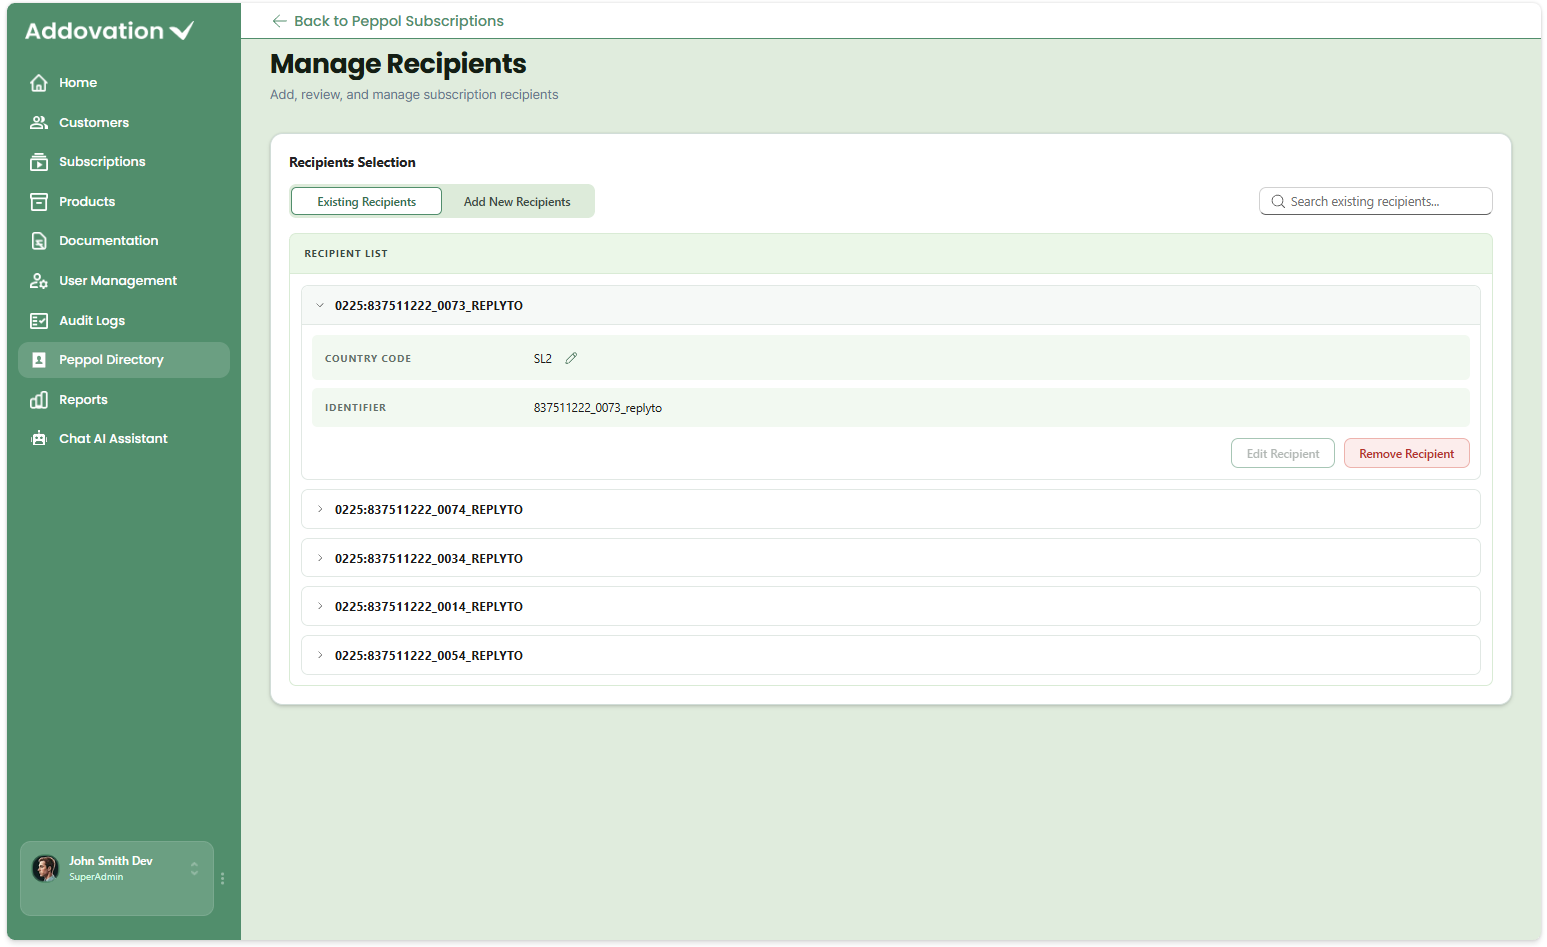
- On the Existing Recipients tab, expand the recipient.
- Select the pencil icon next to Country Code.
- Enter the new value.
- Select Edit Recipient to save the change.
The Edit Recipient button becomes available after the value has been changed.
Remove a Recipient
- On the Existing Recipients tab, expand the recipient.
- Select Remove Recipient.
Important: There is no confirmation dialog when removing a recipient. Selecting Remove Recipient immediately removes the recipient from the subscription, and the action cannot be undone.
Add a Recipient
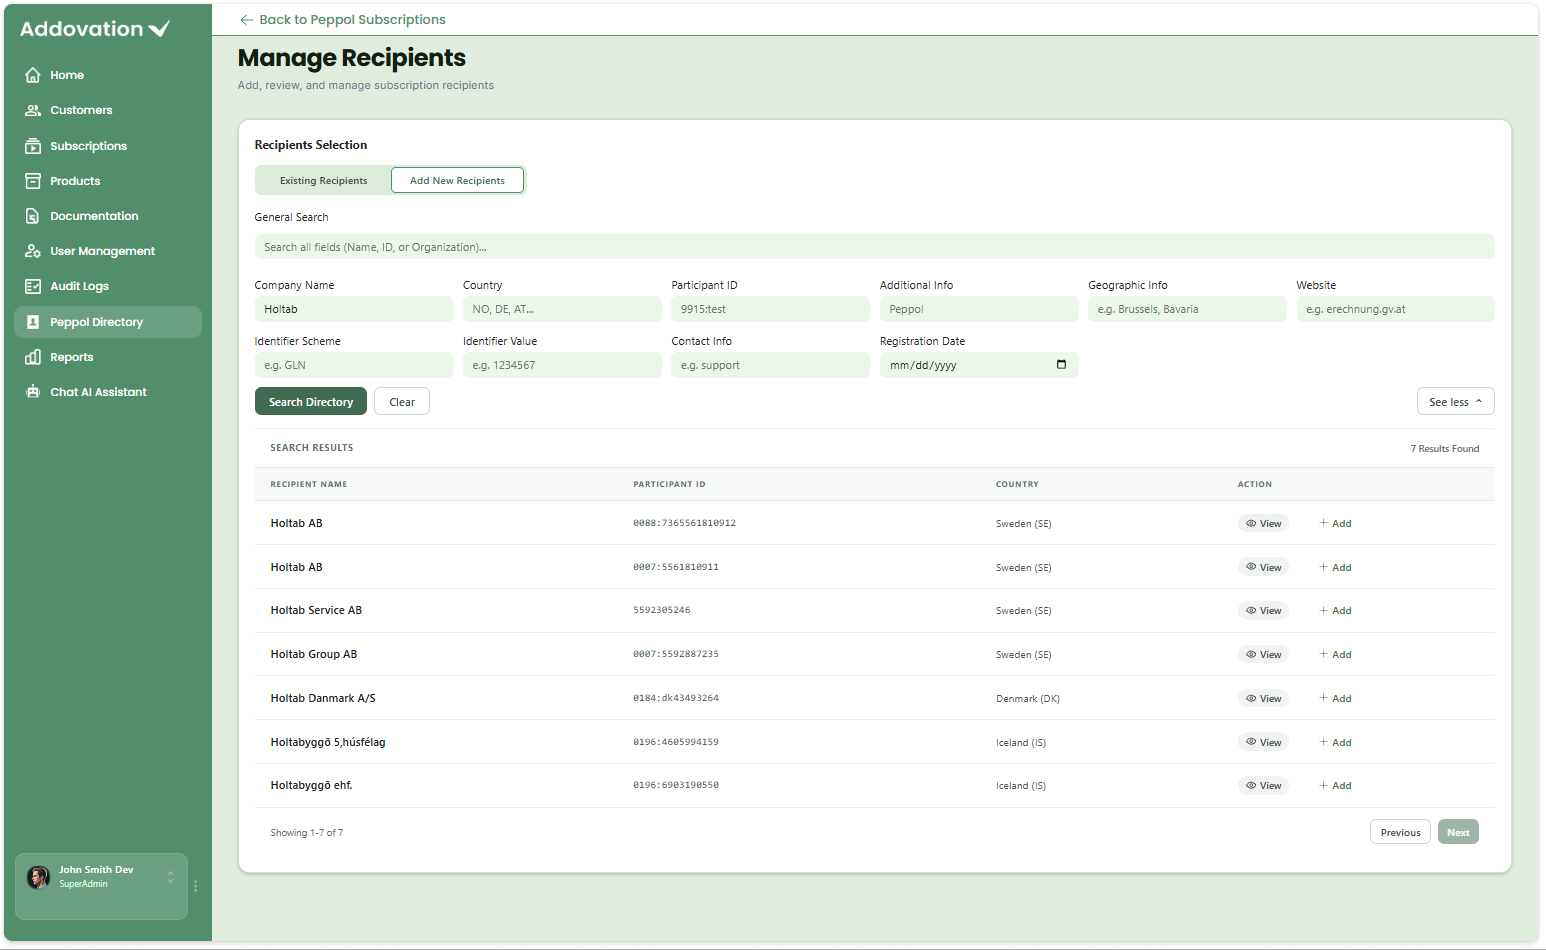
Use the Add New Recipients tab to search the Peppol Directory and link a recipient to the subscription.
- Select the Add New Recipients tab.
- Use General Search to search by name, ID, or organization.
- Select See more to access additional search fields, including:
- Company Name
- Country
- Participant ID
- Additional Info
- Geographic Info
- Website
- Identifier Scheme
- Identifier Value
- Contact Info
- Registration Date
- Select Search Directory to search for matching recipients.
- Select Clear to reset the search fields.
- Review the search results, including the recipient name, Participant ID, and country.
- Select View to review the recipient's details before adding it.
- Select + Add to link the recipient to the subscription.
Important: Selecting + Add immediately links the recipient to the subscription. Use View first to confirm that you have selected the correct recipient.
Reports
The Reports page allows administrators to create, manage, and control access to reporting templates available to customers.
The page has two tabs:
- Manage Reports — view and maintain existing report templates, including their status and customer assignments.
- Create Reports — create a new report template using the AI Report Builder.
These are two views of the same page. Switching between the tabs does not affect reports that have already been saved.
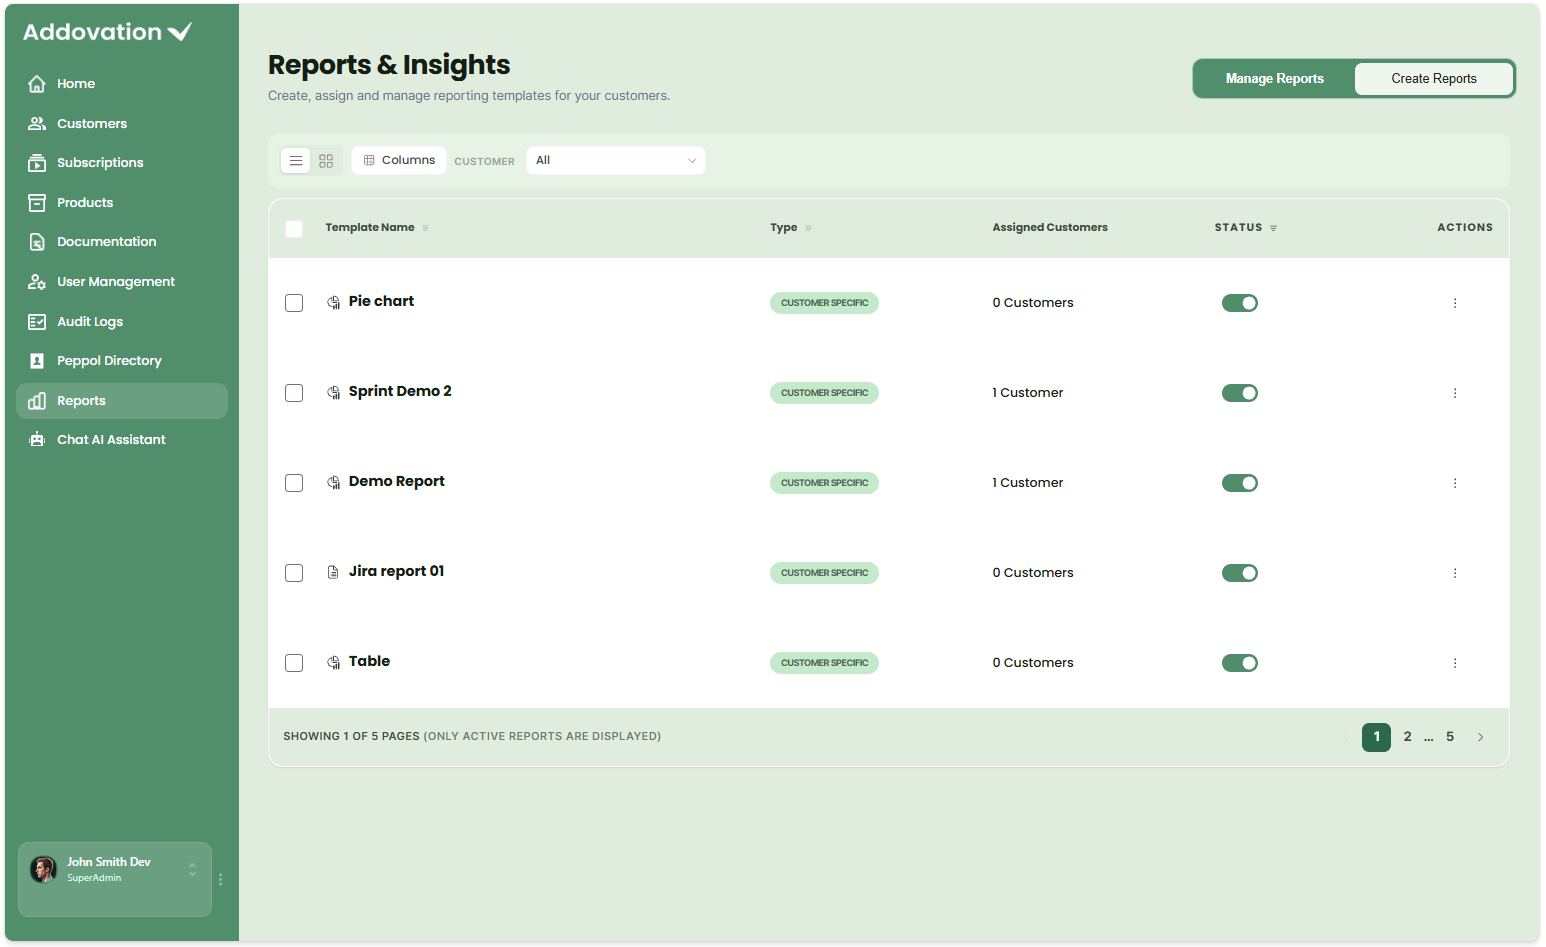
Manage Reports
The Manage Reports tab allows administrators to view and maintain the report templates that have already been created.
Each report displays:
- Template Name
- Type
- Assigned Customers
- Status
- available Actions
Use the Customer filter to view reports assigned to a specific customer.
Use the Status filter to show:
- Active
- Inactive
- All reports
By default, only Active reports are displayed.
Use the Type filter to show:
- Customer Specific
- Standard
- All reports
By default, All reports are displayed.
Reports can be viewed in List view or Grid view.
- List view displays reports in a table.
- Grid view displays them as cards.
In List view, use Columns to choose which information is displayed.
Select the checkbox next to one or more reports to display the bulk action bar. From the bulk action bar, you can Edit or Delete the selected reports.
Each report also provides an Actions menu for managing that individual report.
Each report's ⋮ actions menu provides:
- Edit Report
- Delete Report
Customer assignment is managed from Edit Report. The Active/Inactive status is managed using the Status toggle directly in the report row.
Important: The Status toggle changes the report's Active/Inactive state immediately without a confirmation dialog. If a report is accidentally deactivated, use the Status filter to find the Inactive report and select the toggle again to reactivate it.
Edit a Report
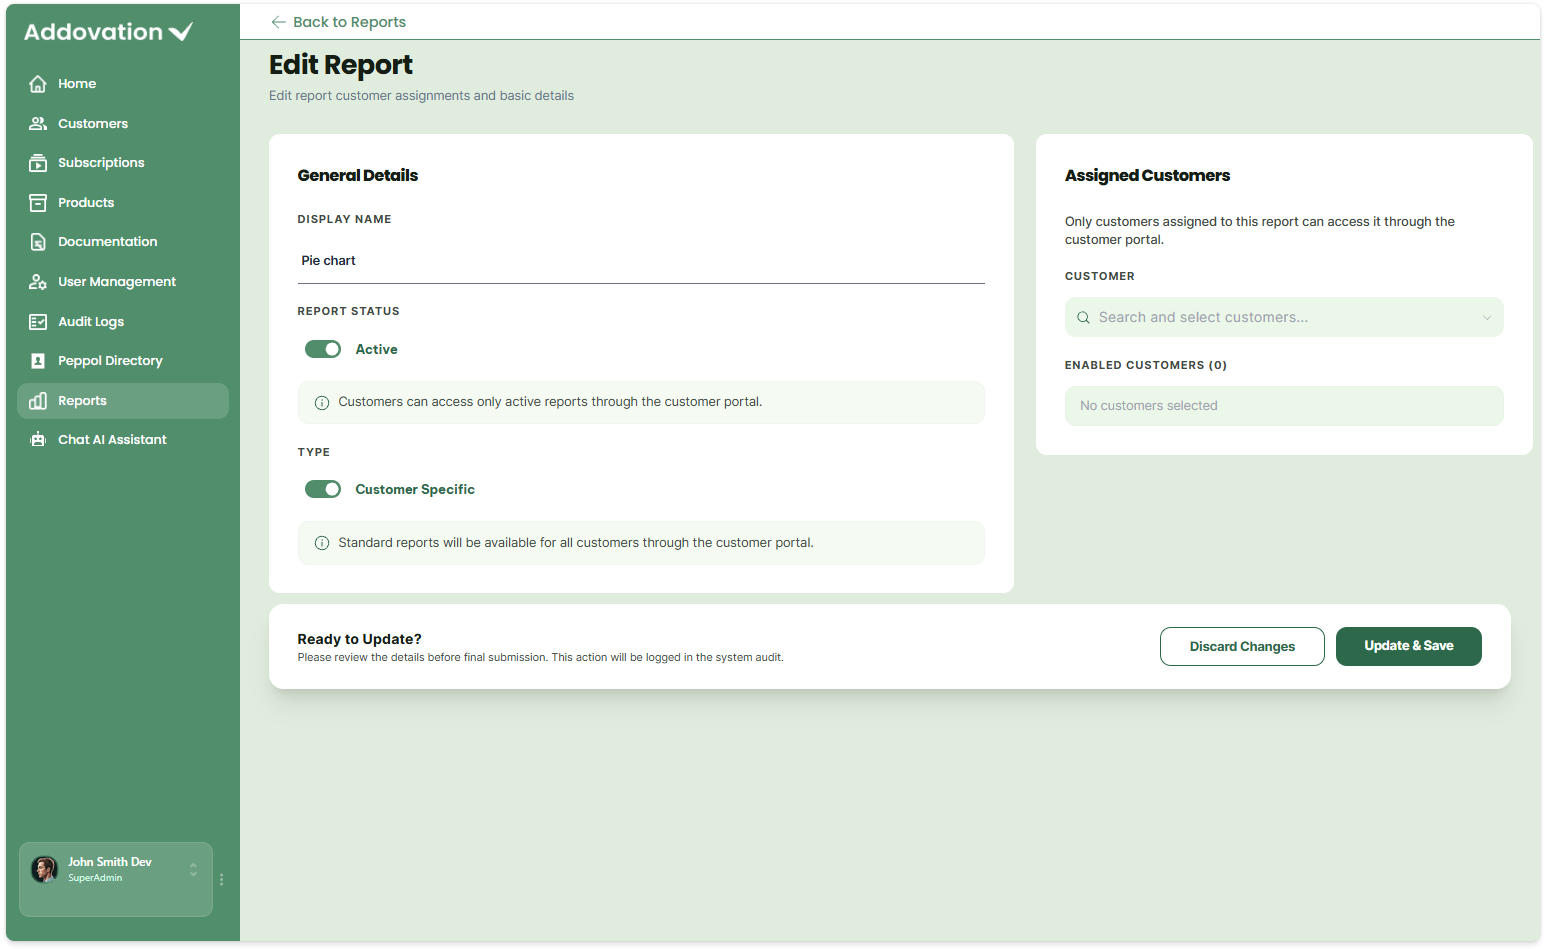
Use Edit Report to update the report name, status, type, or assigned customers.
- On the Manage Reports tab, open the report's ⋮ actions menu.
- Select Edit Report.
- Under General Details, update:
- Display Name
- Report Status — Active or Inactive.
- Type — Customer Specific or Standard.
- Under Assigned Customers, select Search and select customers.
- Select the customers to assign and then select Add Selected Customers.
- Review the customers listed under Enabled Customers. Remove a customer using the × control if required.
- Select Update & Save to save the changes.
- Select Discard Changes to leave without saving.
Note: Standard reports are available to all customers, while Customer Specific reports are available only to the customers assigned to them. Updates to a report are recorded in the system audit.
Delete a Report
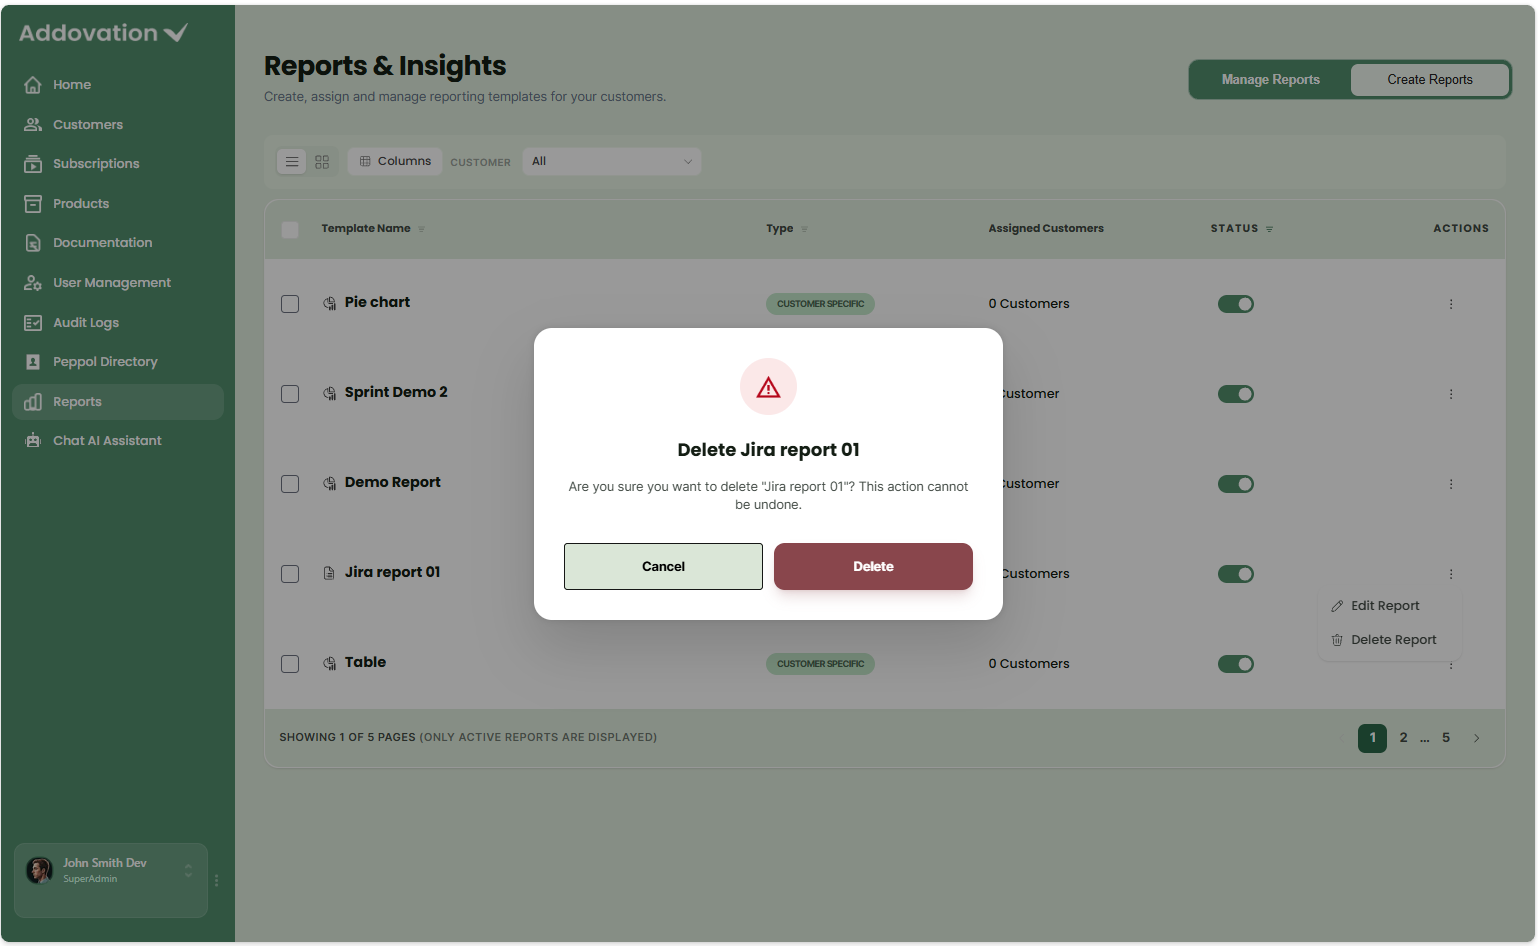
- On the Manage Reports tab, open the report's ⋮ actions menu and select Delete Report.
- Alternatively, select one or more reports using the checkboxes and select Delete from the bulk action bar.
- Review the confirmation message.
- Select Delete to permanently remove the report, or Cancel to keep it.
Create Reports
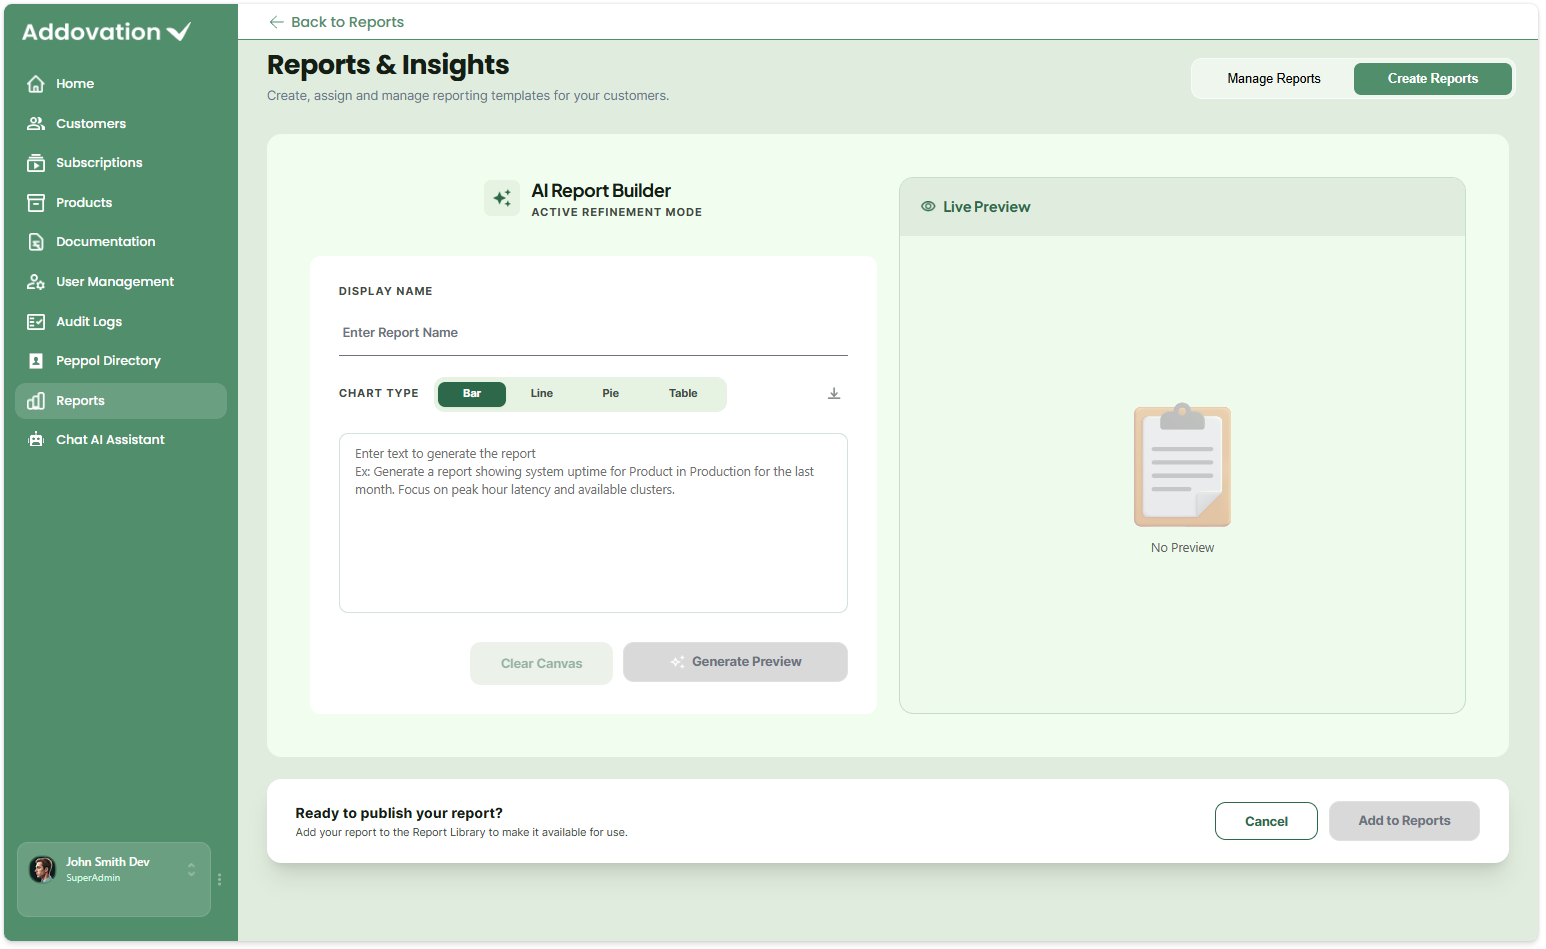
The Create Reports tab uses an AI Report Builder to generate a new report template from a written description rather than building the report field by field.
Enter a Display Name for the report.
Select a Chart Type:
- Bar
- Line
- Pie
- Table
In the description box, describe the report you want to generate. Be specific about:
- The data source and subject
- How the data should be grouped or summarized
- The required date range
For example:
Generate a table showing the total number of JIRA issues grouped by priority from May 1, 2026 to July 9, 2026.
Select Generate Preview.
Review the generated report in the Live Preview panel.
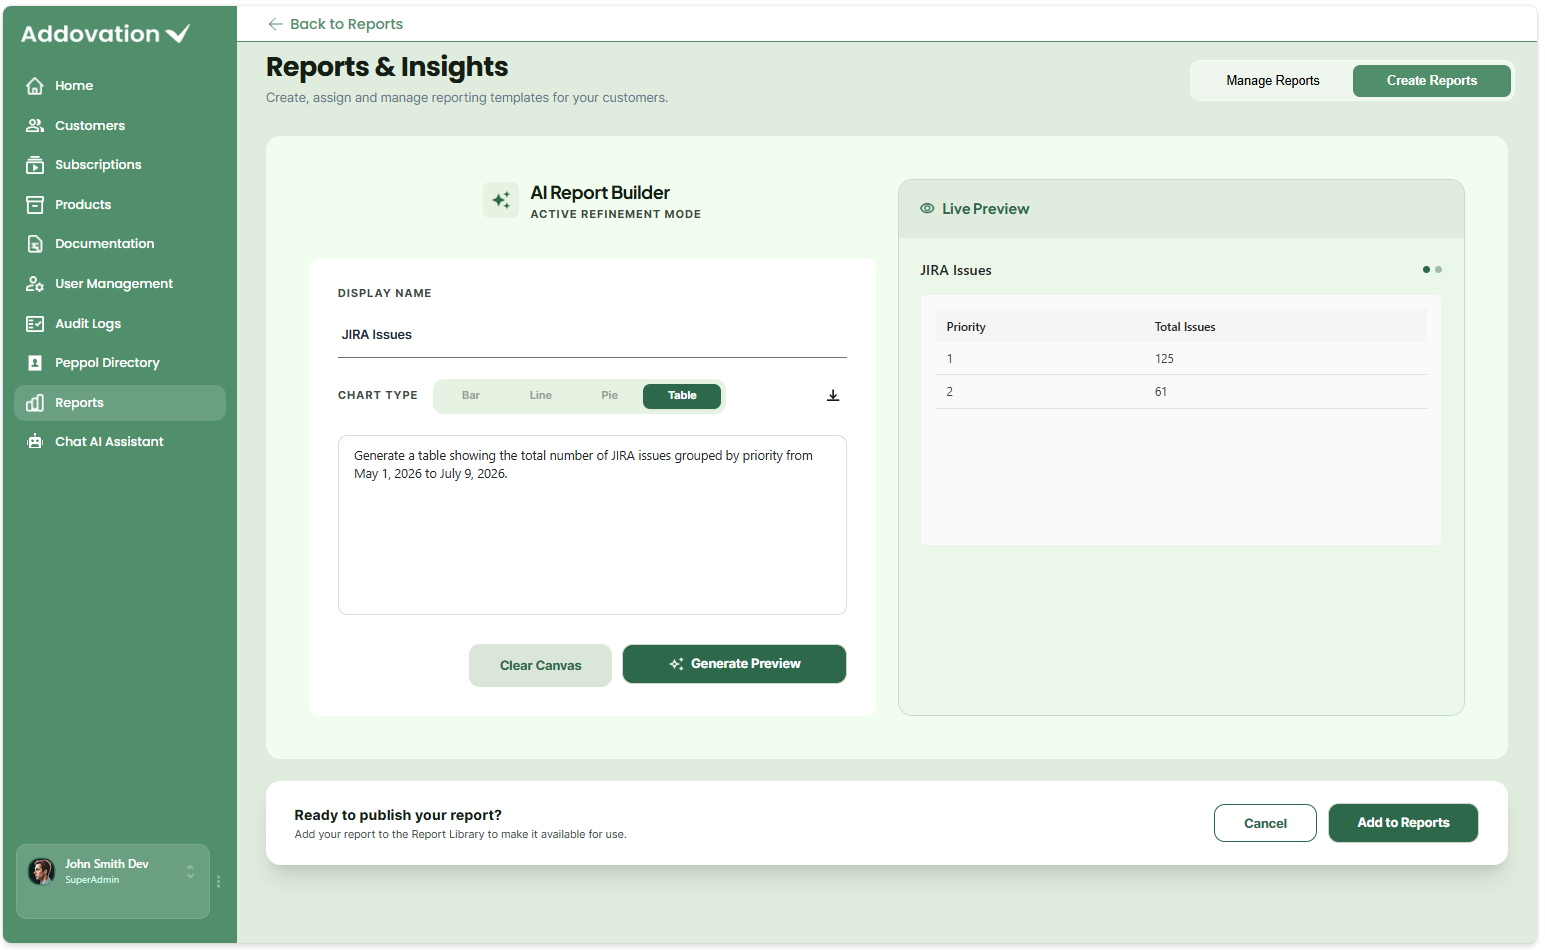
A generated preview displays the report title and data according to the selected chart type.
Once a preview has been generated:
- The preview can be downloaded using the Download icon above the chart type options.
- The Chart Type selection is locked to the type used to generate the preview.
- To try a different chart type, select Clear Canvas and generate a new preview.
Use Clear Canvas to clear the report description and chart type and start again. The Display Name is not cleared.
If the description is too vague, unsupported, or cannot be matched to available data, generation may fail. A warning is displayed in the Live Preview panel and as a notification. Review the description and try again with more specific information, such as the data source, grouping, and exact date range.
Once a preview has been generated successfully, select Add to Reports to save the report template to the Report Library.
Select Cancel to leave the tab without creating the report.
Note: No fields are explicitly marked as required, but Generate Preview becomes available only after a Display Name and description have been entered. Add to Reports becomes available only after a preview has been generated successfully.
Customer assignment is not part of the creation process. A newly created report starts Customer Specific but unassigned and can be assigned to customers later or mark as Standard from the Manage Reports tab using Edit Report.
How the Tabs Work Together
A report created and saved through Create Reports is added to the Report Library and appears in the Manage Reports list.
From Manage Reports, administrators can:
- Edit the report
- Assign or remove customers
- Change the report name
- Change the report type
- Activate or deactivate the report
- Delete the report
This allows administrators to create the report first and manage its availability and configuration afterward.
Chat AI Assistant
The Chat AI Assistant provides quick answers and guidance on using the Admin Portal without requiring administrators to search through documentation.
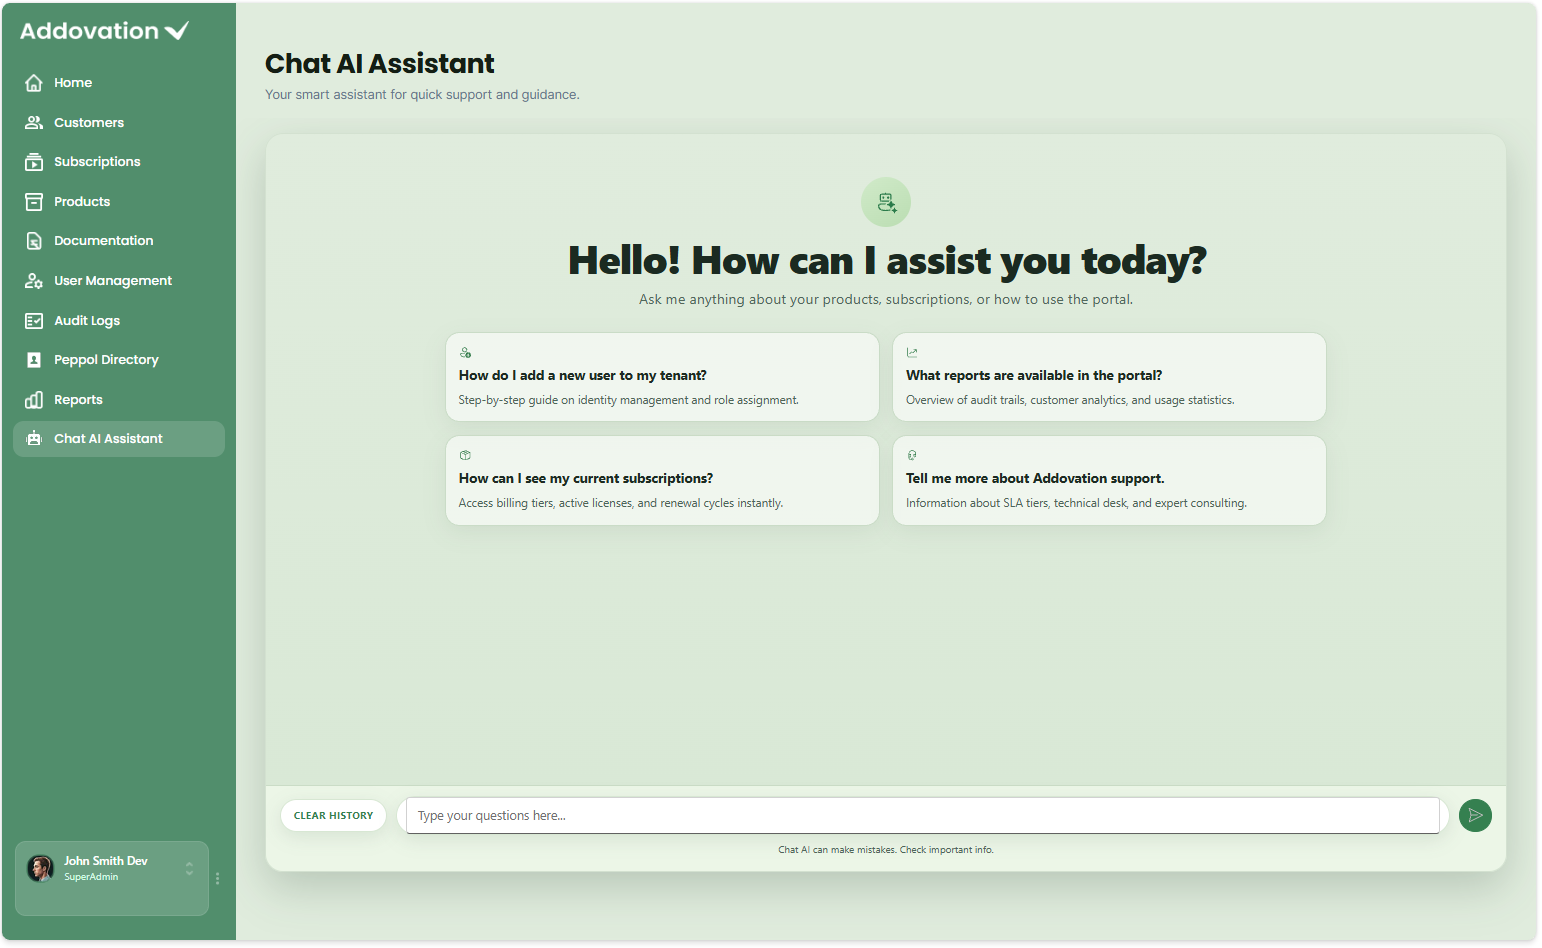
When no conversation has started, the assistant displays a greeting and suggested prompts to help get started.
The assistant can provide step-by-step guidance for tasks such as adding a user, explain where to find information such as reports or subscriptions, and provide information about Addovation support.
Important: The assistant displays a reminder that "Chat AI can make mistakes. Check important info." Treat responses as guidance and verify important information where necessary.
Suggested Prompts
When no conversation has started, four suggested questions are displayed as selectable cards.
Select a suggested prompt to send it immediately. Suggested prompts work in the same way as questions entered manually.
Chat Controls
- Message box — Enter a question in the "Type your questions here..." field.
- Send — Select the send button or press Enter to submit the question.
- Clear History — Removes the current conversation from view and returns to the initial greeting screen with the suggested prompts. The conversation is cleared immediately without a confirmation step.
The assistant displays responses directly in the chat using plain text, with bolded key terms and numbered or bulleted steps where appropriate. Follow-up questions can be asked within the same conversation, allowing the assistant to use previous messages as context.
Using the AI Assistant
- Select a suggested prompt, or enter your own question in the message box.
- Select the Send button or press Enter.
- Review the assistant's response displayed below your question.
- Continue the conversation with follow-up questions. The assistant uses the previous messages in the conversation as context.
- Optionally, select the thumbs up or thumbs down icon below a response to provide feedback.
- Select Clear History to remove the current conversation and return to the initial screen with the suggested prompts.