Addovation Share for Office - User Guide
Last Updated: 2025-12-26
User Authentication and Login/Logout
Addovation Share for MS Office Add-in is used through the word, excel and PowerPoint documents. To begin using Share, follow these simple steps:
Start by selecting the document you wish to synchronize with IFS.
Locate the Share icon on the document toolbar.
In Word:

In Excel:

In PowerPoint:

- If it is not visible, access it via the
Appsicon on the toolbar. A list of available apps will appear. Choose Share from the list.
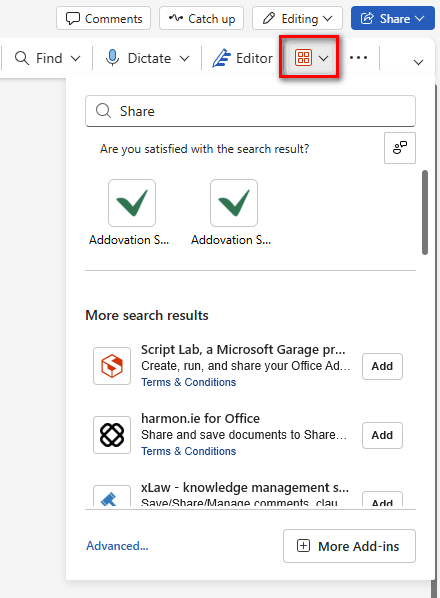
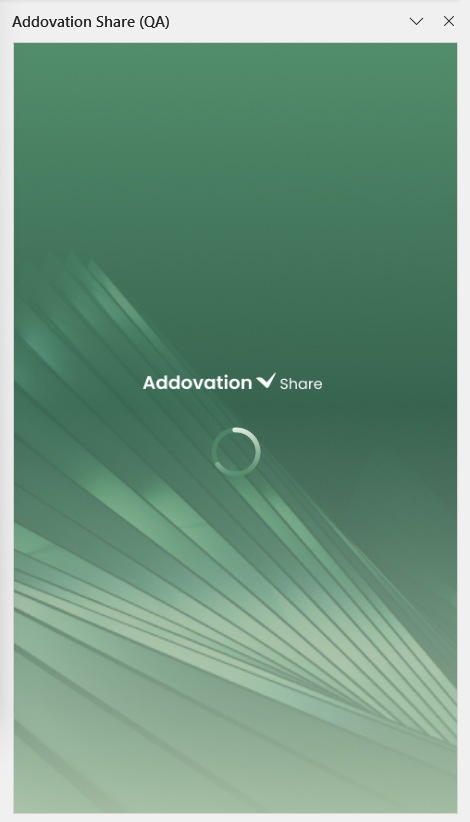
- Then a
splash screenappears on the right side of the document.
The
Microsoft Authenticatorwindow then opens, allowing the user to:Enter their username and password, or
Sign in using
Addovation SSOorSkyforce SSOby selecting an account.
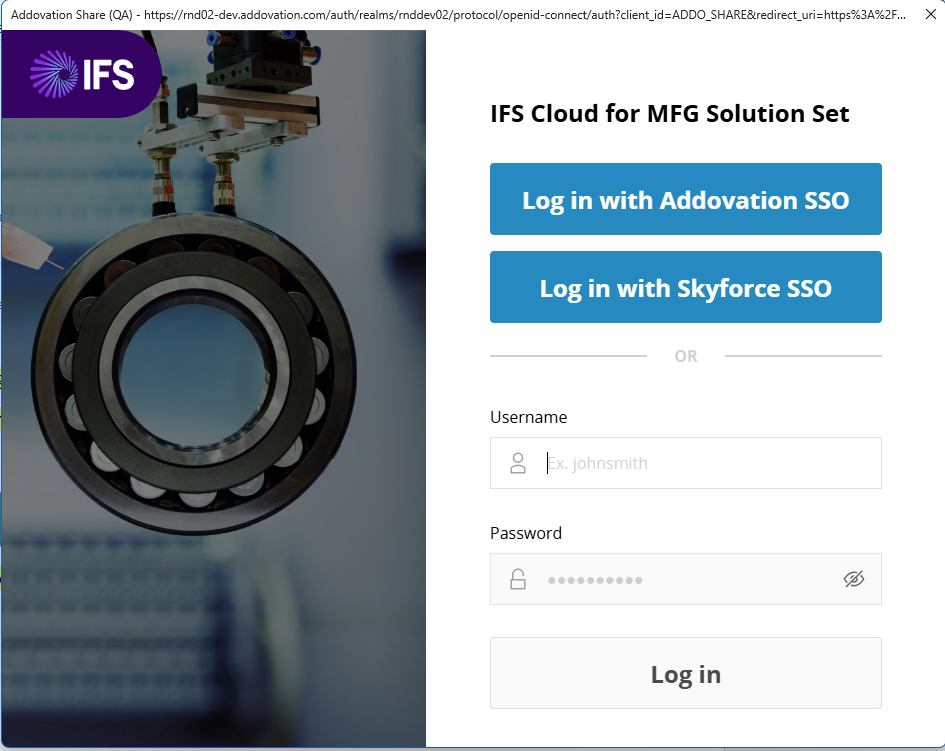
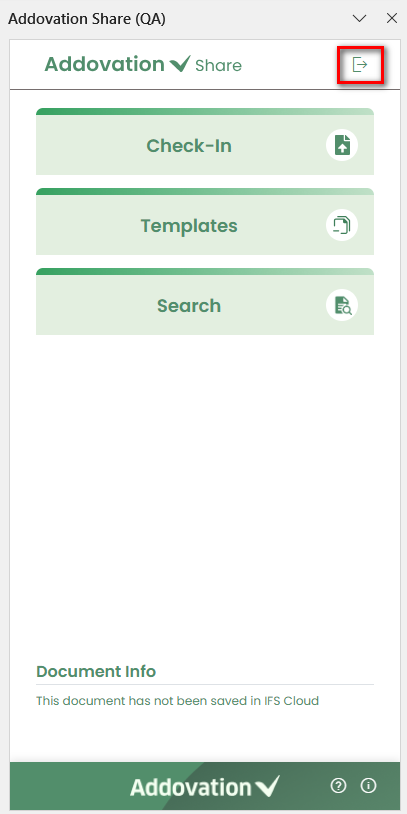
- Once signed in, the user gains access to the landing page. To log out of the application, the user can click the logout icon provided at the top right corner of the add-in.
Note
The flow, functionality, and user interface are the same across Word, Excel, and PowerPoint. Therefore, screenshots and examples shown in this guide apply to all three applications.
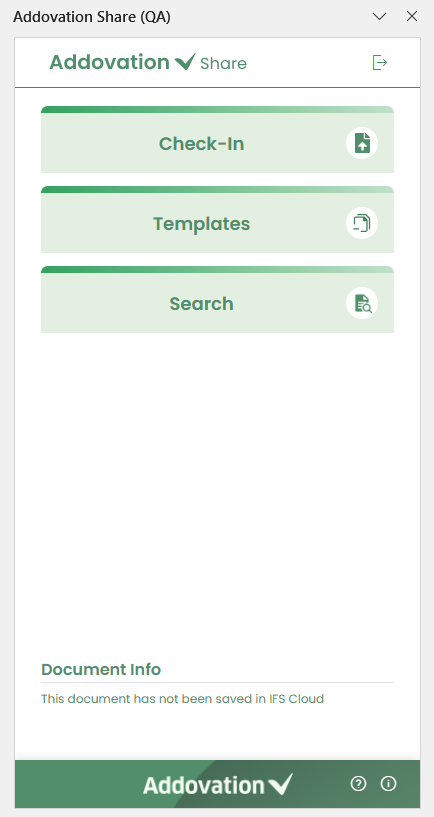
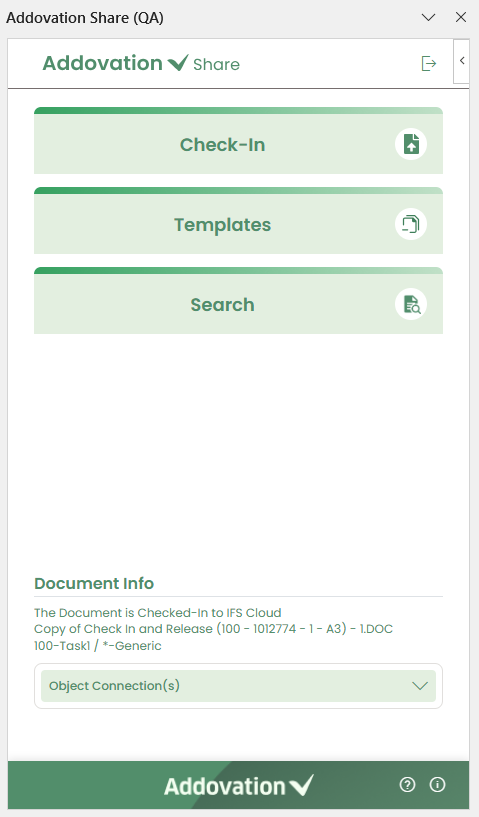
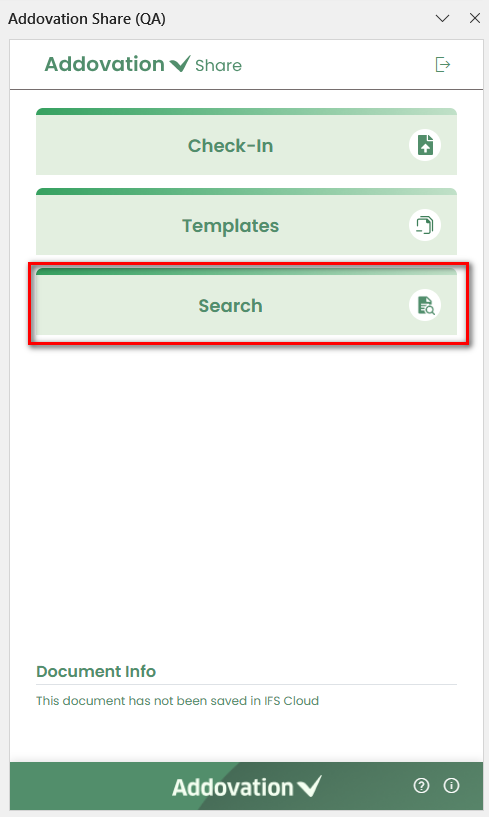
Landing Page
The landing page provides the following three options:
Check In– Check in a document to IFS.Templates– Search for and create documents using templates.Search– Search for existing documents.
Users can begin any of these actions by clicking the respective button.
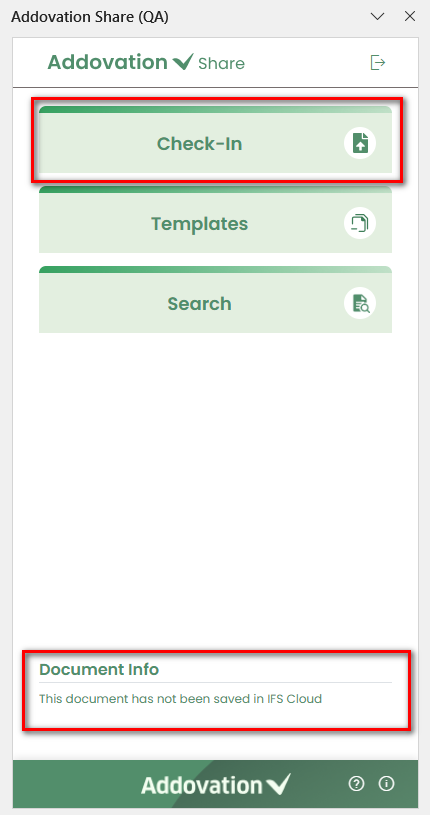
The landing page also includes a
Document Infosection at the bottom. The details shown here vary based on the document’s status. More information will follow in the next sections.
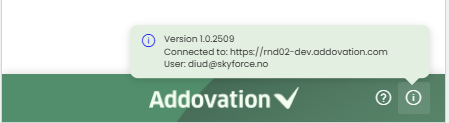
- The bottom bar of the add-in contains the
Addovation logo, aHelp icon, and anInformation icon.

Clicking the Help icon directs the user to the Addovation Share documentation site.
Clicking the Information icon displays a tooltip showing the
application version,connected environment, and thelogged-in user.
Check in Documents
The check-in process varies depending on the document’s current status. There are three possible flows:
- A blank or new document that does not yet have an IFS Document Number
- A document that has an IFS Document Number and is already checked in
- A document that has an IFS Document Number and is currently checked out
Check in a blank or new document without an IFS Document Number
When working with a new document that has not yet been saved in IFS Cloud, the Document Information section shows the message
This document has not been saved in IFS Cloud.To check in this type of document, the user can select
Check inon the landing page.This action starts the check-in process and takes the user to the screen where the document can be saved into IFS Cloud.
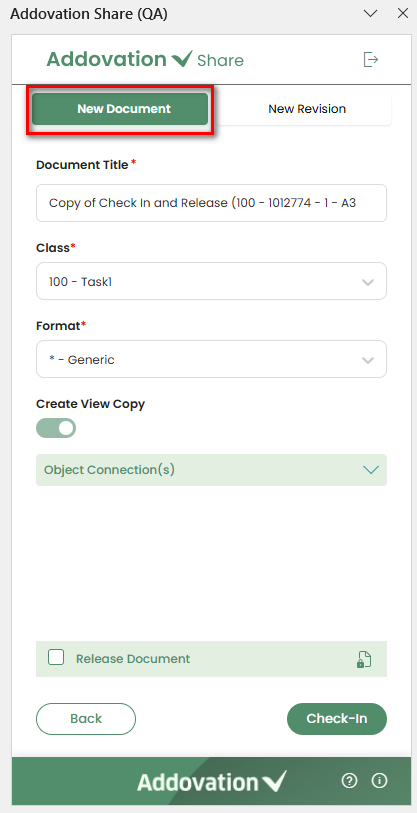
- Two tabs are available on the next screen:
New Documentand NewRevision. TheNew Documenttab is selected by default.
Check-in as a New Document
Document Titleis automatically identified and displayed at the top of the pane. The user has the option to edit this title if needed.
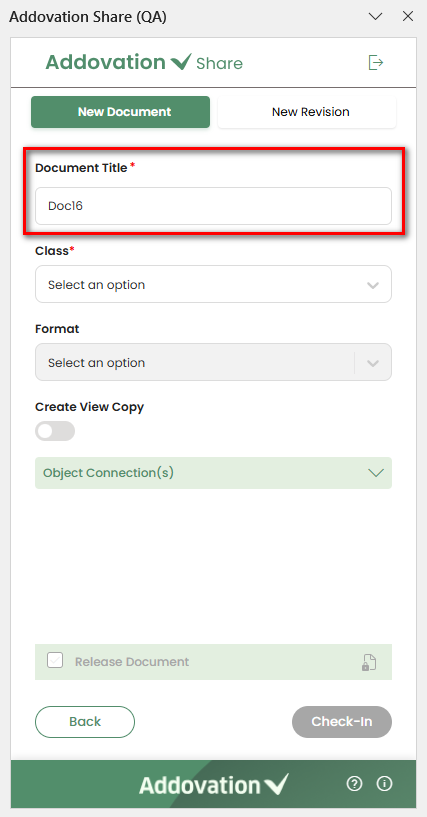
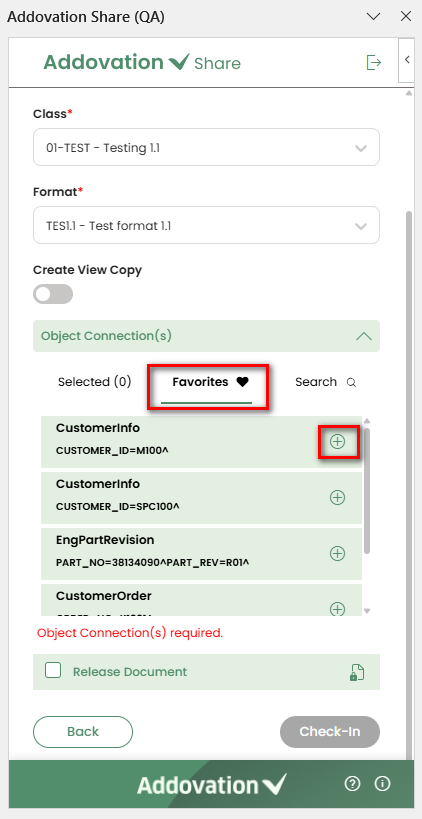
Select Class & Format
The next step of the check-in process is to select the Class and Format.
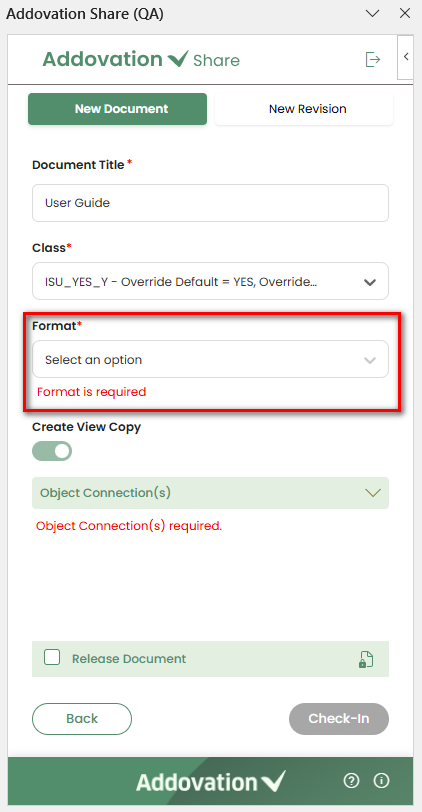
The
Classcan be selected using the drop-down menu and the class field is required field for the check-in process.Createbutton is disabled until the class is selected.The
Formatcan be selected using the drop-down menu and format values are listed based on the selected class. The Format drop down remains disable until a class is selected. The document can be checked-in without a format. However, in some situations, the format is required.If the format is required for the selected class, a message stating
Format is requiredwill be displayed below the field, and theCreatebutton will remain disabled.
Create View Copy
The
Create View Copycheckbox behaves differently depending on the document class.For some classes, it is automatically selected and cannot be deselected.
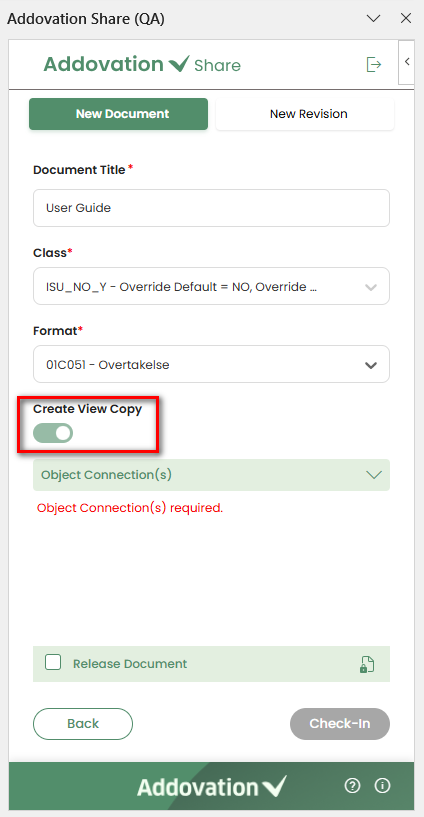
- For other classes, it is initially disabled but can be enabled if needed.

- When this option is selected, a PDF version of the document is created and stored in IFS as a view copy for the new document revision.
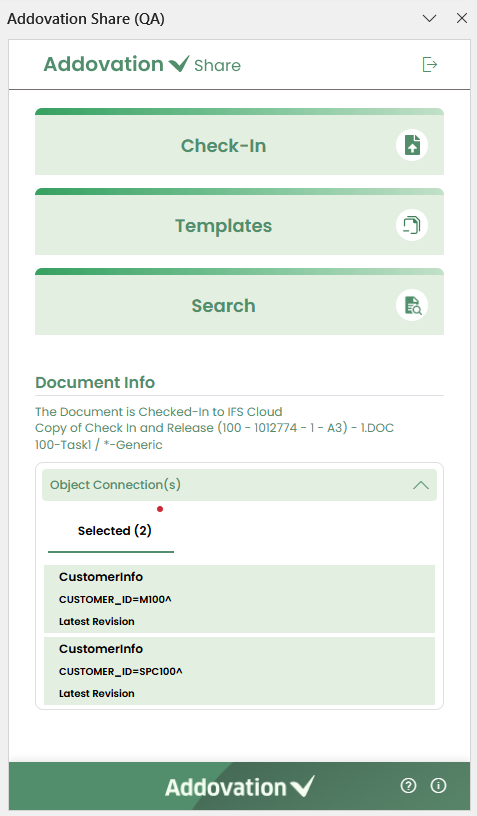
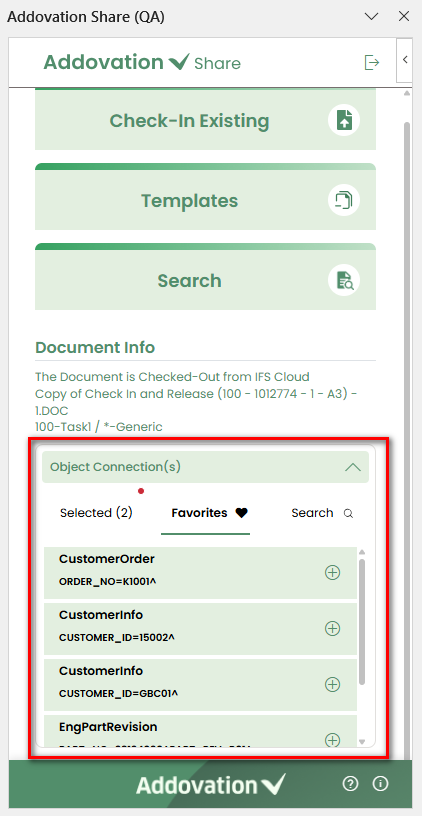
Select Object Connection(s)
- An expandable section is provided for selecting
Object Connectionswhen checking in a document.
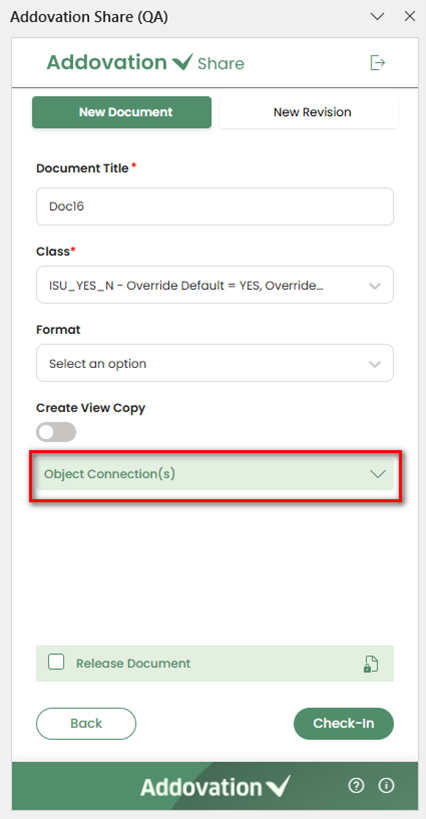
When expanded, there will be three tabs available as
Selected,FavoritesandSearch.Favorites: Displays the object connections marked as favorites in the IFS.Selected: The object connections that have been selected will appear in this tab and can be managed.Search: Provides the advanced search functionality.
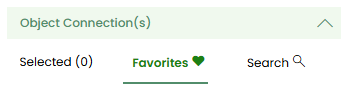
Favorites
- Once the Object Connection(s) section is expanded, user
Favoritesobject connection will be selected by default. User favorites object connections are the once user selected as favorites in Document Object Connections in IFS.
- The user has the option to add the object connections by clicking on the
+icon located in the right corner of the connection from theFavoritestab. After the connection is added, it will be removed from theFavoritestab.
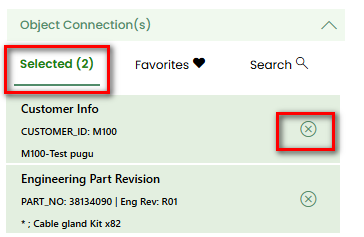
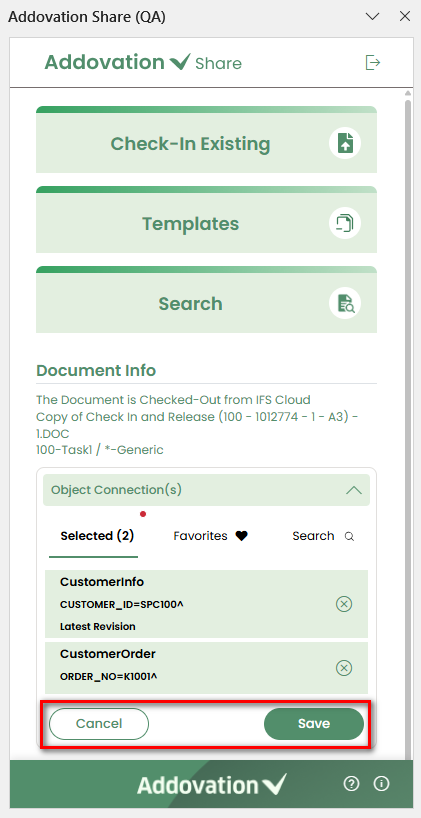
Selected
- Objects added from the
FavoritesandSearchtabs will be moved to theSelectedtab. Upon adding an object, a red dot will appear next to theSelectedtab label, indicating a new addition.
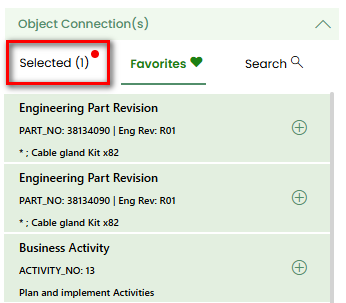
When the
Selectedtab is opened, the red dot will disappear. The selected objects will be listed within theSelectedtab.User has the option to remove the selected connections by clicking on the
xicon located in the left corner. Removed connections will be relocated to theFavoritestab section.
Search
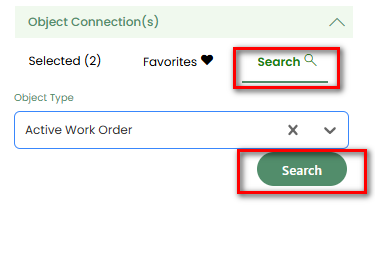
The
Searchtab facilitates users in finding object connections. To search for an object connection, users may first select anObject Typefrom the dropdown menu.Upon selecting the
Object Type, users should click theSearchbutton to initiate the search process. The system will then search for object connections corresponding to the selectedObject Type.Selecting the
Searchoption opens theAdvance Searchwindow, providing users with additional filter capabilities.
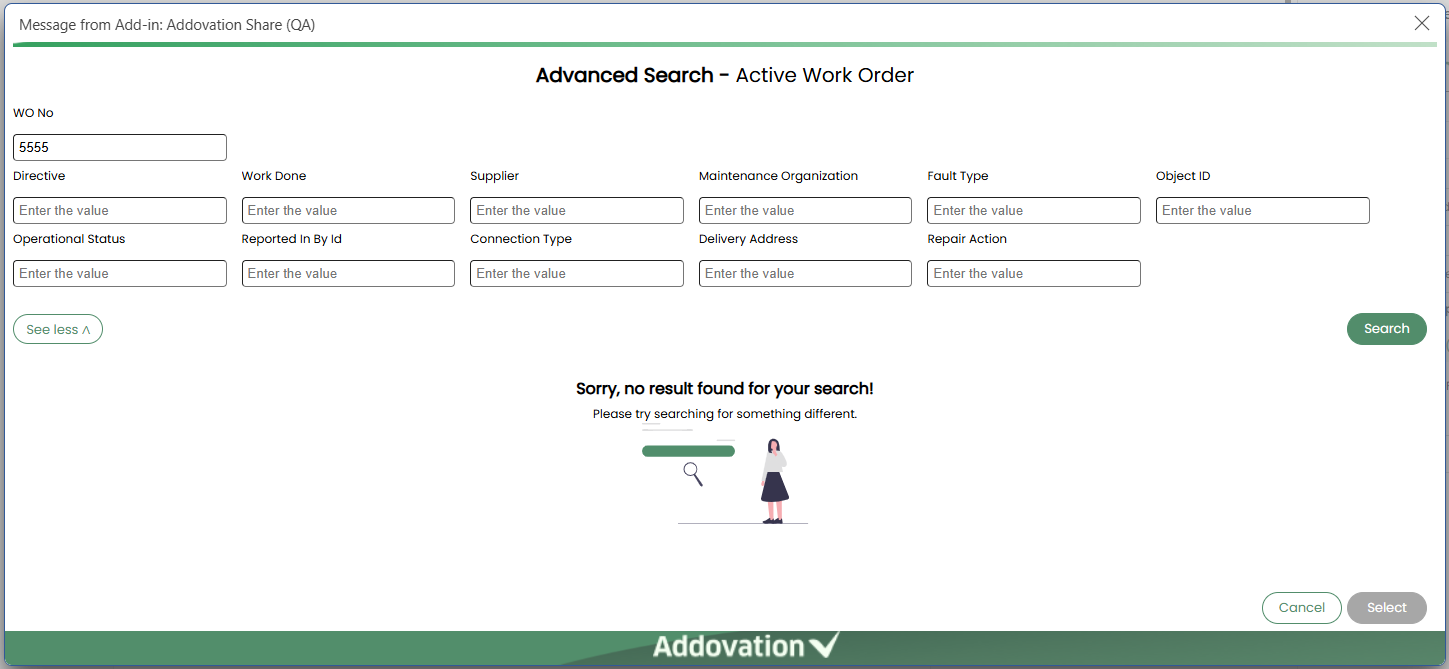
Advanced Search
In
Advance Searchwindow, only the primary filter options will be displayed by default.Clicking on the
See Moreoption loads additional search options and the additional search options can be hidden again by clicking onSee Lessif required.The system will display 25 default records when the Advanced Search window initially opens.
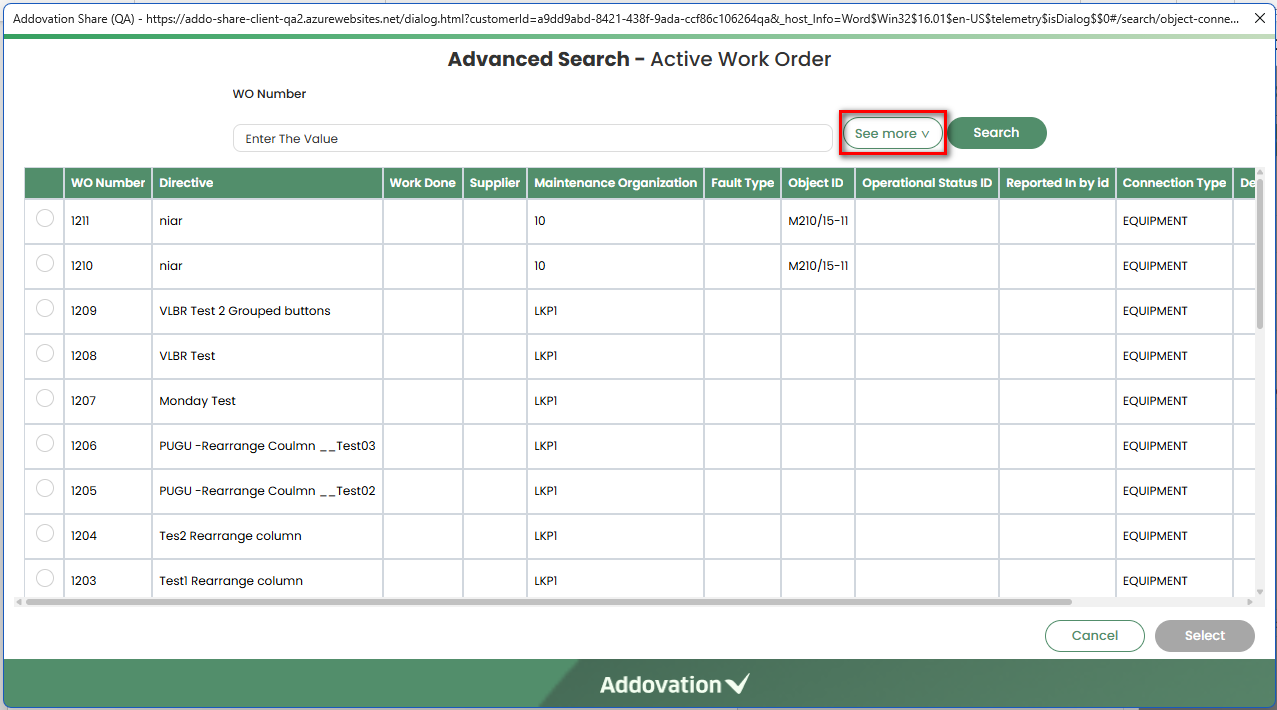
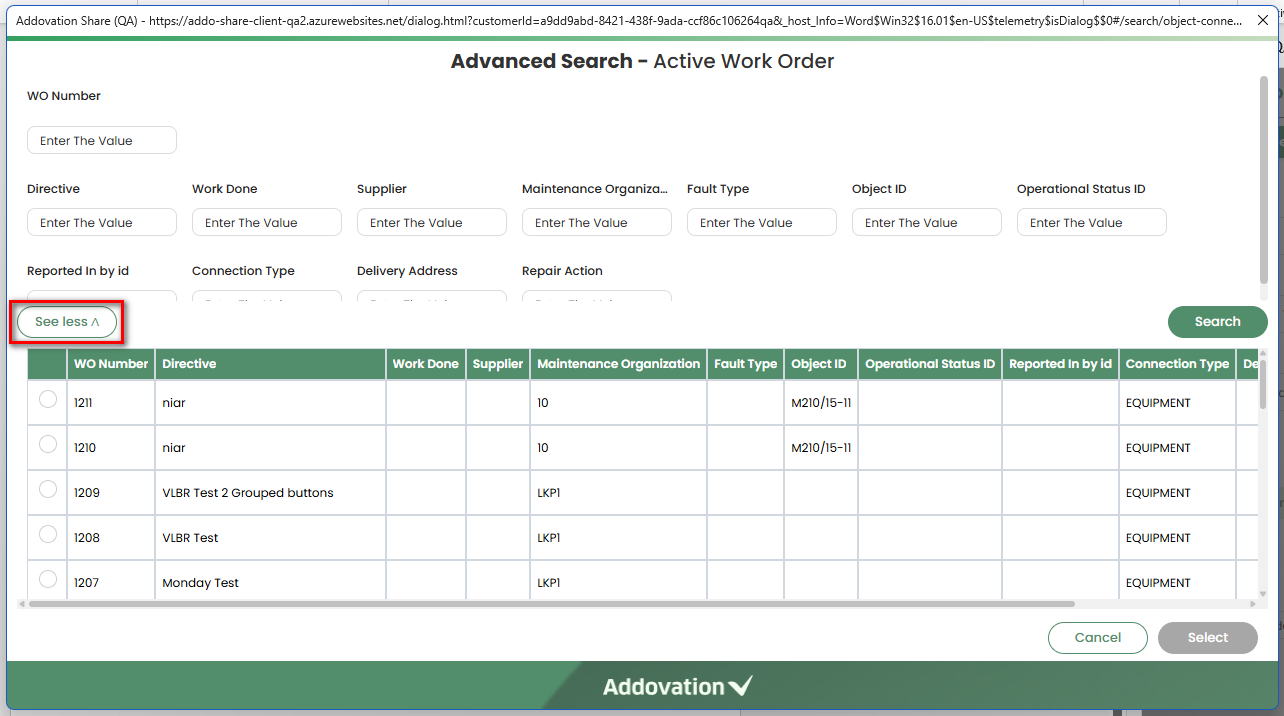
Users can input values into the provided fields and click the
Searchbutton to initiate the search.The system will load a list of search results based on the entered criteria into a grid. Users can select one or more search results by checking the
checkboxin the first column next to each record.The selected objects will be moved to
selectedtab, and the red dot notification will appear.
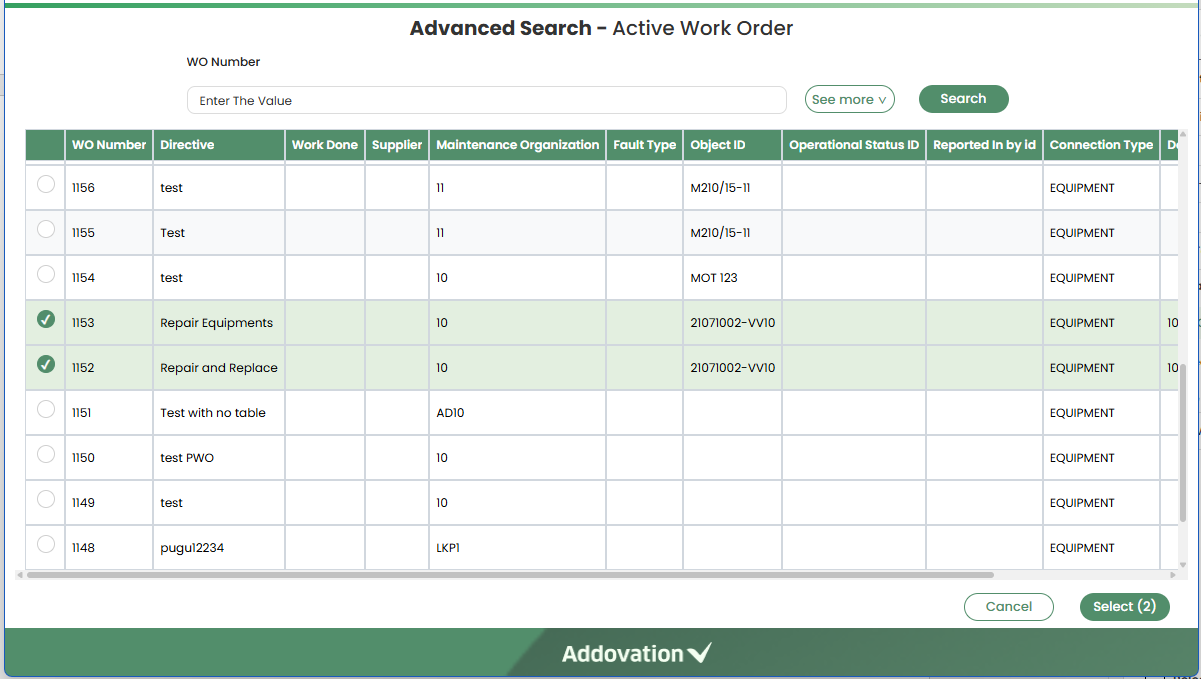
- If no matching results are found for the entered filter criteria, an error message will prompt, stating that no results were found.
After selecting the required objects, users can proceed by selecting the
Selectbutton, which will only be enabled if any objects were selected from the search results.The selected objects will be moved to
Selectedtab, and the red dot notification will be appeared.Users have the option to close the window using the
Cancelbutton if needed.
Note
The document can be checked-in without an object connection. However, in some situations, the object connection is required. If the object connection is required, a message will be displayed inside the object connection section stating "Object Connection(s) required" and the Check-in button will remain disabled until an object is selected.
Release Document(s)
To release the document during check-in, users must select the
Release Document(s)checkbox.It is possible to proceed with check-in without selecting the
Release Document(s)checkbox. If the checkbox is not selected, the document will be checked into IFS without being released.
.png)
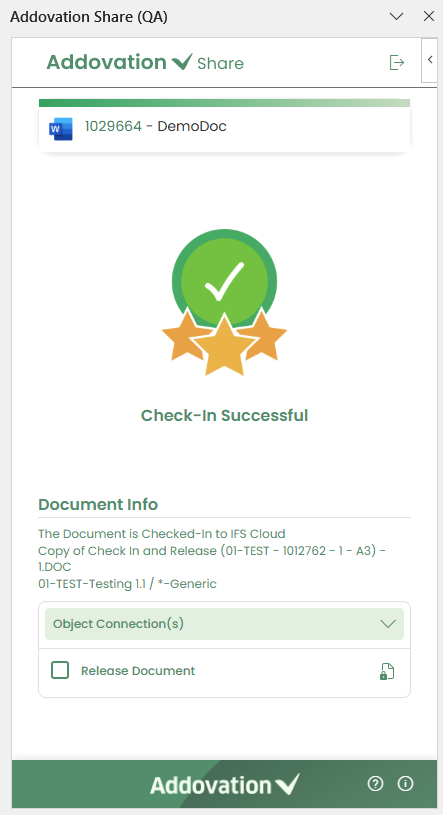
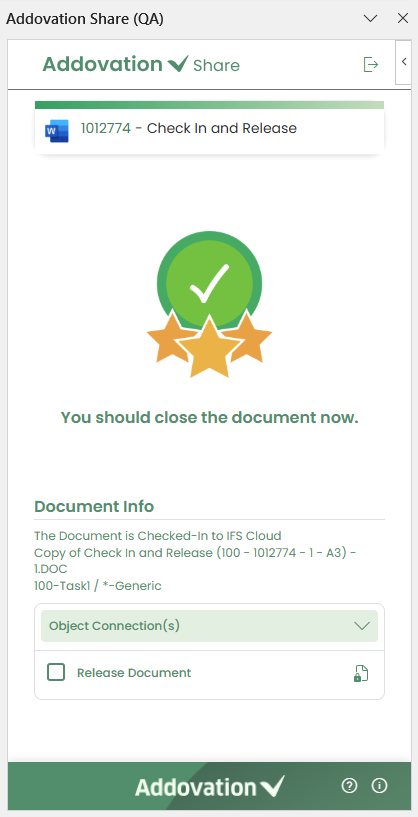
Finish Check-In
After all required details are entered, selecting
Check Inbegins the check-in process.The document is then checked into IFS, and the user is redirected to the
Document Infointerface.At the top of the screen, the newly assigned
IFS Document Numberappears as a clickable link.Selecting this link opens the
Document Revisionpage in IFS, where users can view all information related to the newly created document revision.A confirmation message,
Document checked in successfully, is displayed, followed by a prompt statingYou should close the document now.
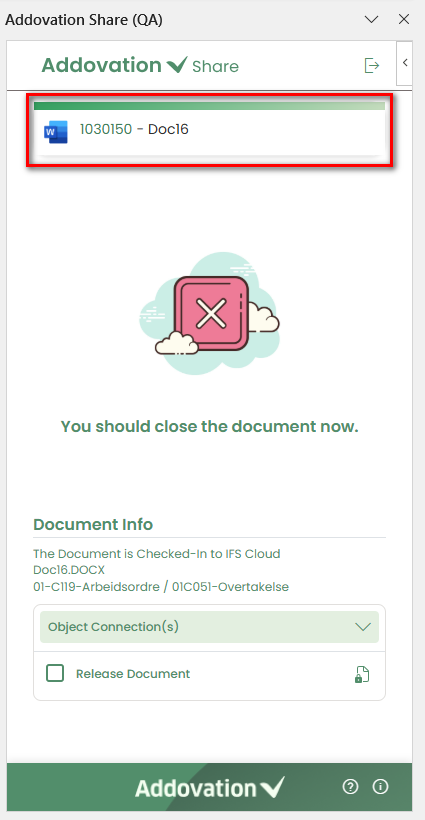
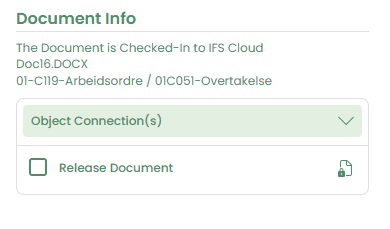
Below the confirmation message, the
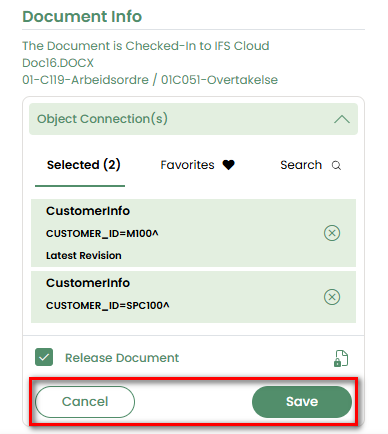
Document Infosection becomes available.It displays key details including
Document Status,Document Title,Class – Class Description, andFormat – Format Description.The
Object Connectionsection can also be expanded, allowing users to add new object connections or remove existing ones, even after the check-in process is complete.The
Release Documentcheckbox remains enabled, giving users the option to release the document after it has been checked in.
- If the user makes any changes to the
Object Connectionssection or updates theRelease Documentstatus, theSaveandCanceloptions will appear. The user can then save these configurations or discard the changes for the current document revision.
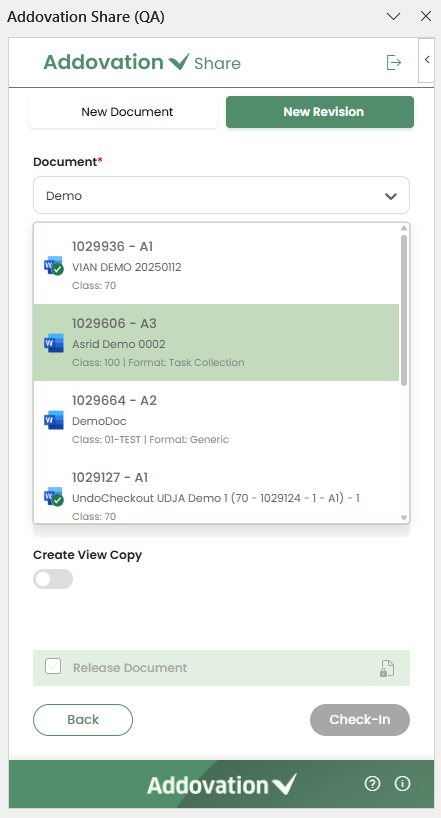
Check-in as a New Revision
- If the user selects to check in the document as a
New Revisioninstead of aNew Documentfrom the tab selection, they will be directed to the following screen.
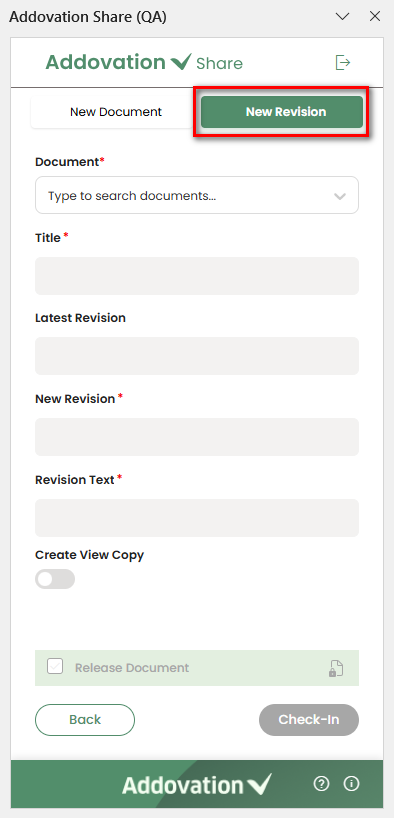
Basic Details
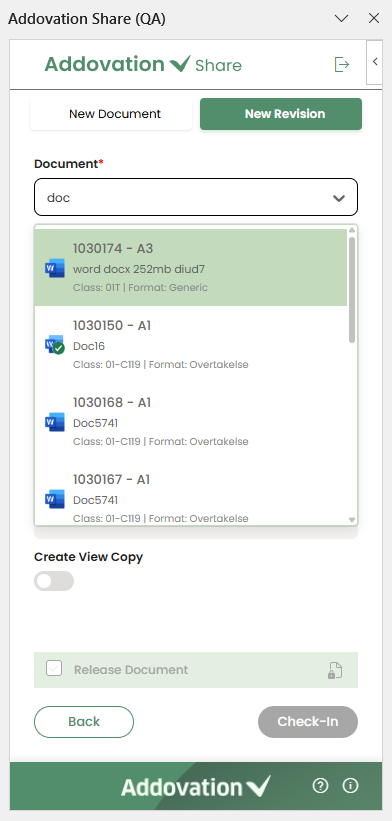
In this screen, only the
Documentdropdown is enabled by default. Users can search this dropdown for documents that are already checked into IFS.The user can then select a document from the list to check in the current document as a new revision of the selected document.
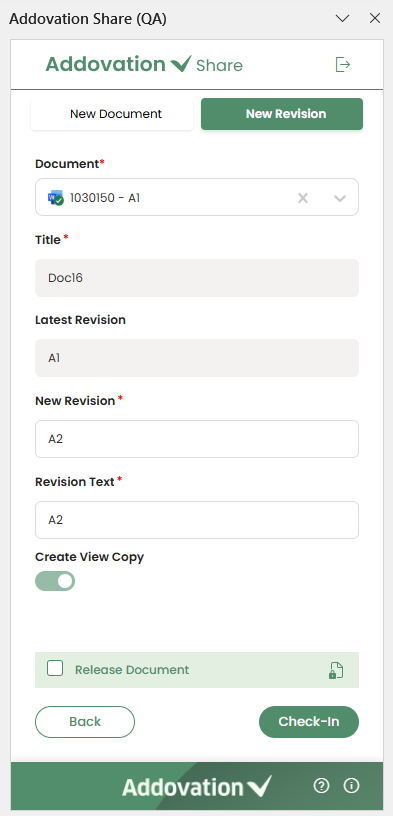
Once a document is selected, the fields
Title,Latest Revision,New Revision, andRevision Textare populated automatically based on the selected document.The
New RevisionandRevision Textfields can be edited if needed.The
Create View Copyoption may be selected or deselected depending on the selected document, but it is disabled for editing.The
Release Documentoption can be selected according to the user’s requirement.
Finish Check-In
Finally, the document can be checked in as a new revision of the selected document by clicking the
Check Inbutton.As in the previous scenario, the document is then checked into IFS, and the user is redirected to the
Document Infointerface.The
IFS Document Numberis displayed as a clickable link, and a confirmation message along with the document information appears, just as before.The
Object Connectionsection andRelease Documentoption remain editable, allowing the user to make changes and save them even after the document has been checked in.
Check in a document that has an IFS Document Number and is already checked in
If a user searches for an existing IFS document that is not currently checked out and chooses to view it, edit, and check it in, the
Document Infosection on the landing page will display the document’s checked-in status, title, class and class description, and format and format description.The section will also include the
Object Connectionsarea.When the Object Connections section is expanded, it will show the connected objects but remain
read-onlyand cannot be edited.The user should then select the
Check Inoption on the landing page to initiate the check-in process.
- Two tabs are available on the next screen:
New DocumentandNew Revision. TheNew Documenttab is selected by default.
Check-in as a New Document
- After making changes to the document, the user can proceed to check it in as a new document using this flow.
Basic Details
The
Document Titleis automatically detected and displayed at the top of the pane. The user may edit this title if needed.ClassandFormatare also auto filled based on the Document Title but can be modified by the user.The
Create View Copyoption may be preselected or disabled depending on the chosen class. If the user changes the class or format, the Create View Copy behavior will update accordingly, as previously described.The
Object Connectionssection can be expanded and is enabled for interaction.The
Selected,Favorites, andSearchtabs function in the same way as previously explained.The
Release Documentoption can be selected according to the user’s requirement.
Finish Check-In
Finally, the document can be checked in as a new document by clicking the
Check Inbutton.As in the previous scenario, the document is then checked into IFS, and the user is redirected to the
Document Infointerface.The
IFS Document Numberis displayed as a clickable link, and a confirmation message along with the document information appears, just as before.The
Object Connectionsection andRelease Documentoption remaineditable, allowing the user to make changes and save them even after the document has been checked in.
Check-in as a New Revision
- After editing the document, if the user chooses to check it in as a
New Revision, they will be taken to the following screen.

Basic Details
Similar to the previously described Check-In as a New Revision flow, the
Documentdropdown is enabled by default.Users can search this dropdown for documents that are already checked into IFS and choose to check in the current document as a new revision of the selected document.
- Once a document is selected, all remaining fields and options function the same way as in the previously described
Check-In as a New Revisionflow, including the behavior of theTitleandRevision fields, theCreate View Copyoption, and theRelease Documentoption.
Finish Check-In
The final steps in this flow are the same as those described in the previous Check-In as a New Revision process.
After clicking
Check In, the document is checked into IFS and the user is redirected to theDocument Infointerface.The
IFS Document Numberappears as a clickable link along with a confirmation message, and both theObject Connectionssection and theRelease Documentoption remaineditableafter check-in.
Check-in a document that has an IFS Document Number and is currently checked out
When you check out a document for editing and open the add-in to check it back in under the same revision, the landing page will look slightly different from previous flows.
The
Check Inbutton will be shown asCheck-in Existing, since the document is already checked out by the user.The
Document Infosection will display the document’schecked-out status,title,classwith itsdescription, andformatwith itsdescription.
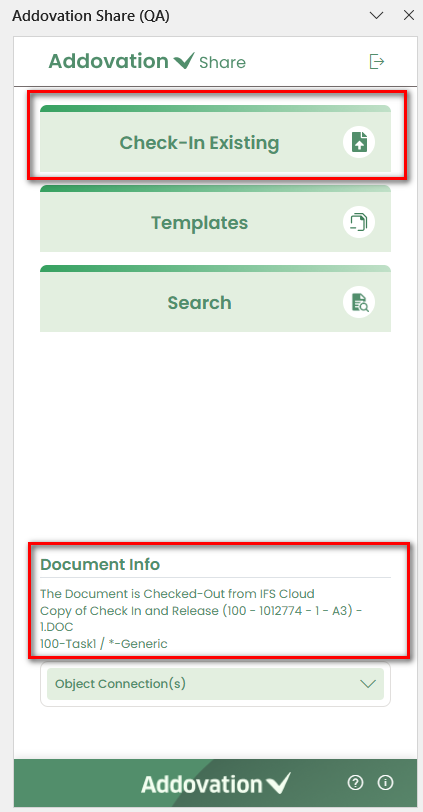
The
Object Connectionsarea will be available on the landing page.When expanded, the
Object Connectionssection becomeseditabledirectly from the landing page.The user can
addnew object connections orremoveexisting ones from here.
Clicking
Check-in Existingwill check the document back into IFS under thesame revision number.The user will then be redirected directly to the
Document Info screenwithout any intermediate steps.This screen behaves the same as in the previous flows: a
confirmation messageis shown, theIFS Document Numberappears as a clickable link, and both theObject Connectionssection and theRelease Documentoption remain editable after check-in.
Templates
- To search for and create documents using templates, the user can click on the
Templatesoption on the landing page.
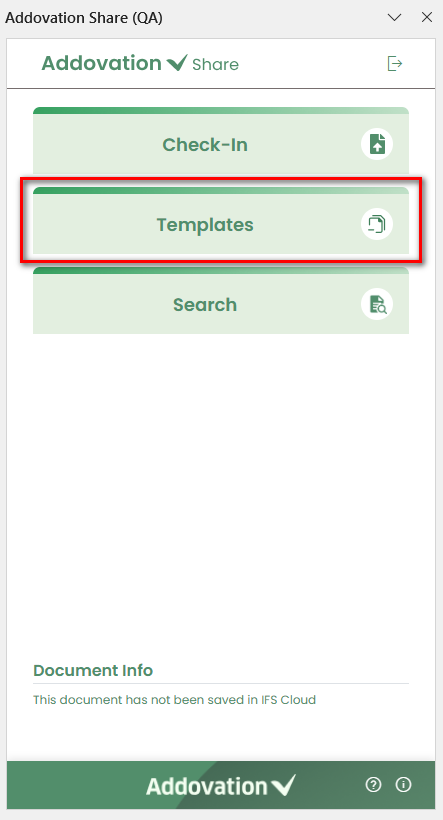
- This will navigate the user to a new screen where templates can be searched and related actions can be performed.
List of Templates
The screen includes a language selection dropdown positioned at the top, allowing the user to select a preferred language for searching templates.
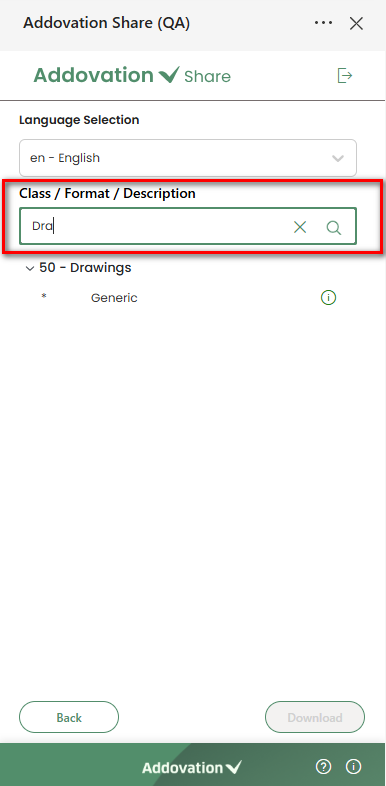
Englishis selected by default.Below the dropdown, a search bar is provided where the user can enter a
Class,Format, orFormat Descriptionto search for templates.
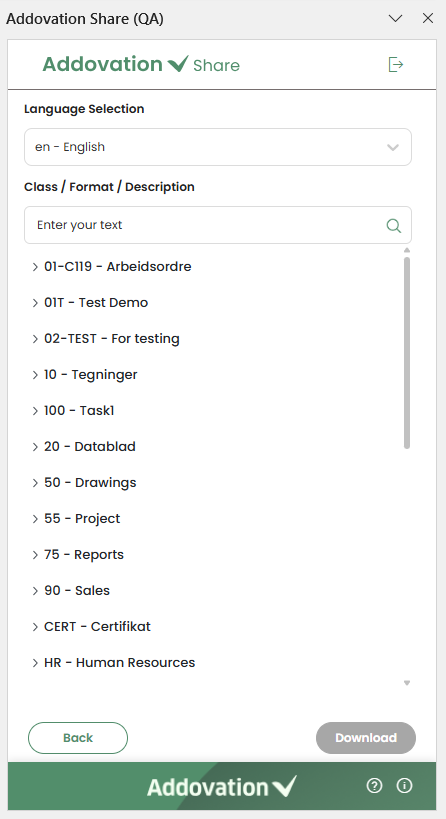
- The list will automatically filter based on the entered criteria. Once the user starts typing, a
Clearoption will appear, allowing the user to remove the search text.
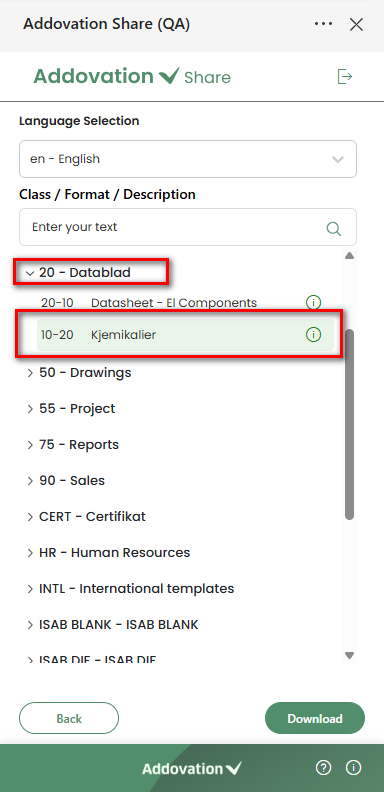
Templates are displayed below the search bar, grouped by
class.Each class section can be expanded or collapsed by the user. When expanded, the list of templates under that class will be shown.
Each template entry will display the following information:
- File type icon
- Format and Format Description
- Option to view more details (information icon).
When the user hovers over the
file typeicon, a tooltip appears showing additional details about the template.
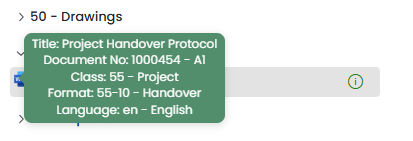
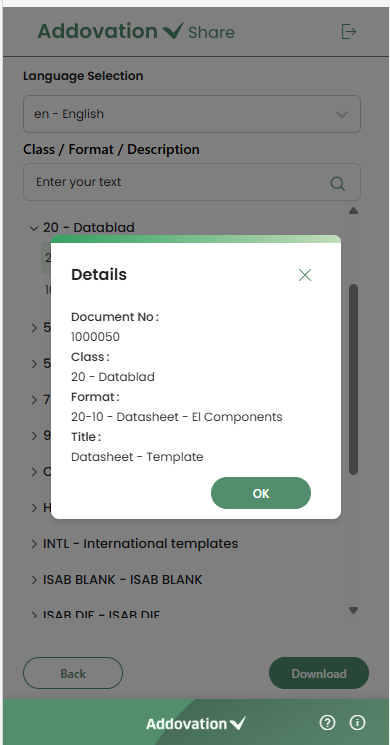
Clicking the
informationicon will open a detail pop-up showing more information about the selected template. The following details will be displayed in the pop-up:- Document Number
- Class/ Class Description
- Format/ Format Description
- Title
- When the user clicks on a record, it becomes
highlighted, and theDownload buttonis enabled. Only one template can be downloaded at a time.
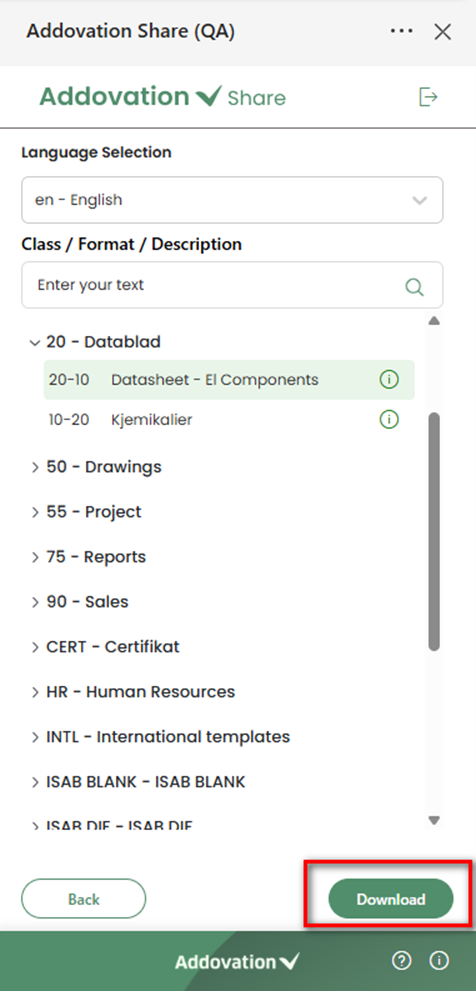
- Once a template is selected and the Download button is clicked, a pop-up window will appear displaying the
Document Titleand two available options.

Available options in the pop-up are as below.
Download to Local: Selecting this option saves the template to theuser’s computer. The user can then open it and create a new document based on the template.Open in OneDrive: Selecting this option opens the template directly inOneDrivefor immediate use.
In either case, the user can create their own document using the template and check it back into IFS using the add-in if needed.
The user can close this window by clicking the
Cancelbutton.
Searching
- This feature allows users to search for documents in IFS Cloud. To begin, the user can click on the
Searchoption on the landing page.
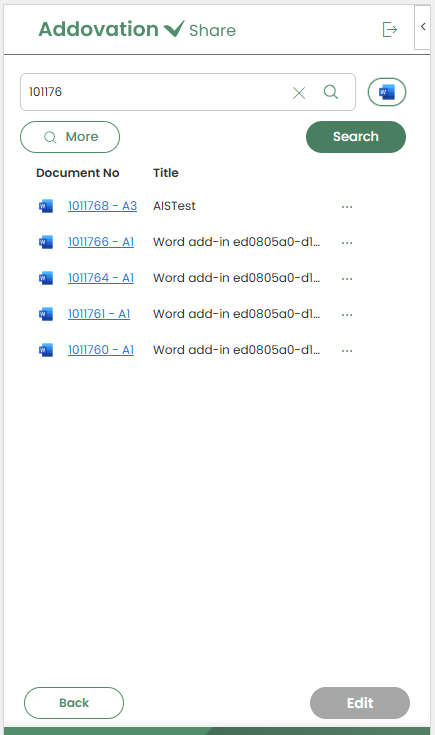
Basic Search
- Selecting
Searchwill navigate the user to a new screen where basic search functionality is available.
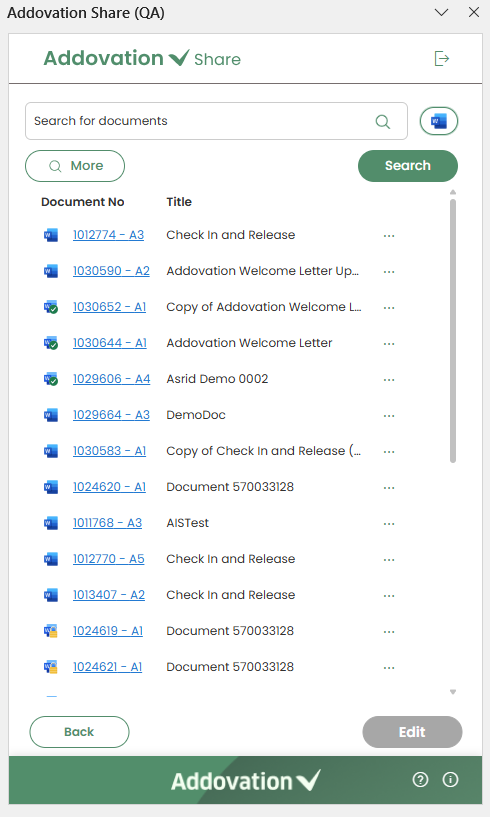
At the top of the screen, a search field will be displayed along with two buttons:
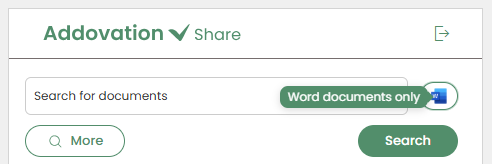
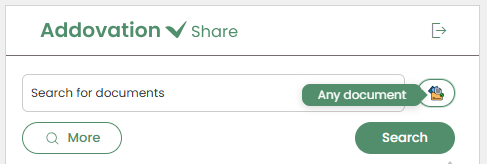
MoreandSearch.The small button with the
Word iconnext to the search field filters the search results byfile type.By default, it is set to
Word Documents Only.Clicking the button switches it to
Any Documents, allowing all document types (not just Word files) to appear in the search results.
At the bottom of the screen, two additional buttons are available:
BackandEdit.The functions of the
Search,More, andEditbuttons will be described in the following sections.Clicking the
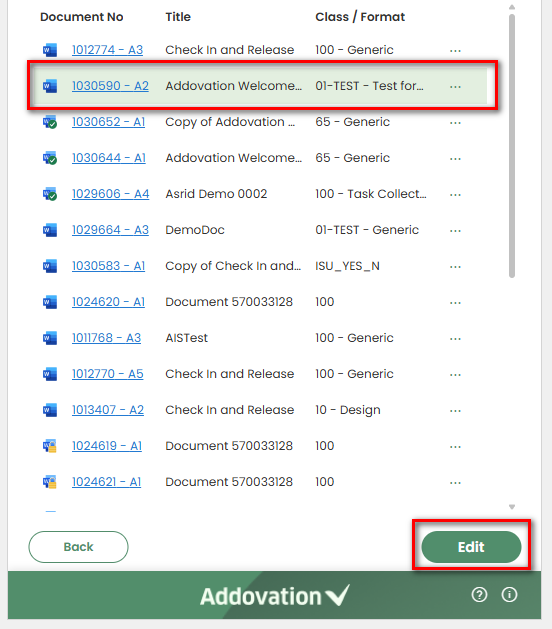
Backbutton will return the user to the Share Add-in home page.Below these controls, a list of up to 25 documents is displayed, sorted by the last action. Each document shows the following details:
- A relevant file type icon
- Document Number with link to IFS Document Revision page
- Title
- Class/Format
- A three-dots icon to access additional actions
When the add-in window is resized to a smaller width, the
Class/Formatcolumn will be hidden to optimize space.Only one document can be selected at a time. Once selected, the document is highlighted, and the
Editoption becomes available.
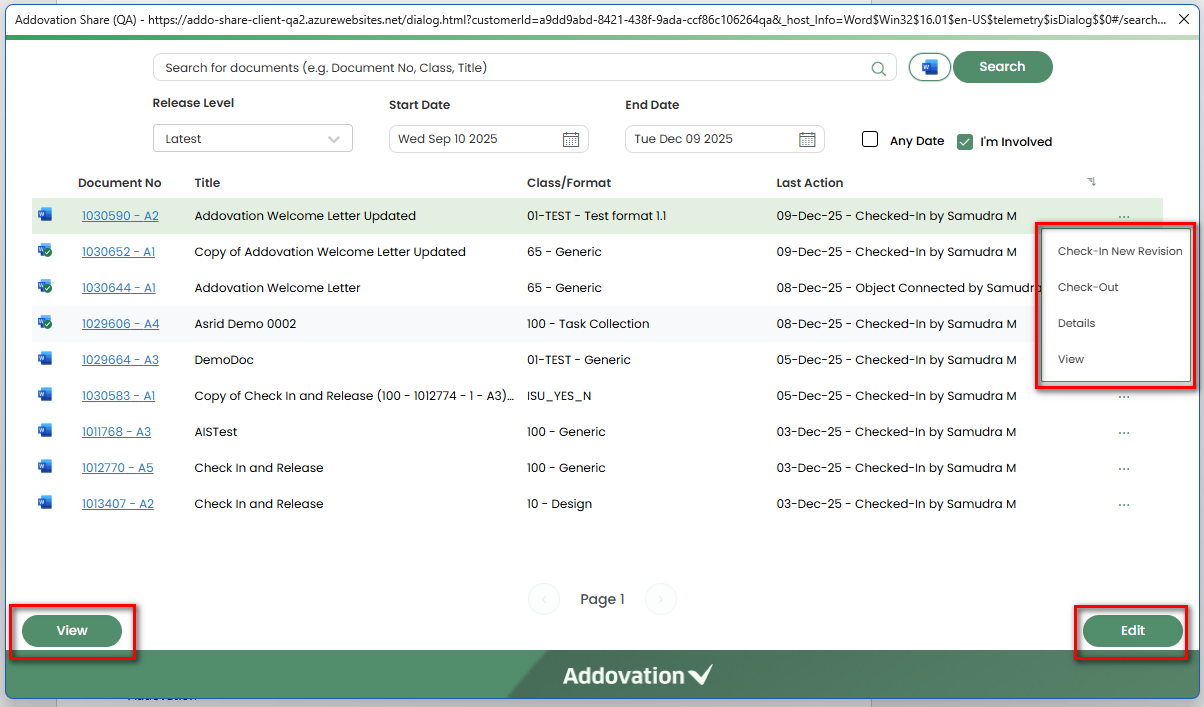
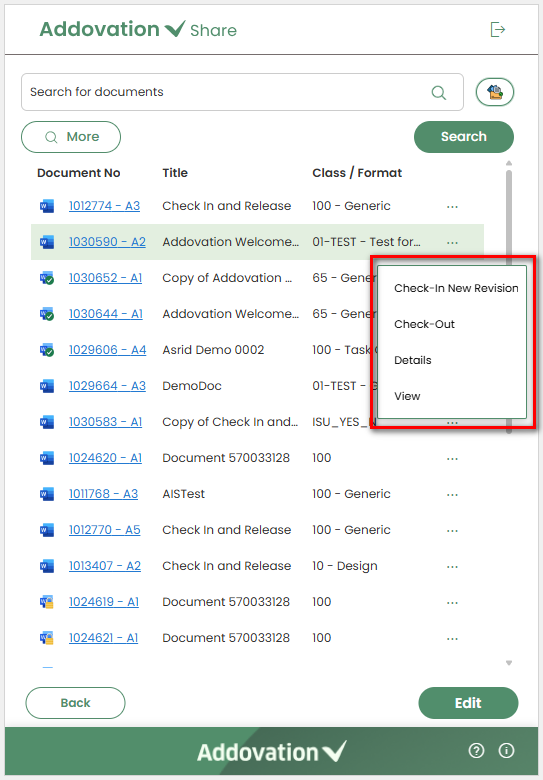
Menu Options
When the user clicks the three dots button next to a document (right corner of the record), a menu will appear with the following options:
- Check In New Revision
- Check Out
- Details
- View
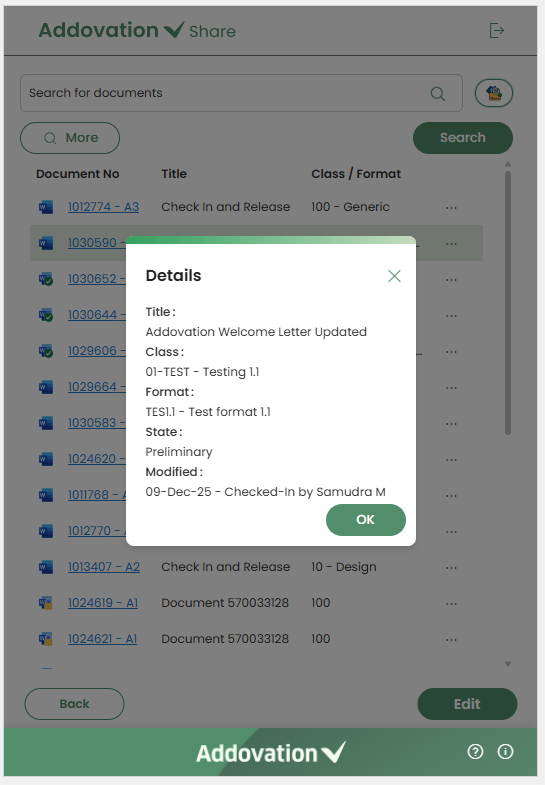
If the user selects
Detailsoption from the menu, a pop-up window will appear displaying the following document information:- Title
- Document Class ID and Description
- Document Format ID and Description
- State
- Last Modified Details
If the user selects
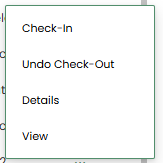
Check In New Revisionfrom the options menu, a new revision of the document is created. The existing document in the list is replaced with this new revision, while the previous revision remains accessible in IFS if required. This option is disabled for documents that are currentlychecked out.If the user selects
Check-Out, the document will be checked out from IFS. Once checked out, the menu label will change toUndo Check-Out, allowing the user to revert the action if needed.The
Check-Outoption is only available for preliminary documents that are not already checked out.
If the user selects
View, the document will be downloaded without being checked out from IFS and automatically opened in the respective application (Word/Excel/PowerPoint).If a view copy exists for the document, the PDF version of the view copy will be downloaded instead.
Search Documents
The user can enter search criteria in the search field (basic search) and initiate the search by clicking the
Searchbutton.- Up to
25 matching recordswill be displayed, sorted by the last action. - The user can clear the search criteria by clicking the
xicon inside the search field. This action will reset the document list to its default view.
- Up to
Edit Documents
The
Editbutton remains disabled until a document is selected.When clicked, the document is
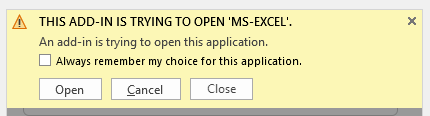
checked outfrom IFS,downloaded, andautomatically openedin the respective application (Word/Excel/PowerPoint). If the user is editing for the first time, a pop-up will appear asking whether they want to open the document and if the choice should be remembered for that application.
- This option is only available for preliminary documents that are not already checked out.
Advanced Search
when the user clicks the
Morebutton, the Advanced Search window will open with additional filter options.The
file typefilter is also available in the Advanced Search window, located next to the search bar.
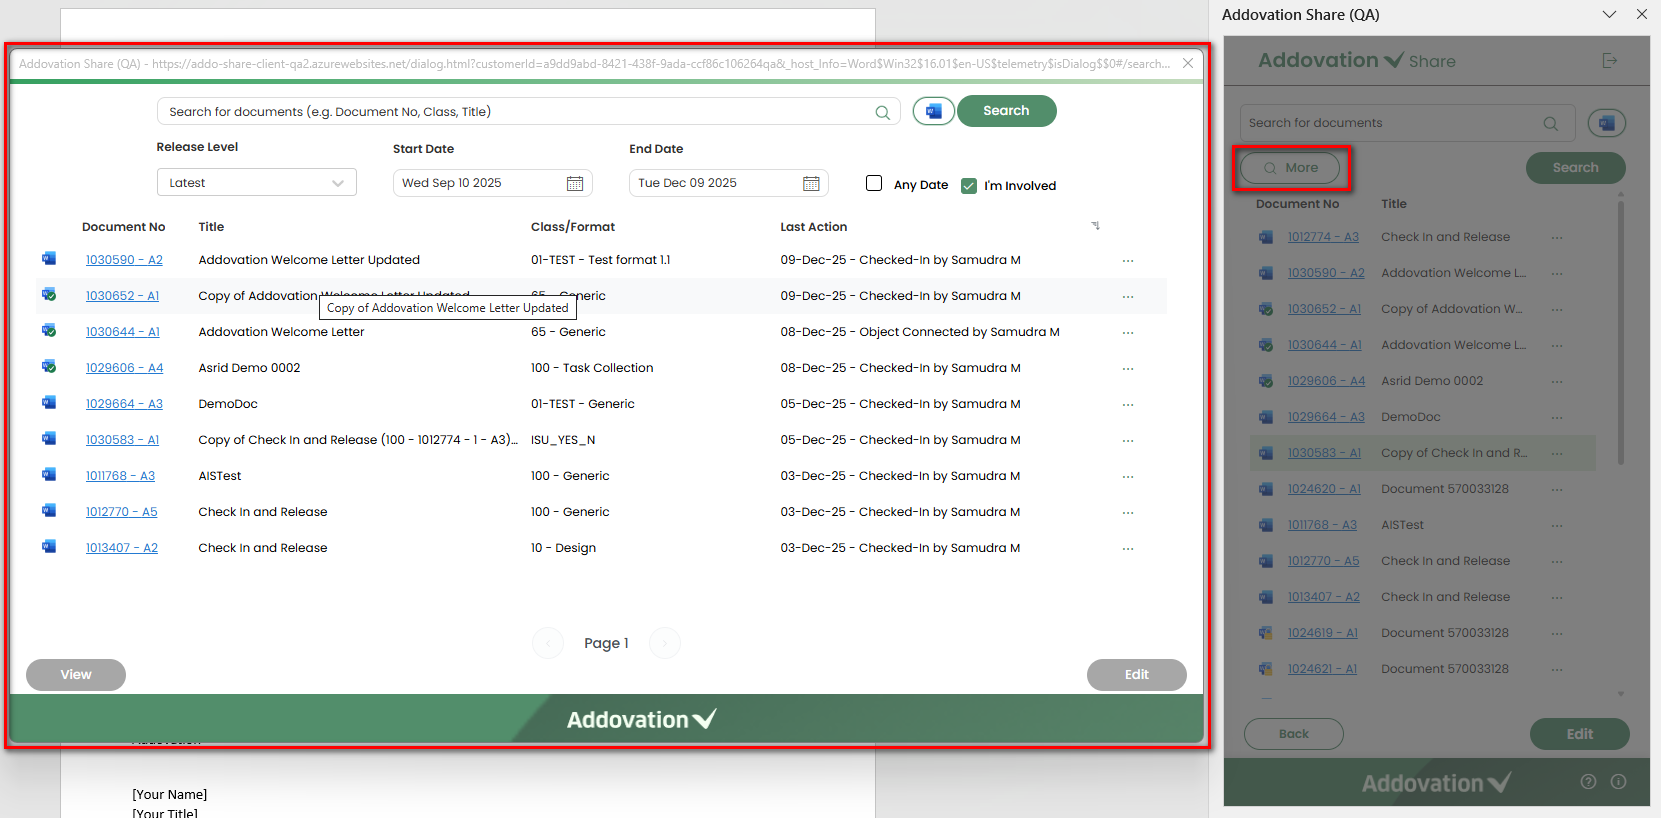
Release Level: A dropdown with the following options: All, Latest (default), and Latest Released.
Date Range: Two date pickers for Start Date and End Date, with the default range set to the last 90 days
Checkboxes:
- Any Date
- I'm Involved
By default, the list displays records that match the filters selected by default (Release Level: Latest, Date Range: Last 90 Days), with pagination applied.
Search Behavior
The
Searchbutton remains enabled, allowing the user to run a search at any time by entering search criteria in the search field and adjusting filters as needed.The matching search results are displayed with pagination. The user can clear the search by clicking the
xicon in the search field.Each record in the result set displays the following details:
- A relevant file type icon
- Document Number with link to IFS Document Revision page
- Title
- Class/Format
- Last Action
- A three-dots icon to access additional menu options
Options in the menu function the same as explained under basic search.
EditandViewoptions are also available as buttons at the bottom of the window for the user’s convenience.The Advanced Search window can be closed by clicking the
xin the top-right corner.