Addovation Share for Teams - User Guide
Last Updated: 2026-04-10
Introduction
The Addovation Share Teams Integration Solution allows users to upload documents to IFS, retrieve them when needed, and perform check-in and check-out operations within the IFS Application.
The solution includes:
- Filter channels by customer
- Search and filter documents from file type (IFS documents and OneDrive documents)
- Check-in documents
- Check-in documents as new revisions
- Check-in documents as existing revisions
- Download IFS documents
- Check-out documents
- Undo check-out
- Preview documents in teams
- View IFS documents in aurena
- Open OneDrive documents in browser
- Download OneDrive documents
- View document details
The User Guide is envisioned to assist individuals utilizing the Share Teams Integration Solution.
Sign in to Share Teams Integration
To use Share Document Management, users must have an IFS User ID linked to their Microsoft 365 account with the required permissions.
Open
Microsoft Teamsand log in to your account.Enter your email address as the username.
Enter your password.
Click the
Sign inbutton to proceed.
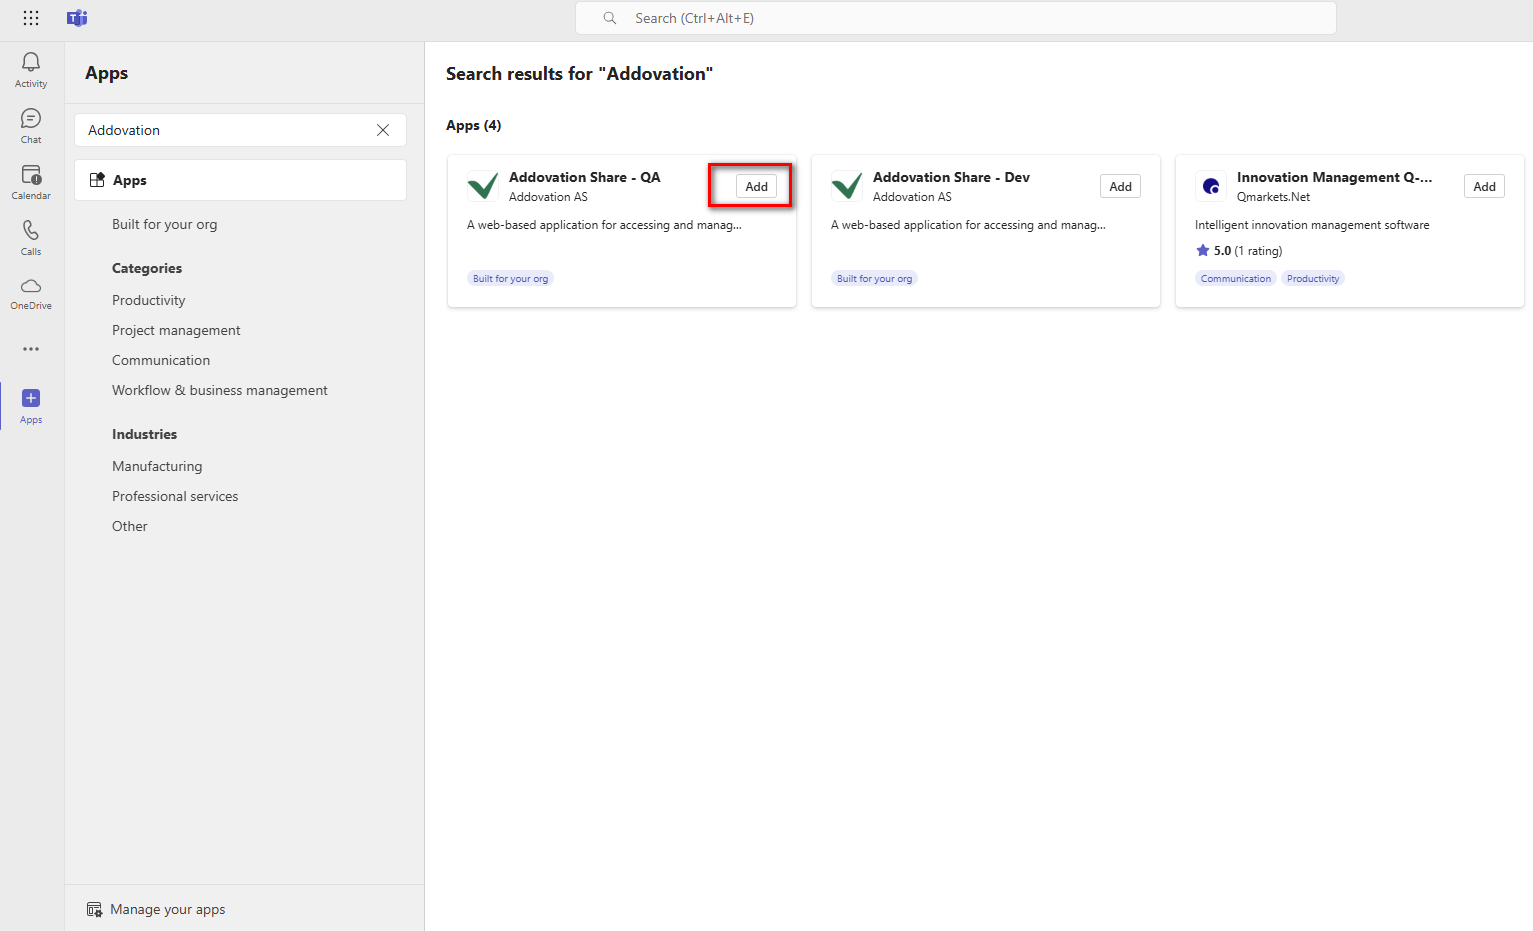
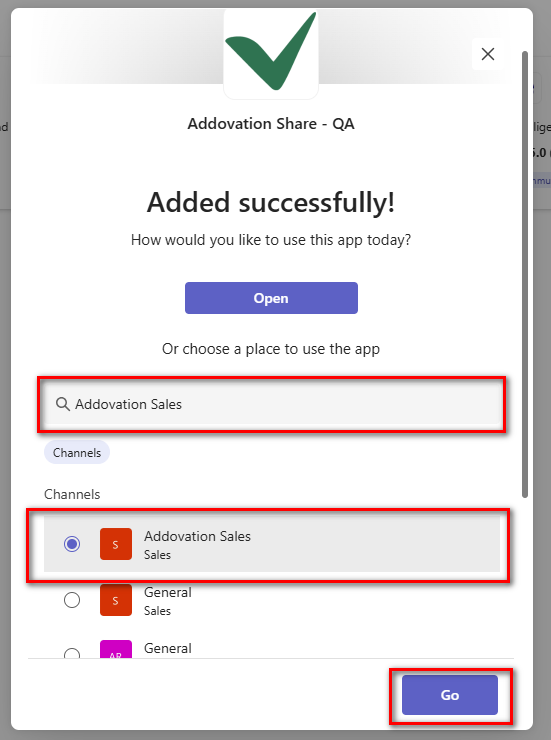
App Installation
In the left sidebar, click on the
Appsicon. It may look like a grid of dots or be labeled asApps.In the Apps section, browse through the featured apps or use the search bar to find the
Teams Channel App.
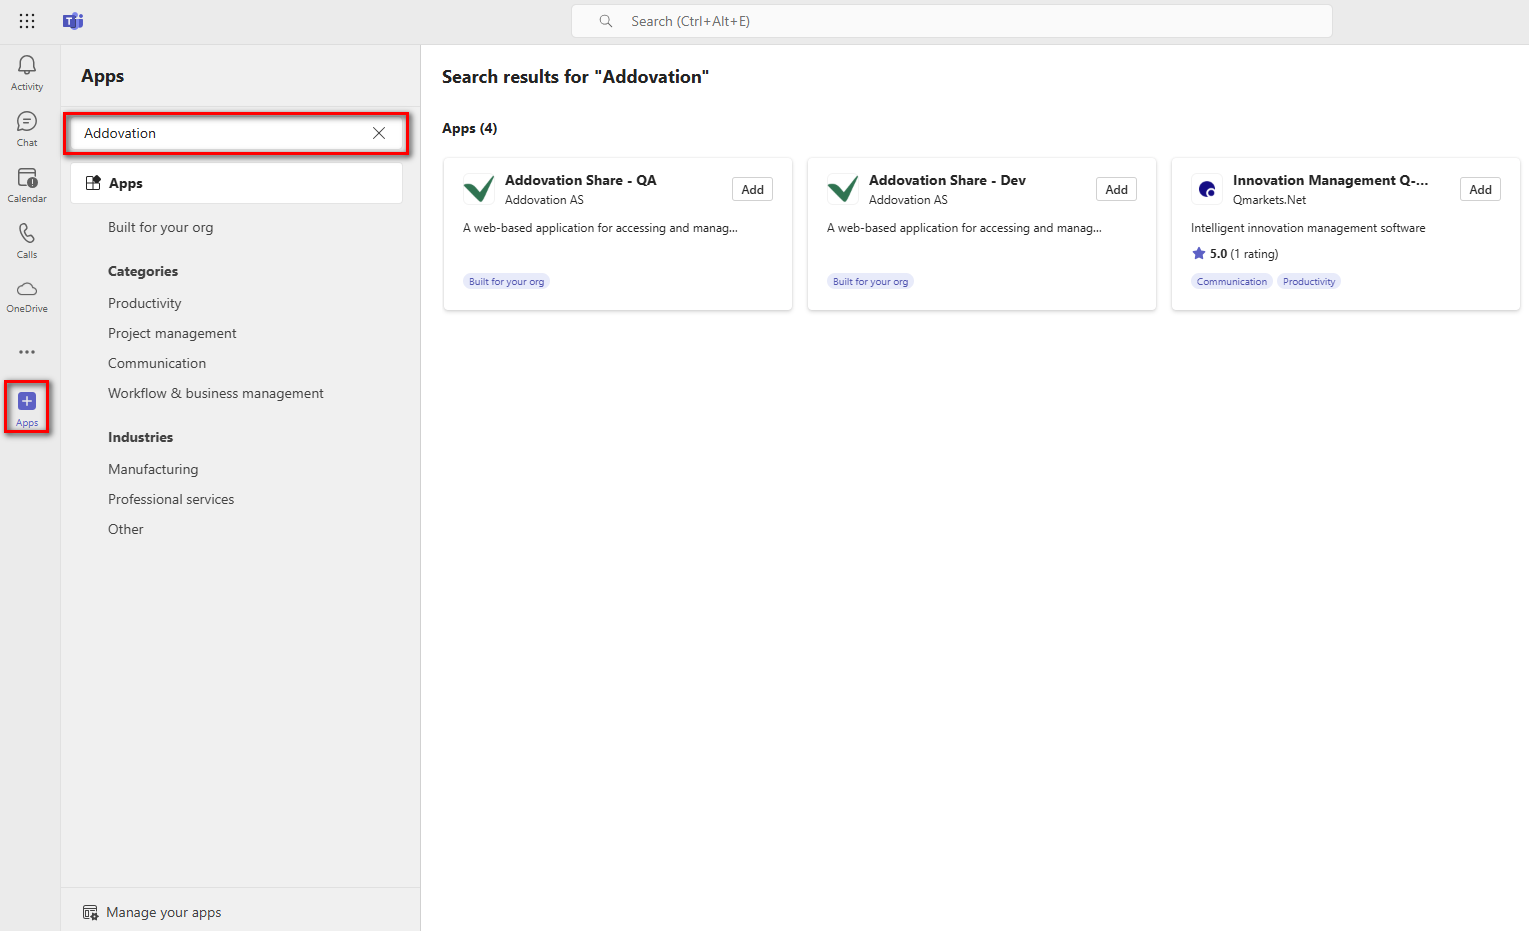
- Click the Add button.
This will open the
Addovation Sharewindow.In the window, select the
Addoption.
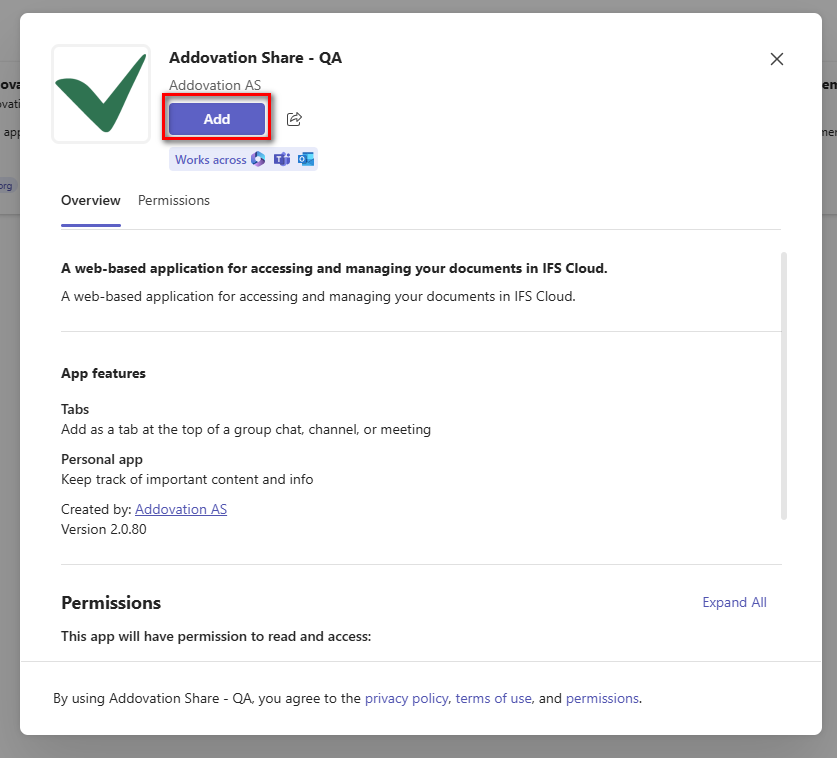
You will now be prompted to select a channel to use the app. Choose a channel from the list or use the search bar to find a specific one.
After selecting your channel, click Go option.
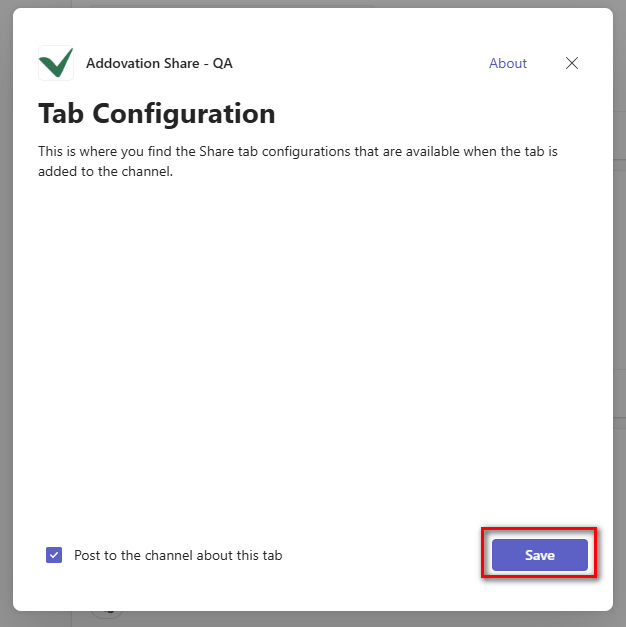
then click Save.
- You will be directed to the Teams Channel App.
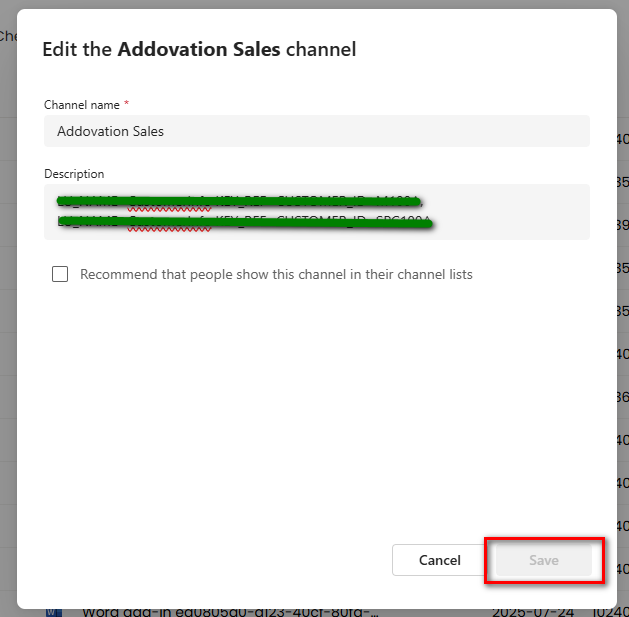
Add or Update a Channel Filter
Click the three dots (...) next to the channel name.
From the dropdown menu, select
Edit Channel.
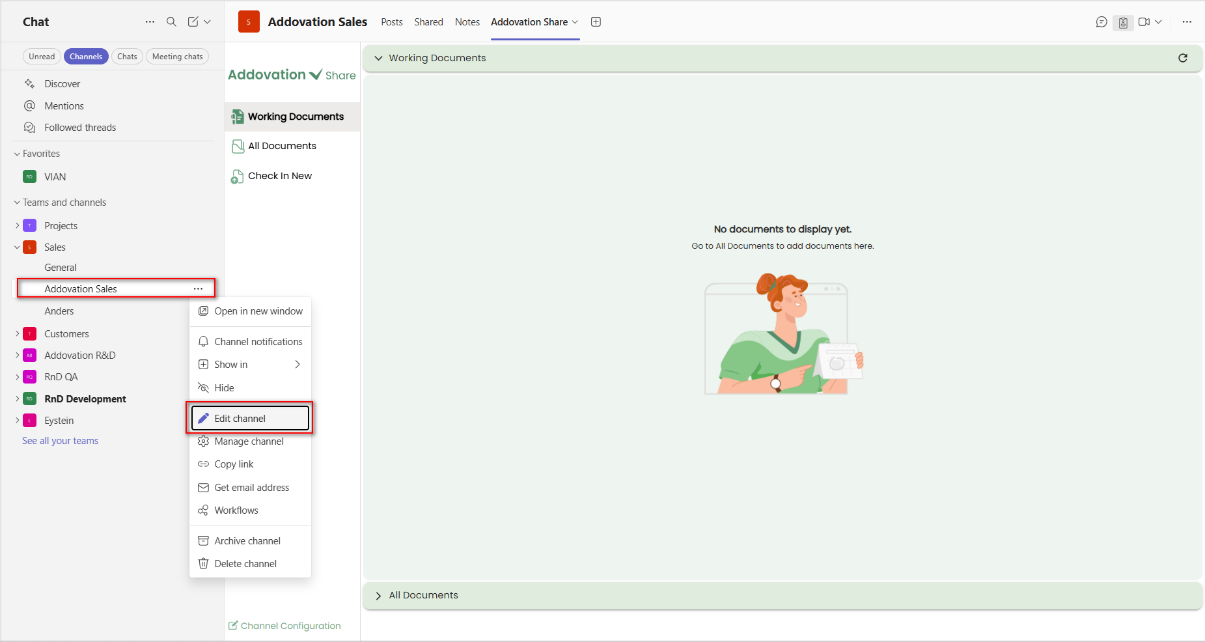
- A new window will appear where you can add or update the channel filter based on the customer. After making the necessary changes, click
Saveto apply the filter.
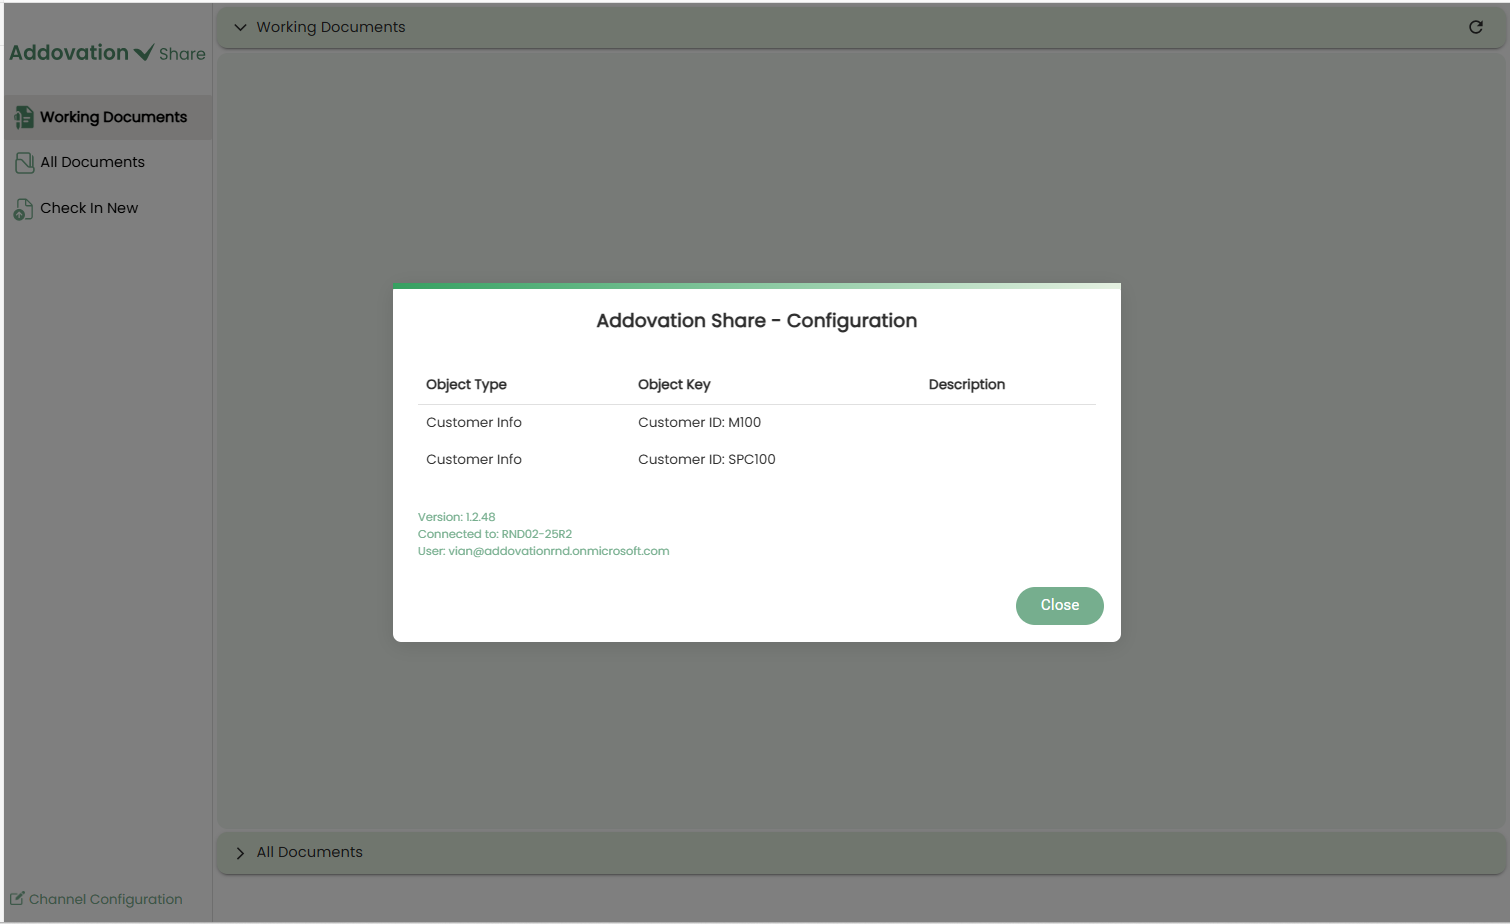
- You can view existing channel configurations by selecting
Channel Configurationfrom the bottom of the navigation bar.
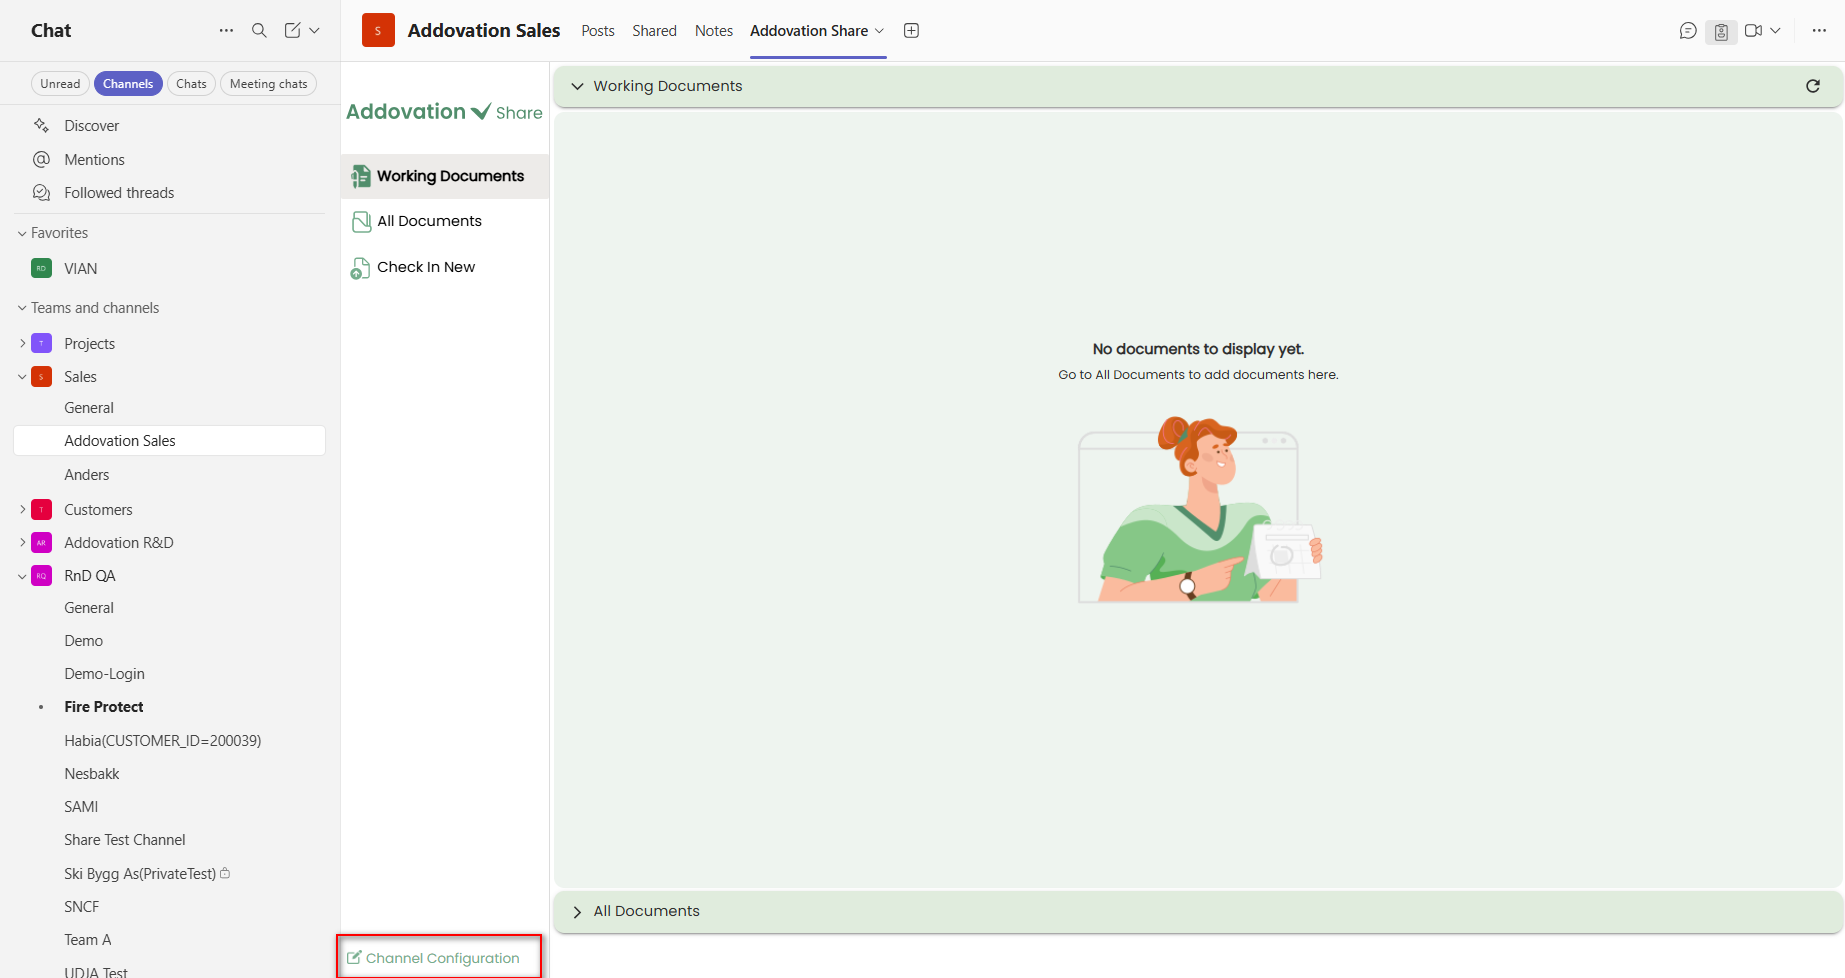
When you click this option, a new window will open displaying the objects connected to the selected channel, along with the following details:
- Application Version
- Connected Environment
- Logged-in User
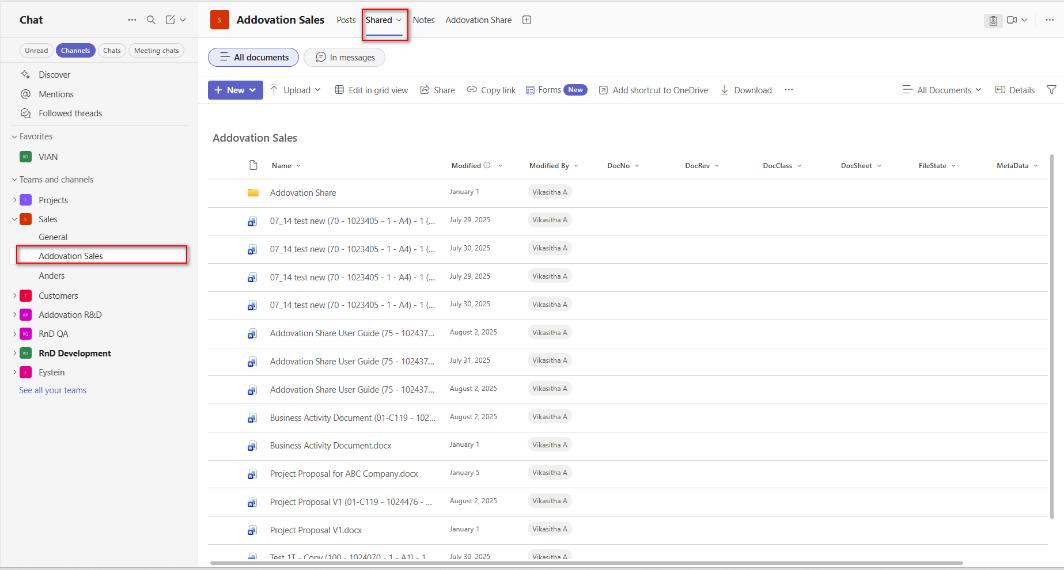
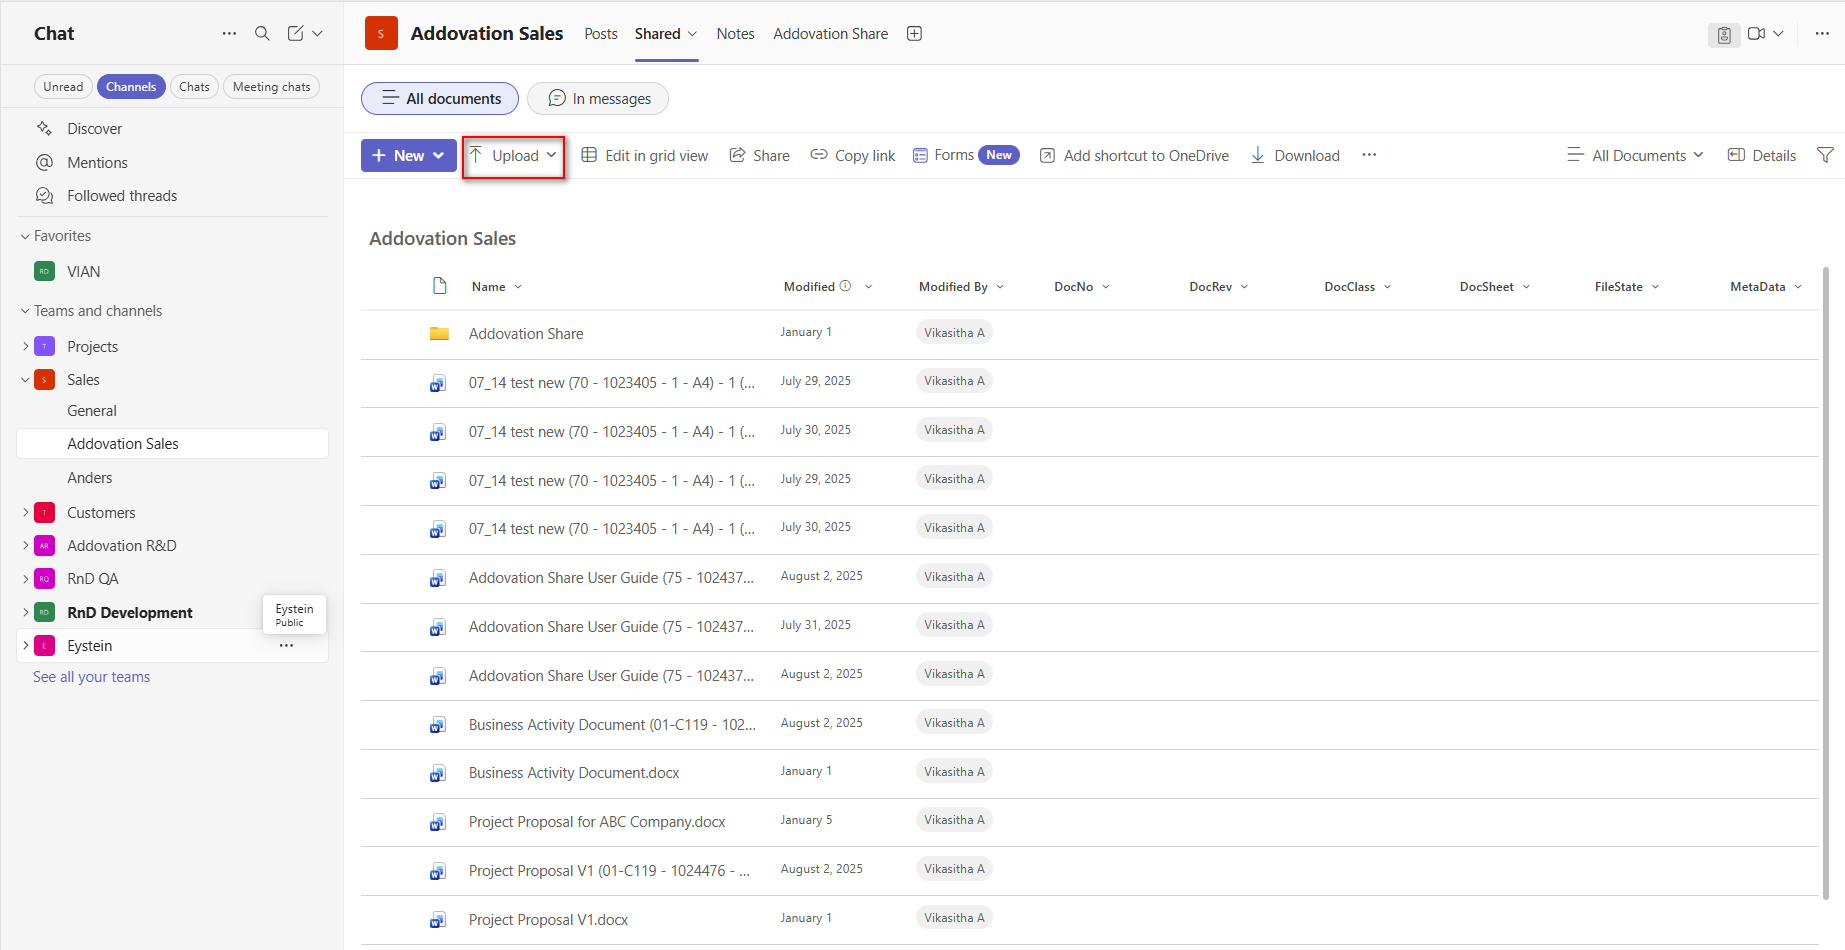
Upload Documents to OneDrive
In the
Teamstab, select the customer channel where the Addovation Share is installed.Click on the
Sharedtab within the channel.
Use the
Uploadoption to add documents to OneDrive. You can upload either individual files or entire folders.If a folder is uploaded, the relevant files within that folder will appear under the
Check In Newtab of the Share application.Once you start using the Share application and download or check out documents through it, a new folder named
Addovation Sharewill be automatically created within this tab.
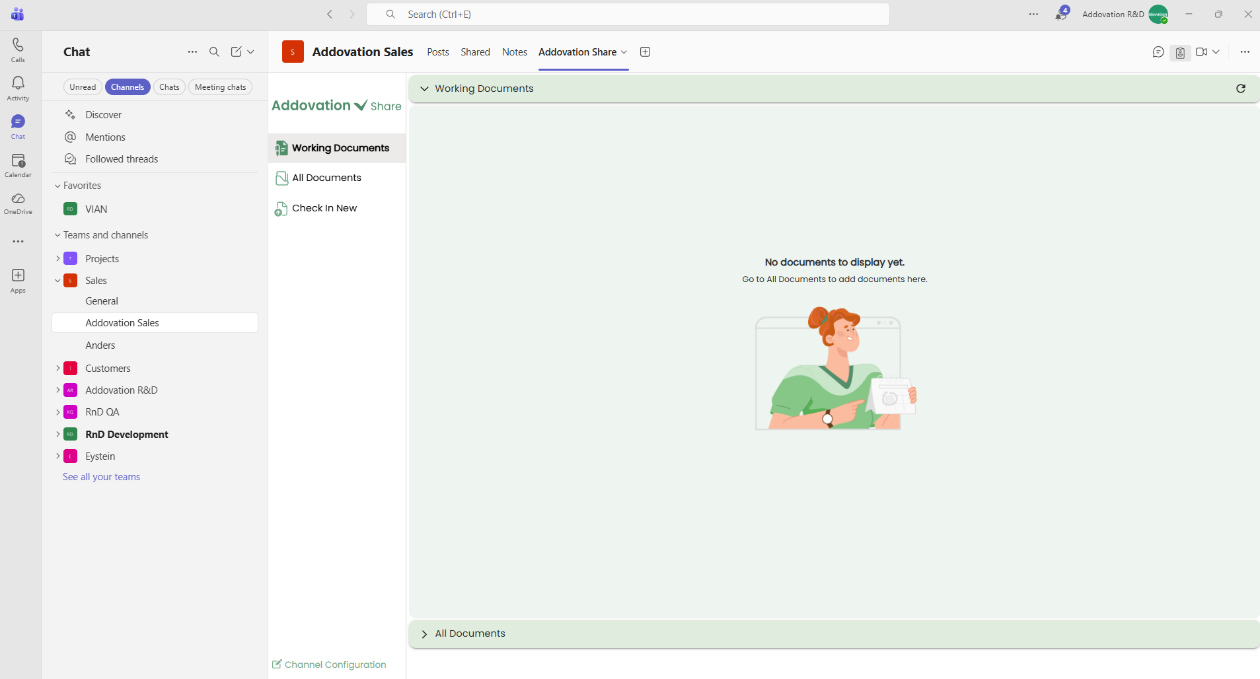
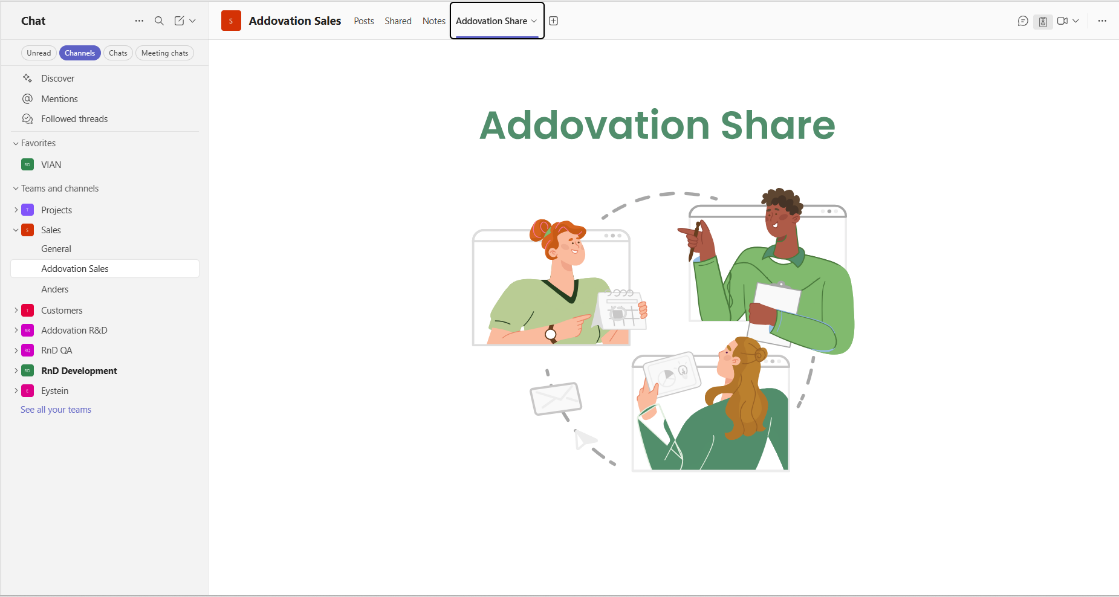
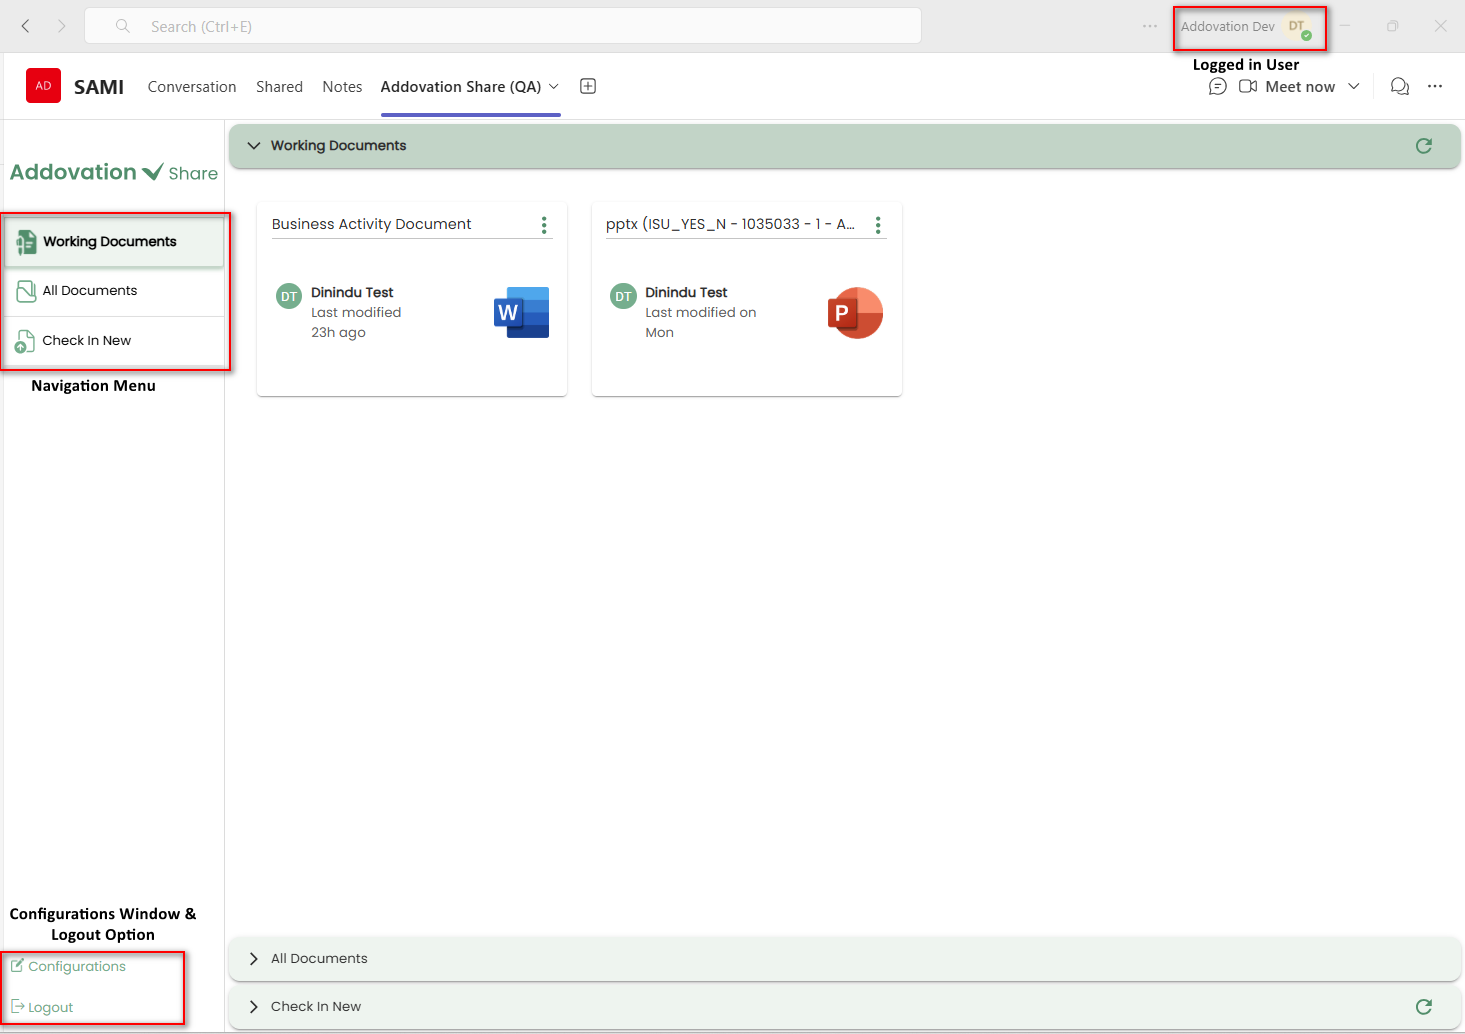
Addovation Share Landing Page
- To access the Share landing page, click on the Share tab. The splash screen below will appear first.
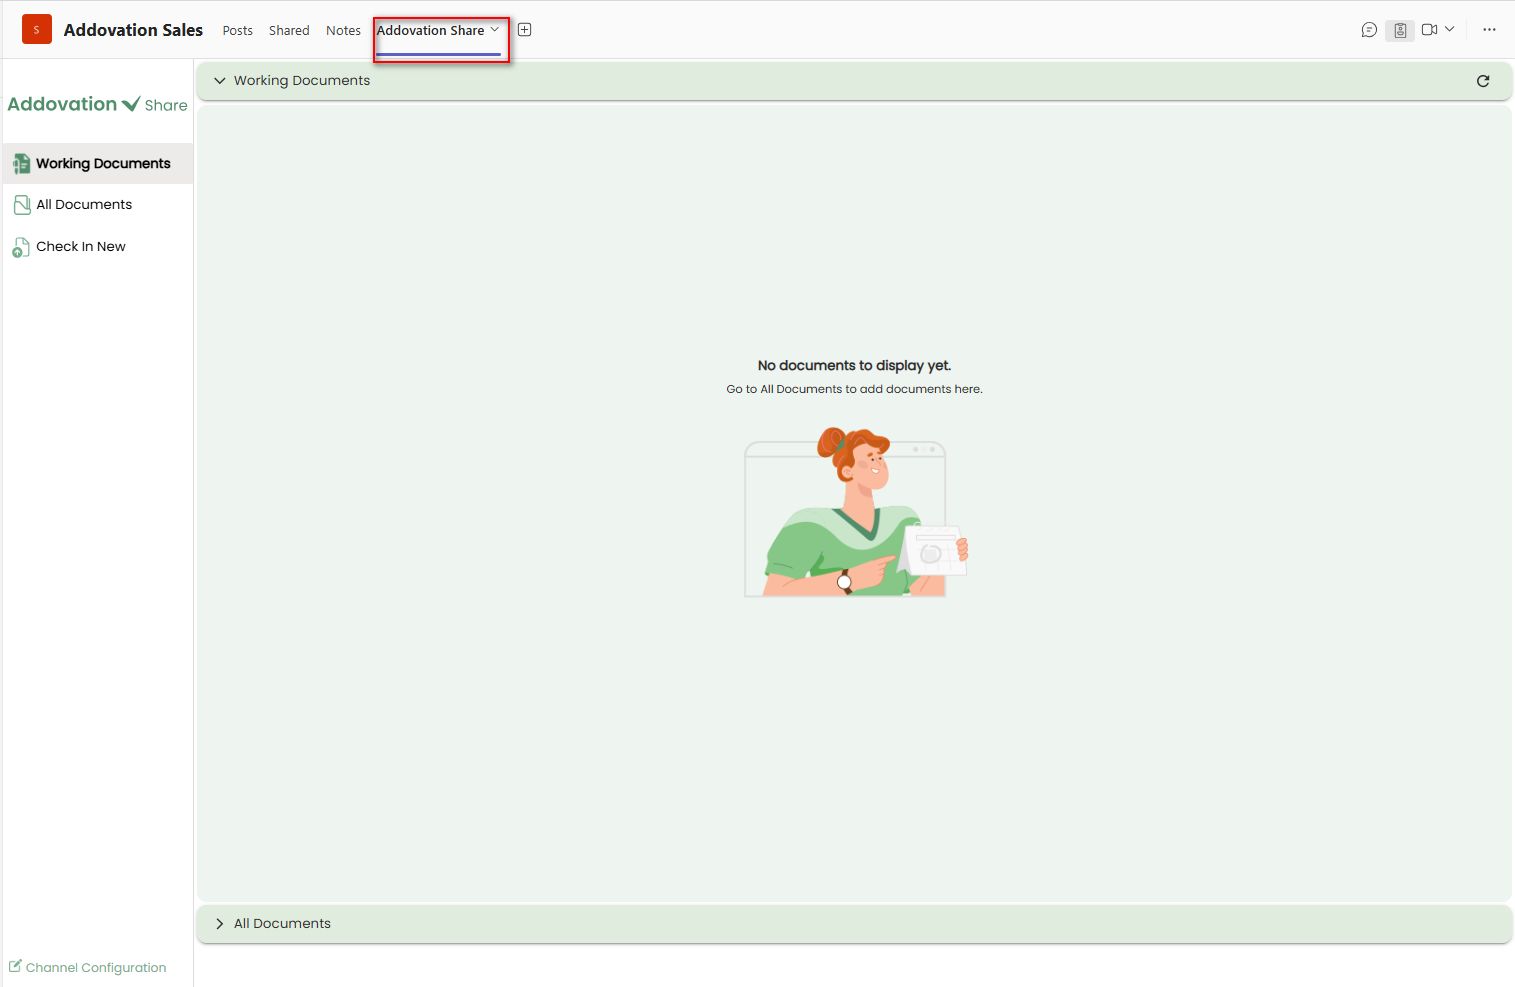
The
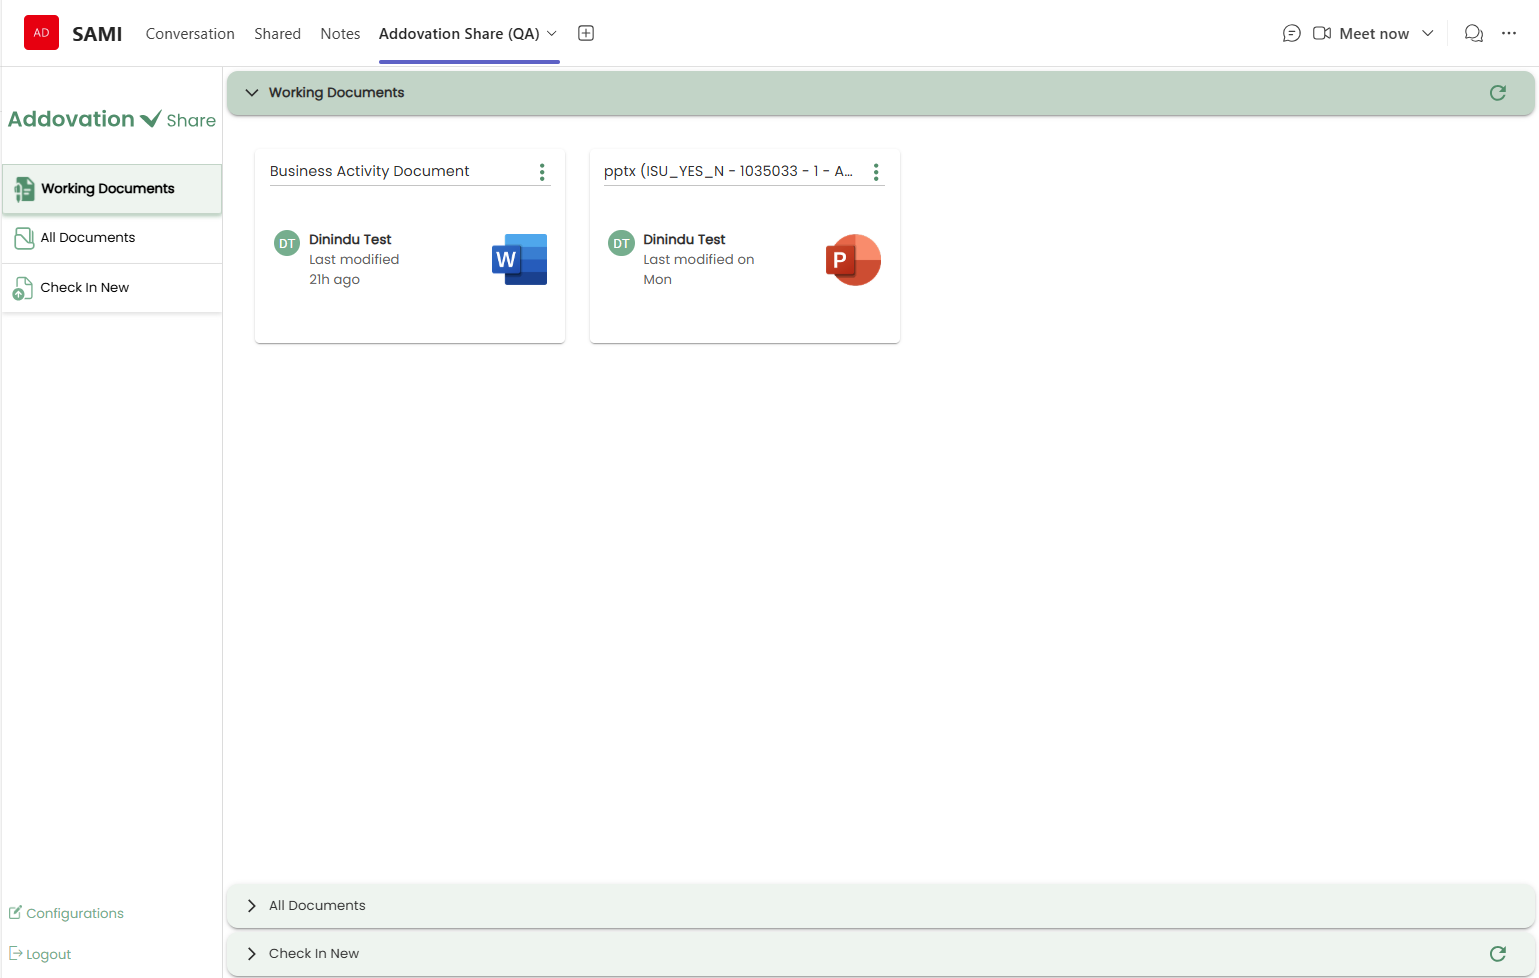
Working Documentspage is displayed by default when you access the section.If no documents are available, a message will be shown indicating that there are no working documents.
- If documents are available, they will be displayed in a card view as below.
The left navigation menu in Addovation Share includes the following tabs:
Working Documents :- Displays documents that are connected to IFS and have been checked out or downloaded through the current Teams channel using the Share application. Regardless of which user performed the action, any document checked out or downloaded through this channel will appear in this section.All Documents :Displays all documents that are connected to IFS and linked to the current channel objects, regardless of their check-out/check-in status.Check In New :Displays documents available in the channel’s OneDrive location.
The logged-in user’s details are displayed in the top-right corner of the page. At the bottom of the navigation pane, two options are available: one to open the configuration window (as explained earlier) and the
Logoutoption.When the user clicks Logout, they are signed out of IFS, and the local session is cleared.
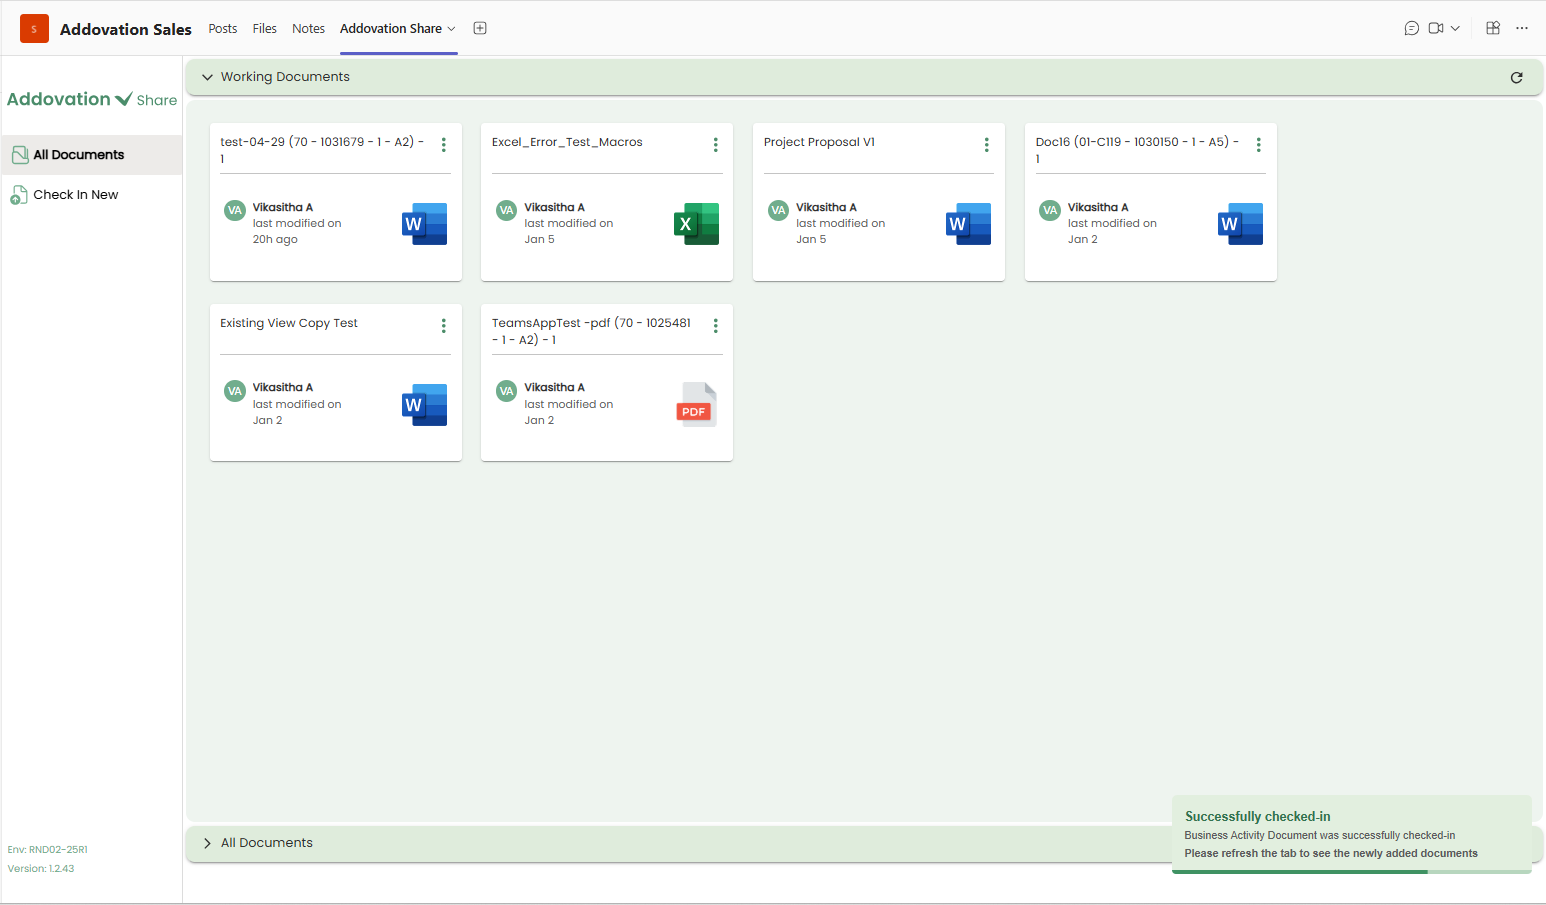
Working Documents Section
This section is expanded by default when user opens the
All Documentstab. Displays documents that are connected to IFS and have been checked out or downloaded through the current Teams channel using the Share application.Regardless of which user performed the action, any document checked out or downloaded through this channel will appear in this section.
Each card displays the document title, a three-dot icon for the options menu, the last modified user’s name and date, and the file type icon.
Clicking a card opens the Document Details pop-up.
The information shown in this pop-up varies slightly depending on whether the document is downloaded or checked out.
Check In a Working Document as a New Revision
- If the selected document is downloaded by the logged-in user, the Document Details pop-up appears as shown below.
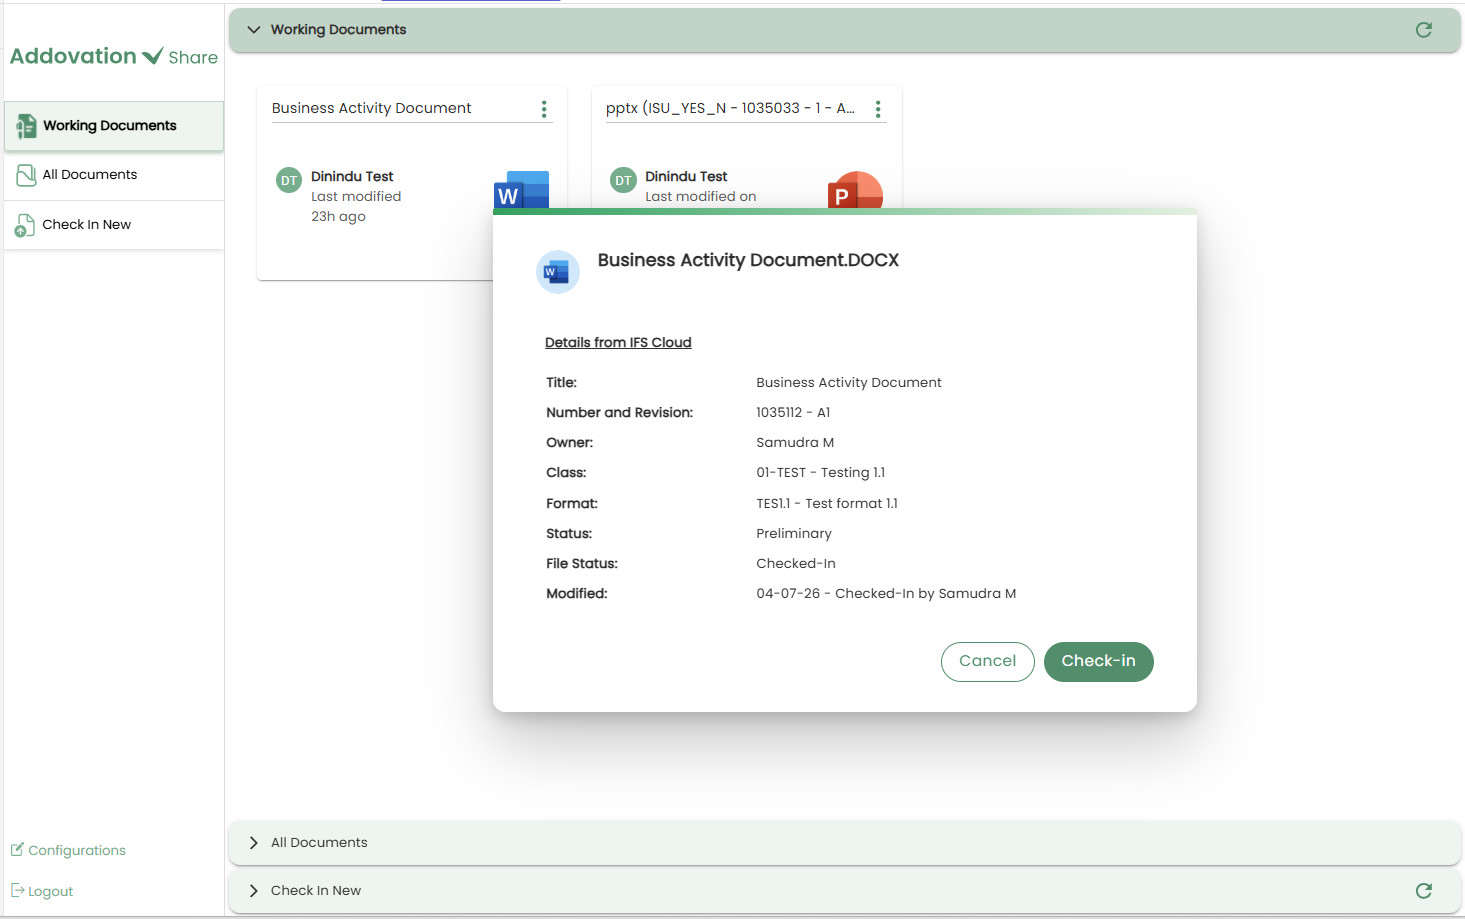
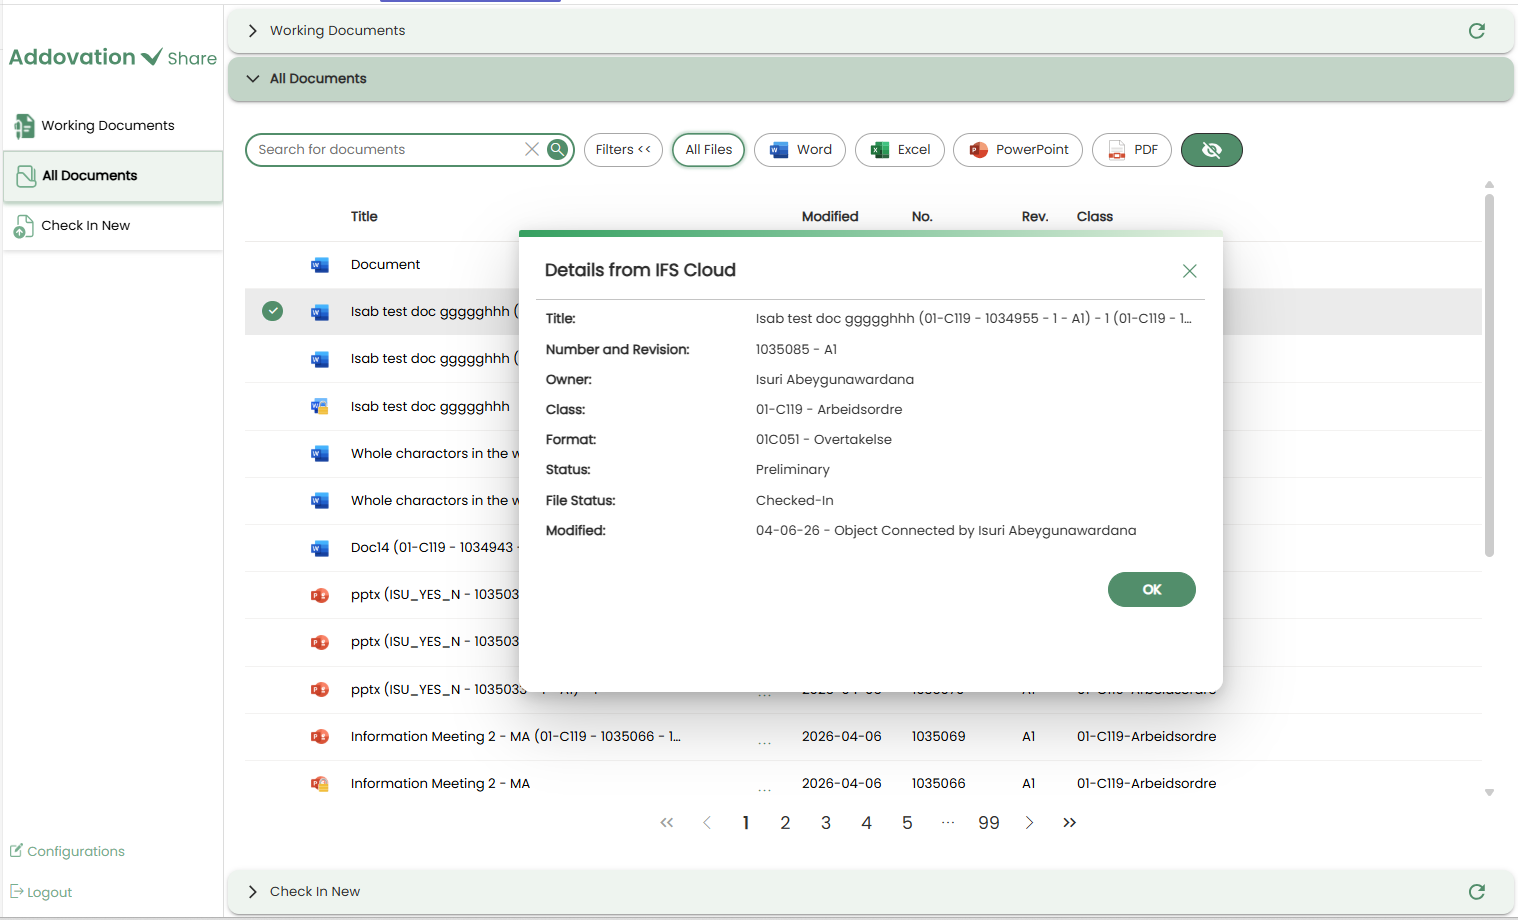
This details pop-up displays additional information about the selected document from IFS, including the title, document number, document revision, document owner, class and format, document status (Preliminary or Released), file status (Checked In or Checked Out), and the last modified user and date.
Clicking
Check-Inopens a new window, allowing the user to check in the selected document as a new revision in IFS.
Note
Checked-out documents cannot be checked in as a new revision.
Selecting a Base Document
Since the documents in the Working Documents tab have already been checked into IFS, the
Document Numberand theLatest Revisionfields are automatically populated.The user can proceed to check in the document as a new revision of the same document or select a different base document.
To choose another base document, use the
searchable dropdownto find and select a document from the current channel.
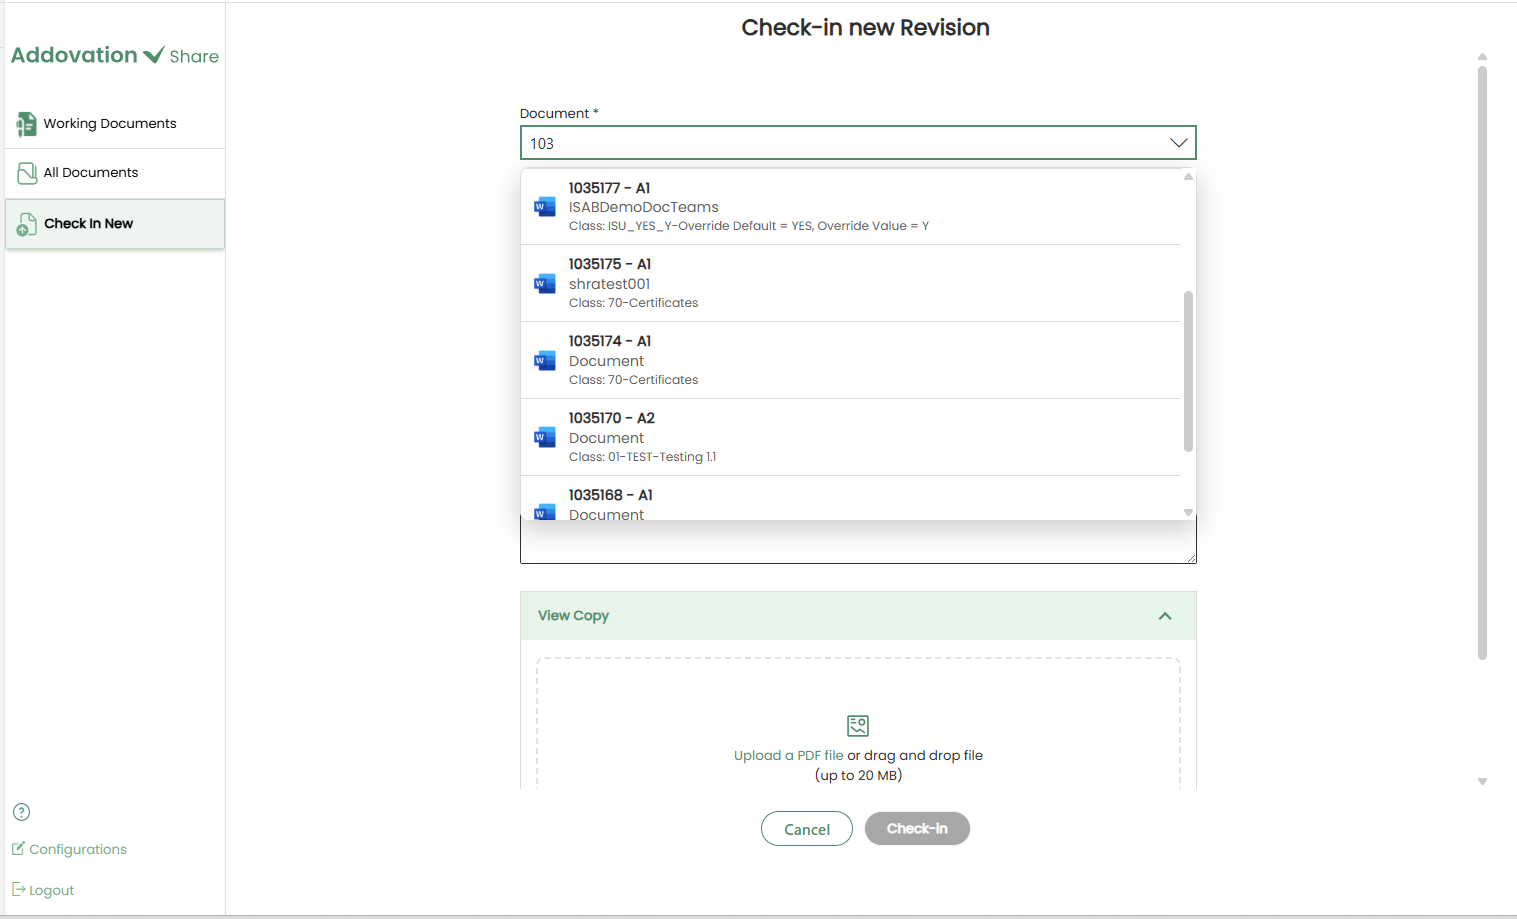
The Document Number, Title, Latest Revision and New Revision fields update based on the selected document.
Class, format, and object connection details are not required in this process, as the base document has already been checked in to IFS with these details.
Providing a revision text is mandatory to proceed.
View Copy
Below the Revision Text field, a collapsible section is available for the view copy.
This section is expanded by default if the view copy is mandatory for the Document Class associated with the selected document.
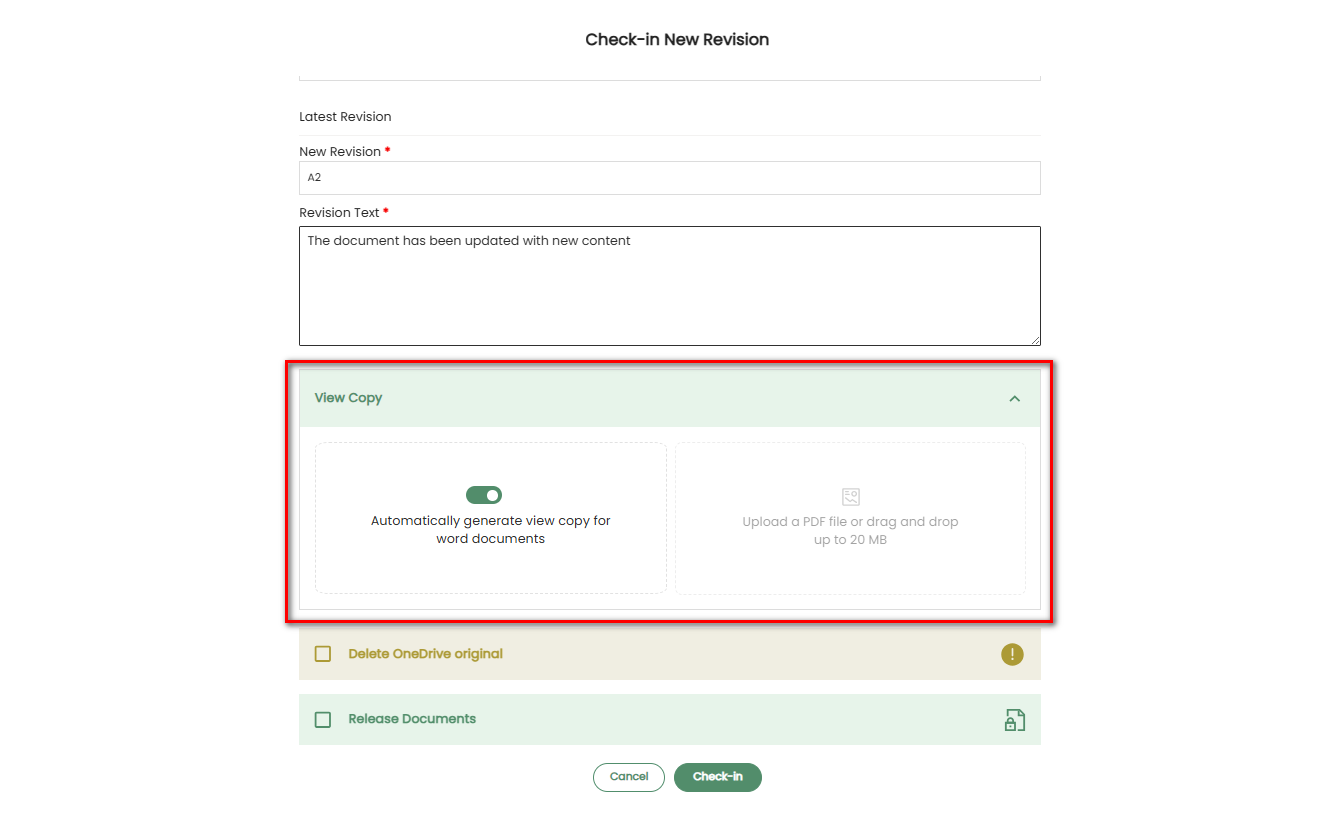
The View Copy option allows users to either:
Automatically generate a PDF version of the file being checked in to IFS as the view copy for the document revision, or
Upload an existing PDF as the view copy.
View Copy Option for Word Documents
Automatic view copy generation is available
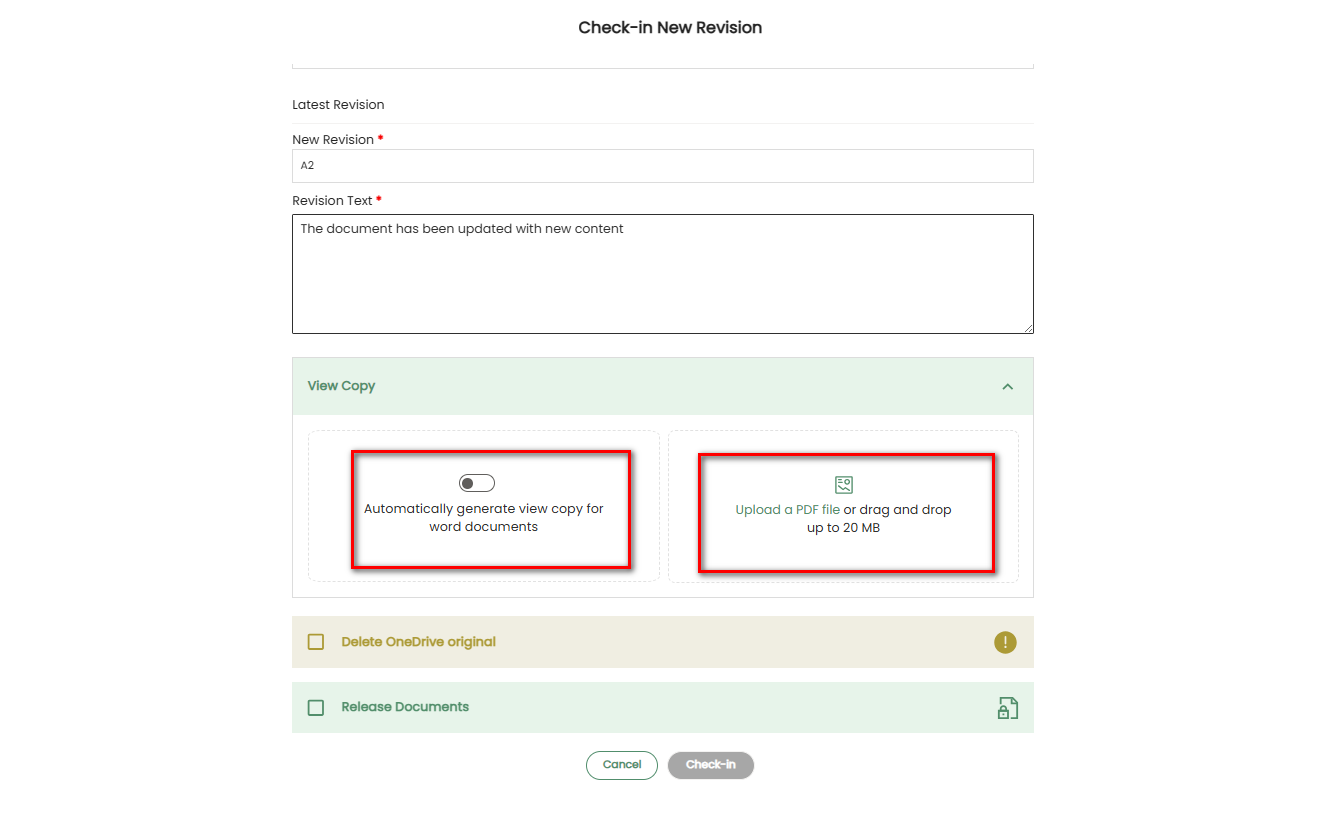
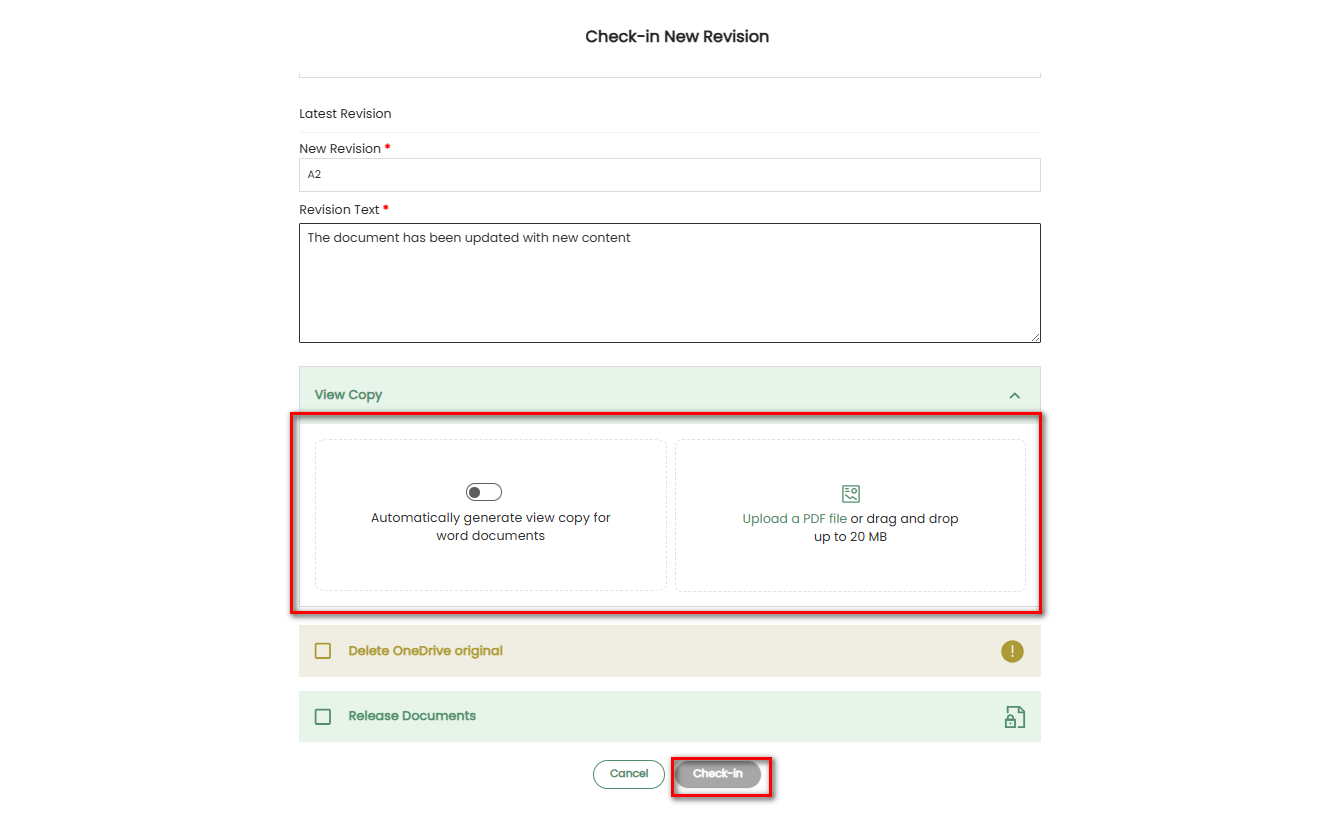
only for Word documents.When checking in a Word document, users will see two options displayed side by side under the View Copy section:
Automatic View Copy (left option): Allows the view copy to be generated automatically. This option is selected by default.
Upload View Copy: Remains disabled while automatic generation is selected.
Users can deselect the automatic generation toggle to enable the Upload View Copy option, allowing a PDF to be uploaded manually.
Creating or uploading a view copy may be mandatory depending on the Document Class associated with the selected document.
- For some document classes, creating a view copy is mandatory.
- For others, it is optional.
When a view copy is mandatory:
The Create View Copy section remains expanded by default when the document revision page is opened.
The Check-In button remains disabled until either; automatic view copy generation is enabled, or a PDF view copy is uploaded.
View Copy Option for Other File Types
- If the selected document is not a Word document, only the Upload View Copy option is available under the Create View Copy section.
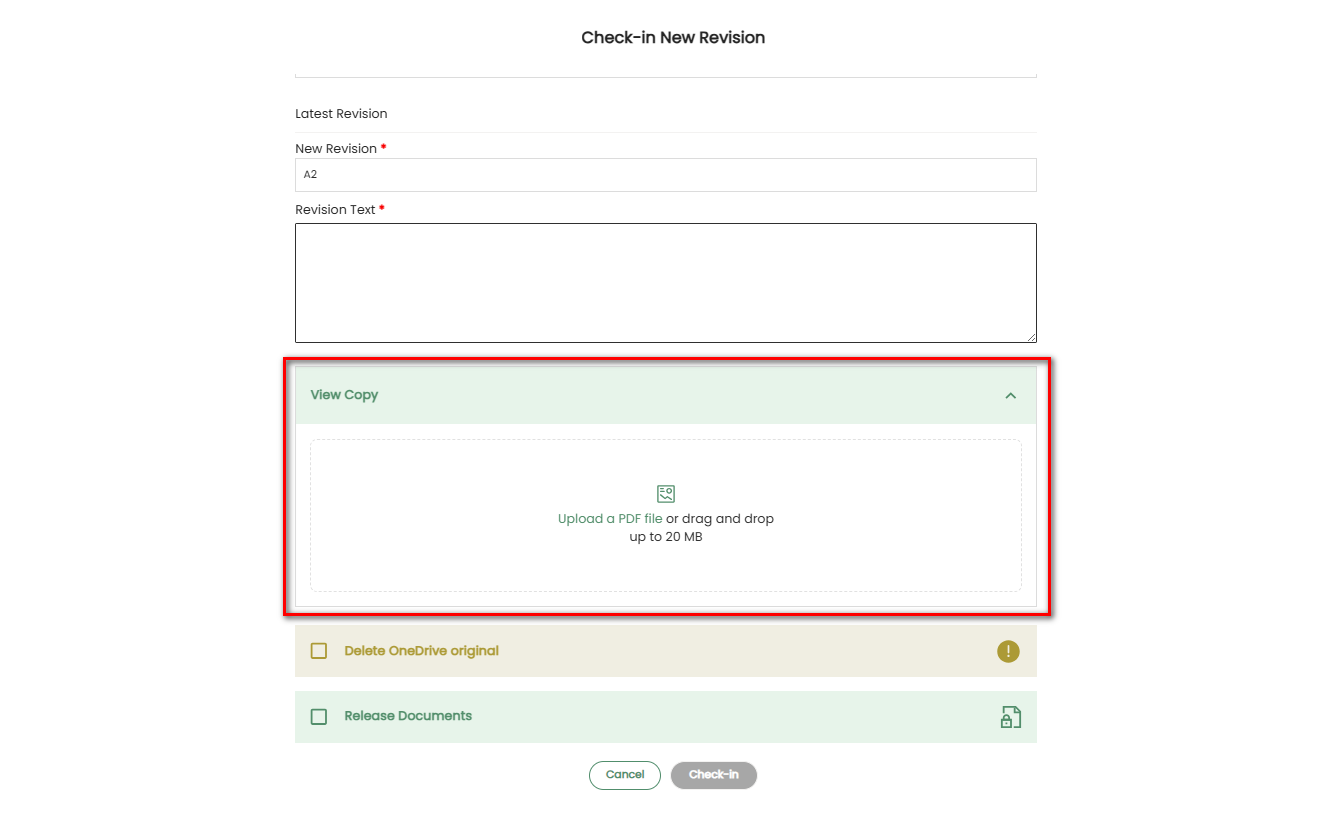
- If a view copy is mandatory for the document class associated with the selected document, the Create View Copy section is expanded by default, and the Check-In button remains disabled until the user uploads a view copy.
Delete OneDrive Original
- If this checkbox is selected, the original document in OneDrive is replaced by the newly checked-in version.
Note
This option can be configured to be either always enabled or always disabled, based on customer preference. The configuration can be set separately for the Check In New Revision, Check In Existing Revision, and Check In New flows. If such a configuration is applied, the checkbox will not be displayed; instead, a message will be shown. If no configuration is applied, the checkbox remains available for the user to select during the check-in process.
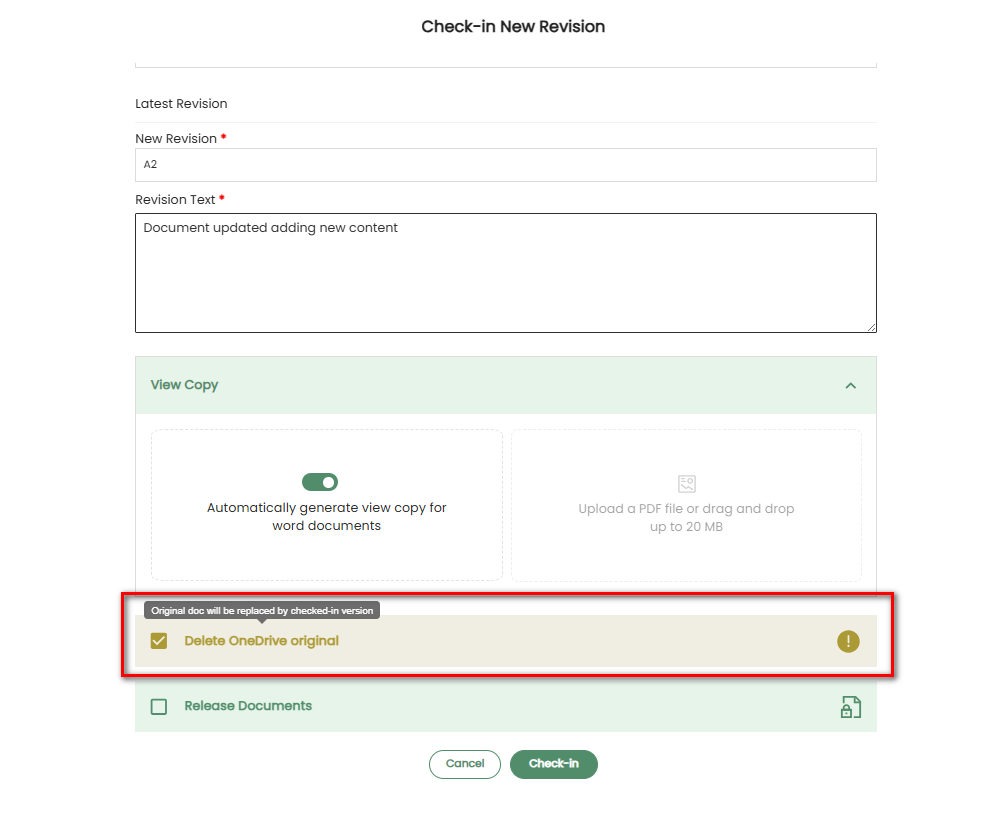
Release Document
- If this checkbox is selected, the document will be checked in and released.
Select Check-In
Clicking the Check-In button will successfully check in the document into IFS as a new revision of the selected base document. After check-in:
The user is automatically redirected to the All Documents tab.
A notification appears in the bottom-right corner of the screen and disappears automatically.
The newly checked-in document appears at the top of the document list with a small indicator to identify it as the new revision.
Check In a Working Document as the Existing Revision
- If the selected document is checked out to the logged-in user, the Document Details pop-up appears as shown below.
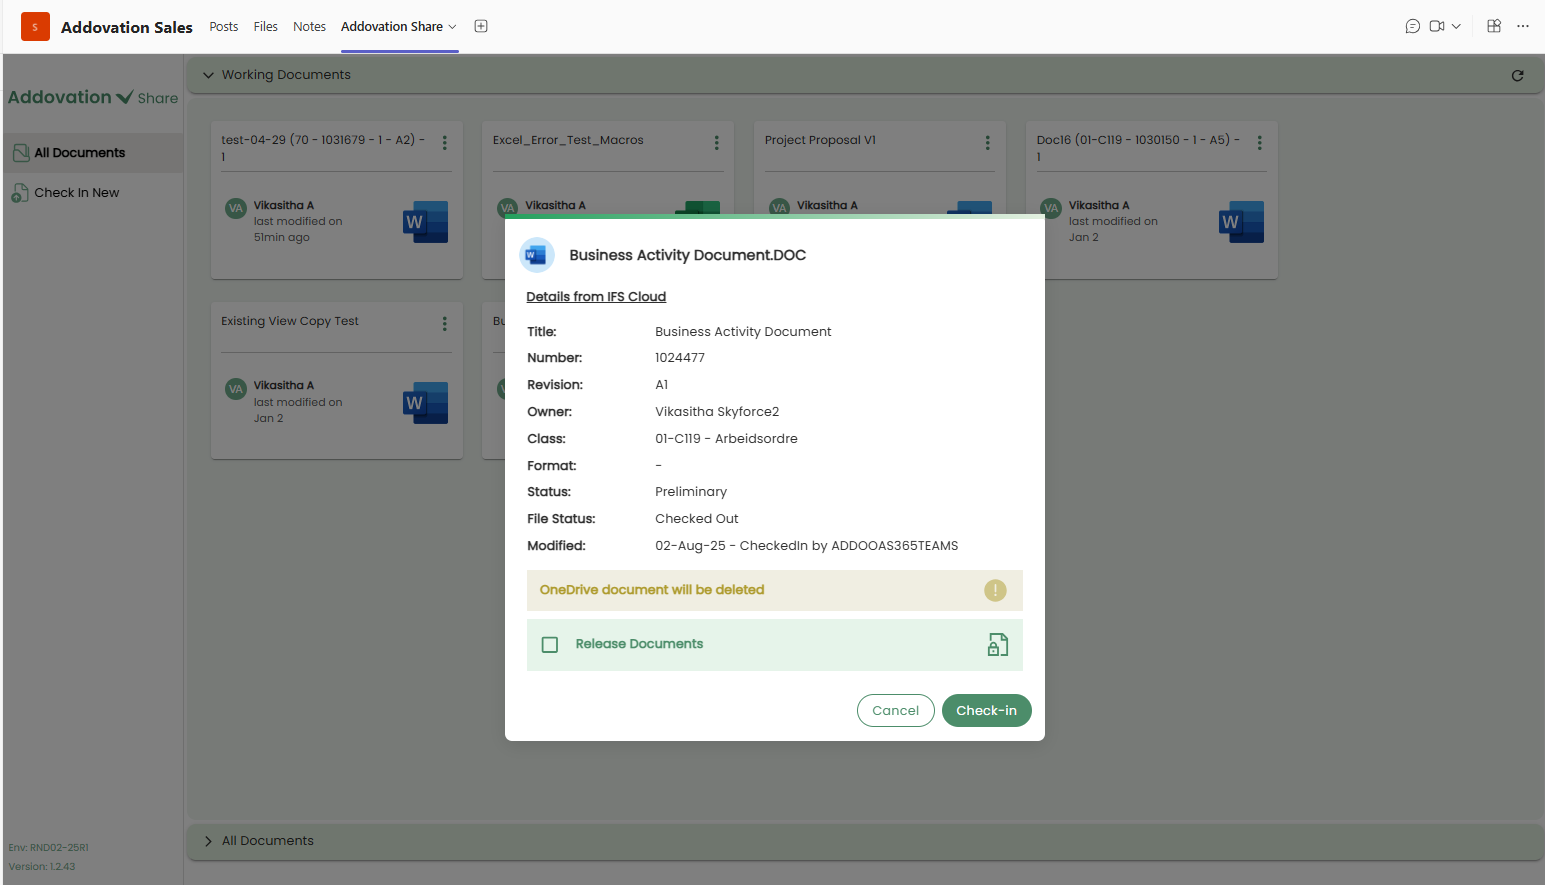
Once the user has finished making updates to the checked out document, they can check it back in to the IFS cloud as the same revision directly from this window.
In this window, the user will also see the
Delete OneDrive OriginalandRelease Documentcheckboxes below the document details.These checkboxes function the same way as explained earlier.
The user can select the checkboxes as preferred, and then click the
Check-Inbutton to check the document back in.After check-in, A notification appears in the bottom-right corner of the screen and disappears automatically.
- The newly checked-in document appears at the top of the document list in All Documents section.
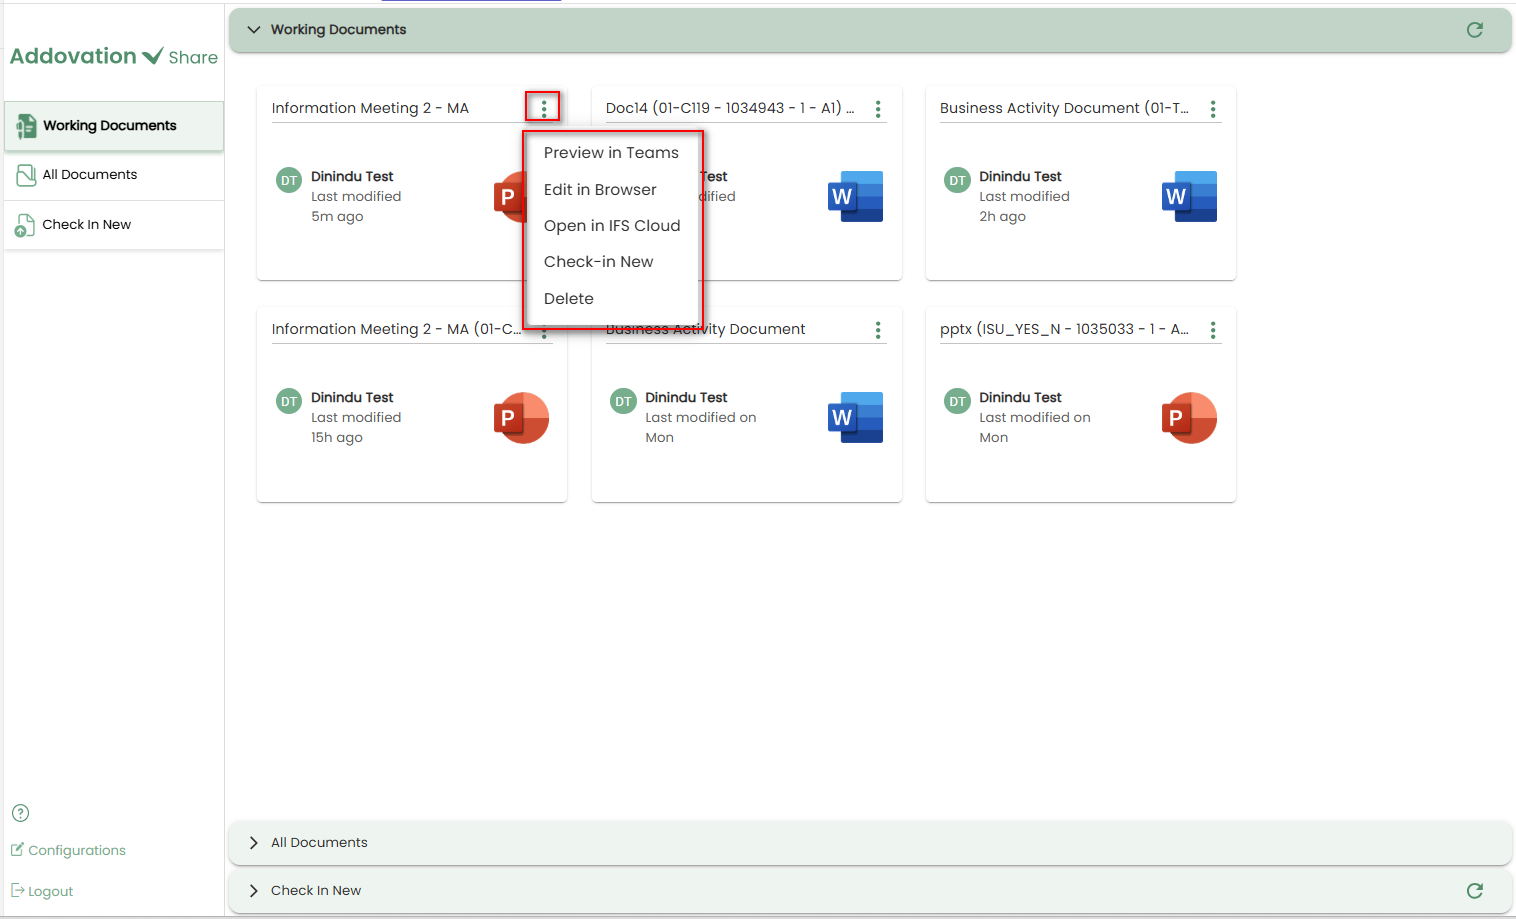
Options Menu for Working Documents
Clicking the three dots icon in the top-right corner of each card opens the Options Menu for working documents.
The menu contains the following options for each downloaded or checked-out document:
- Preview in Teams
- Edit in Browser
- Open IFS Cloud
- Check-in New
- Check-in New
- Delete
Preview in Teams
Selecting Preview in Teams opens the document directly within Microsoft Teams for preview and editing.
The document can be edited if required and changes made will be saved automatically to OneDrive.
Edit in Browser
Selecting
Edit in Browseropens the document in a web browser for preview and editing.The document opened in the browser can be edited if required and changes made will be saved automatically to OneDrive.
Open in IFS Cloud
Selecting this option opens the document revision page in IFS Cloud for the chosen document.
Users can view all details related to the document directly within IFS.
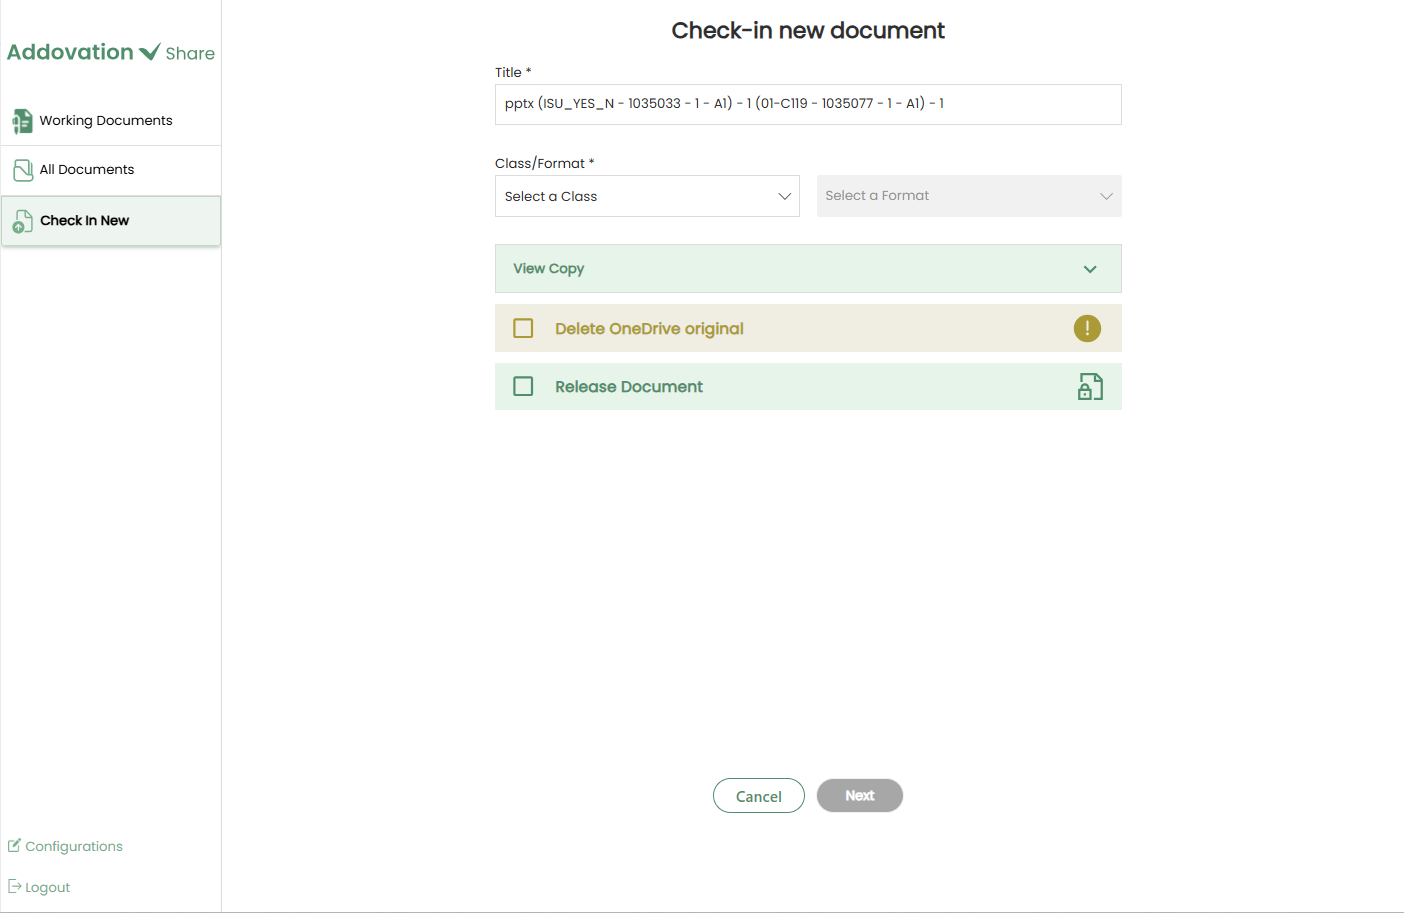
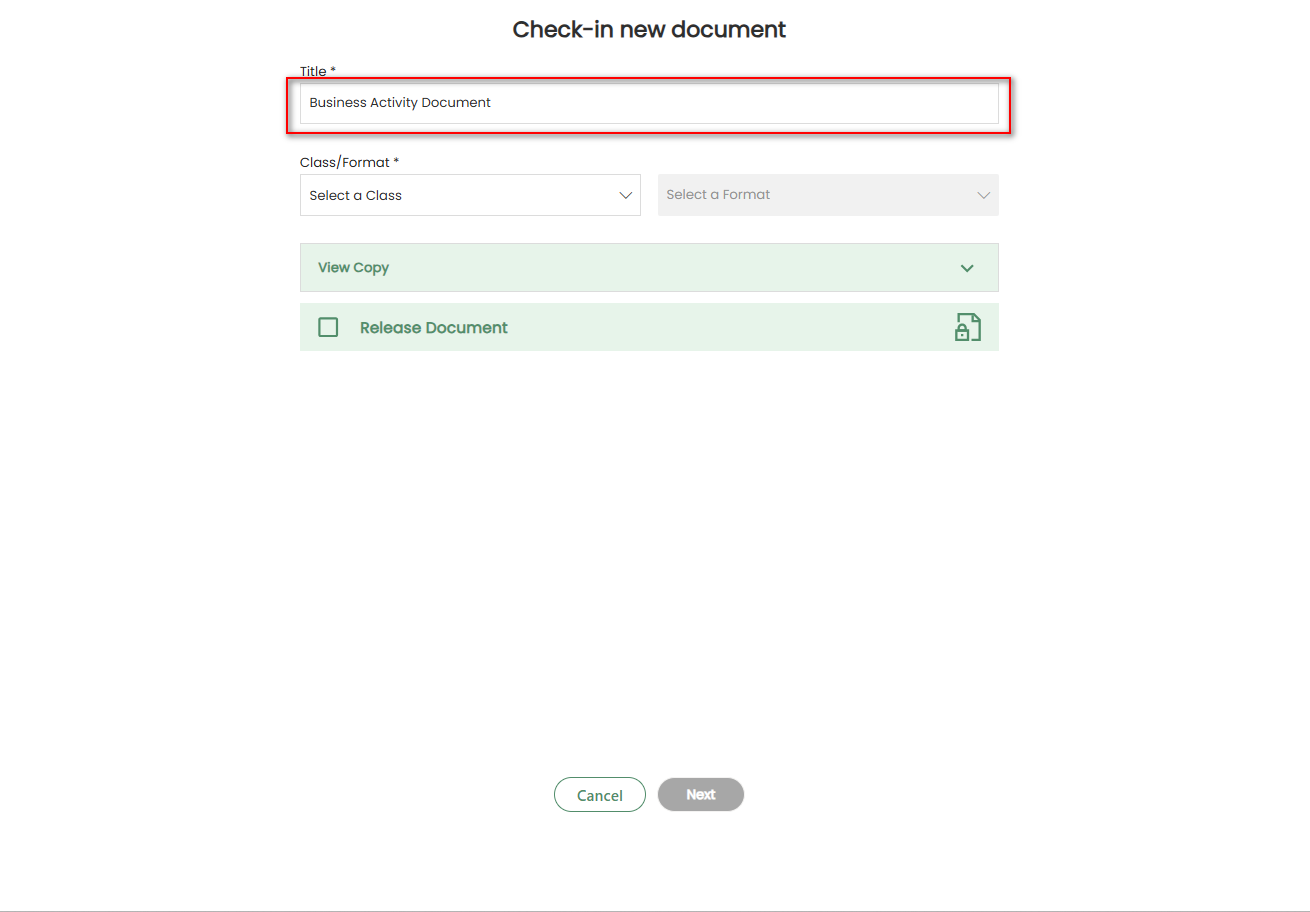
Check-in New
Selecting this option directs the user to the
Check-in New Documentwindow to add the document to IFS as a new document.The document title is loaded automatically but can be edited if needed.
Class/Format Selection
The
ClassandFormatmust be selected using the dropdown menus.Initially, only the Class dropdown is enabled; once a class is selected, the Format dropdown becomes available.
Selecting a
Class is mandatory, while the Format may be required depending on the selected class.The Next button remains disabled until a class is selected. If the format is mandatory, the Next button will remain disabled until it is also selected.
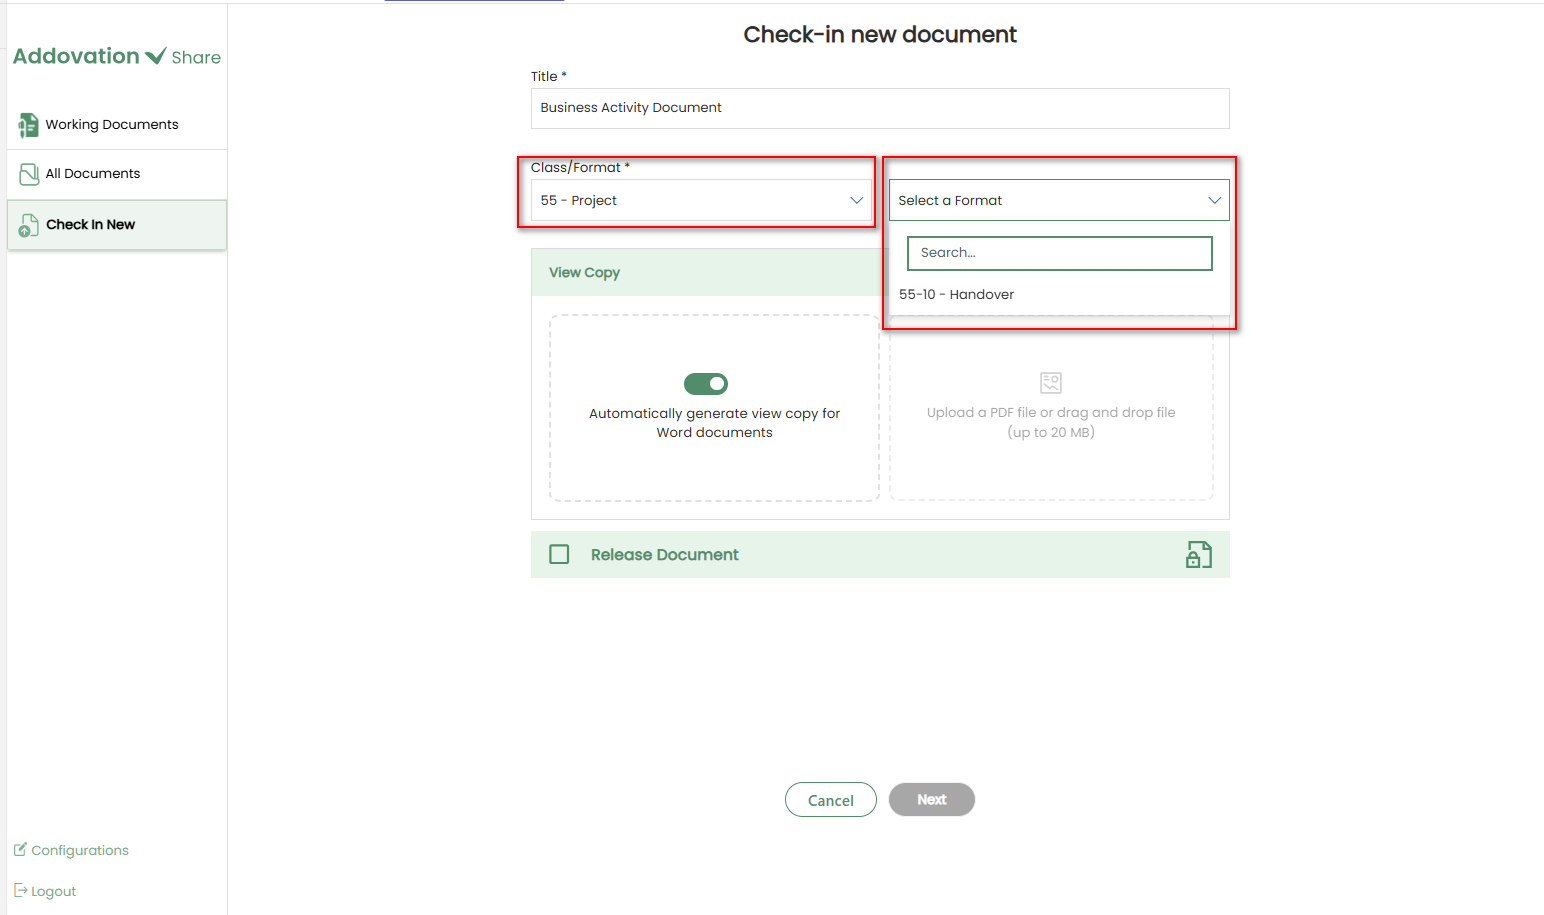
The View Copy, Delete OneDrive Original, and Release Document options work the same way as described in the previous check-in flows.
- After entering the required details and clicking
Next, the Object Connection window will appear.
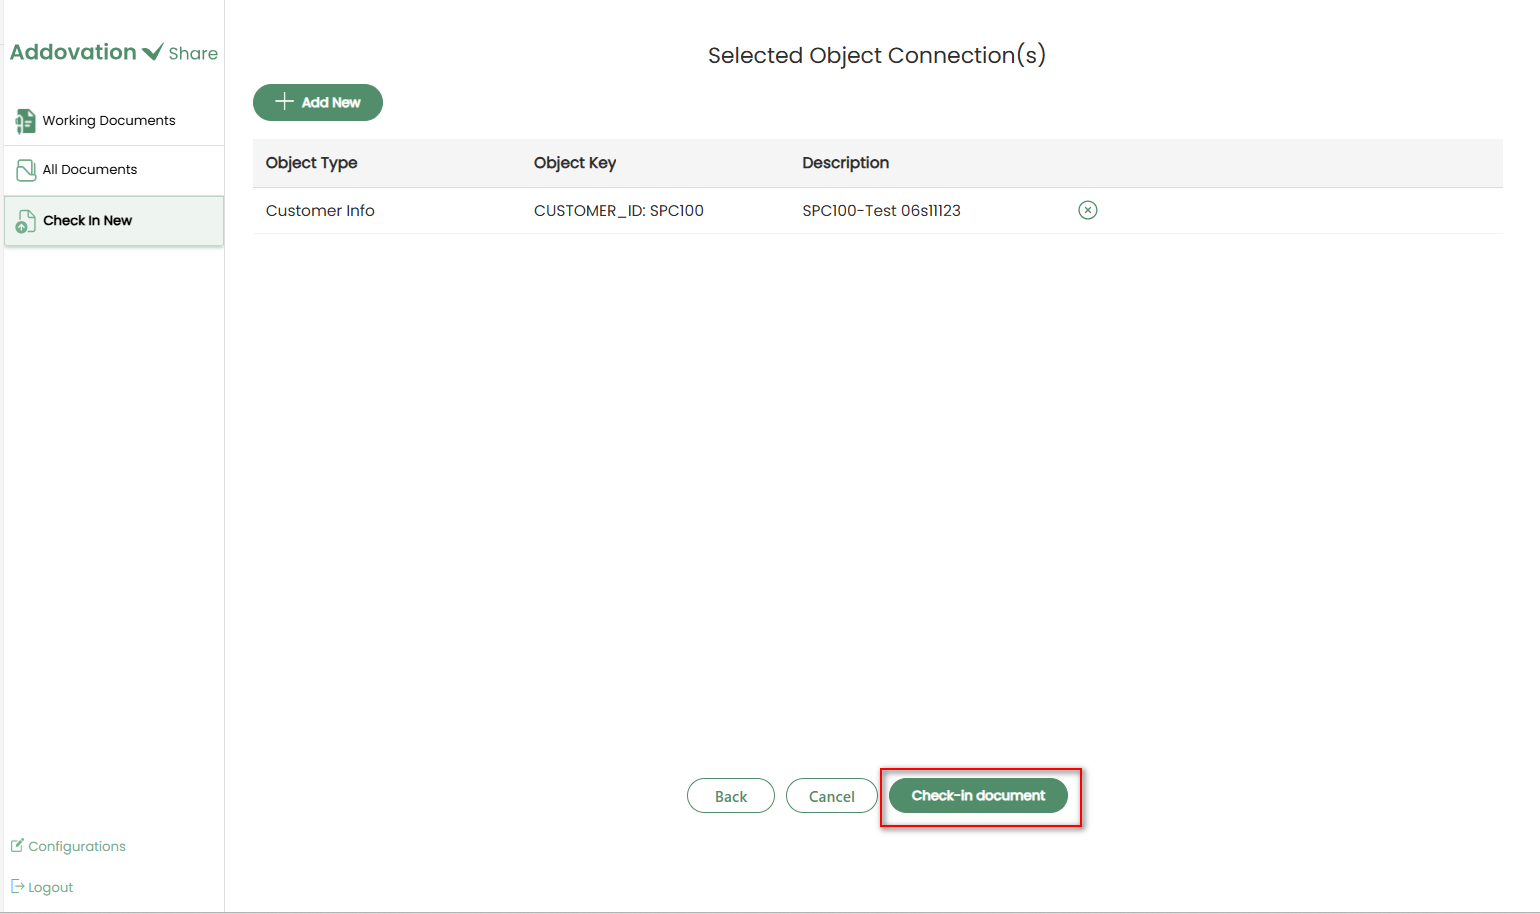
Object Connection Selection
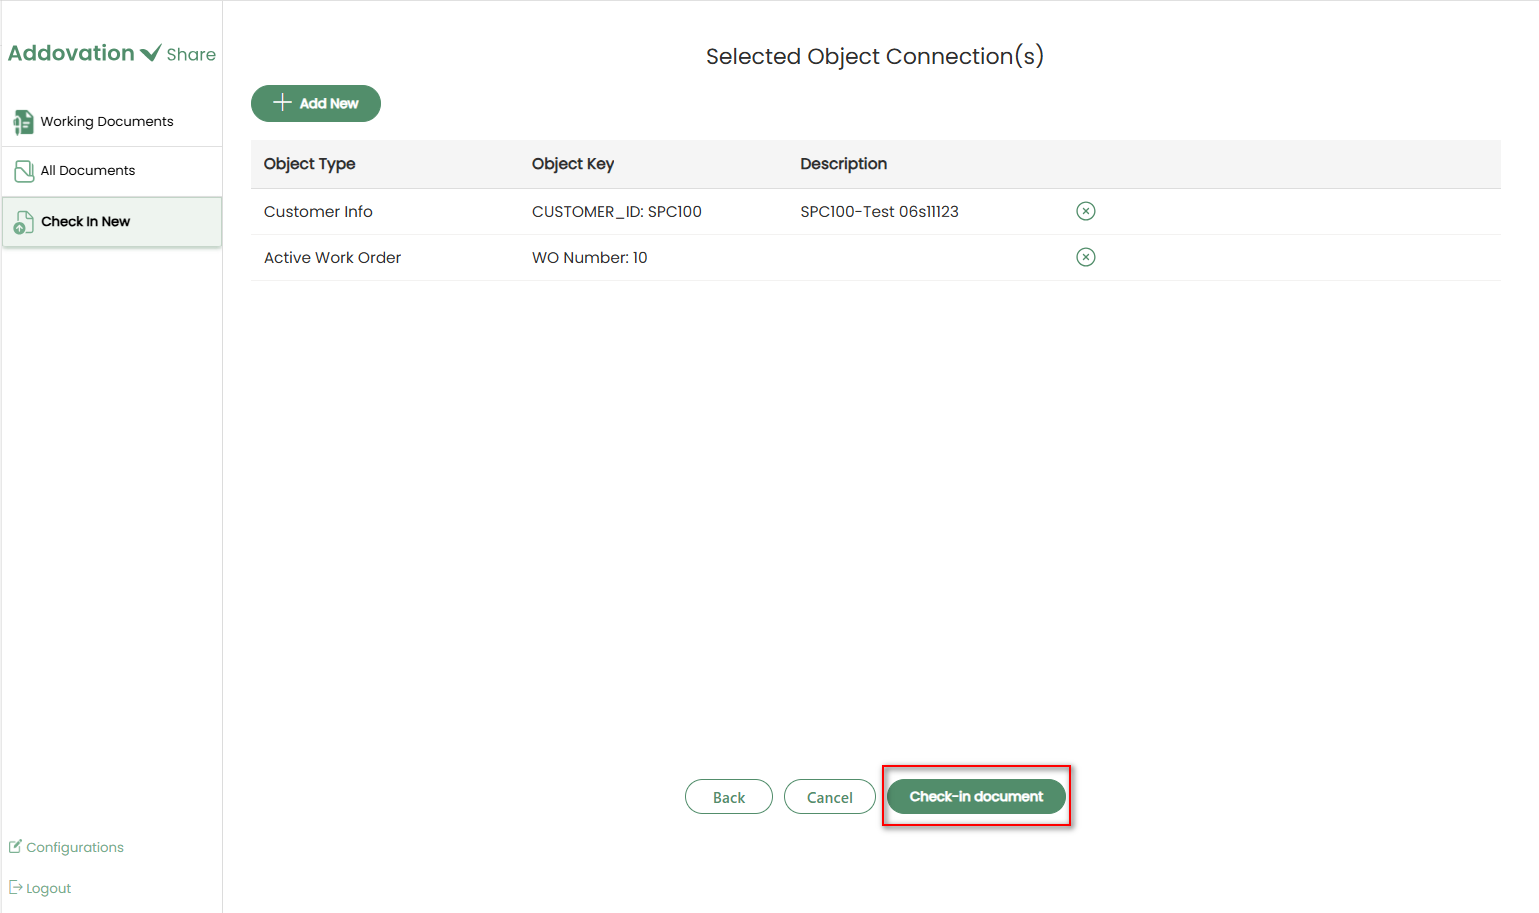
After clicking Next, a new window will open displaying the object connections configured for the selected channel by default.
Any existing object connections can be removed by clicking the cross icon
(×)in the right corner of each item.
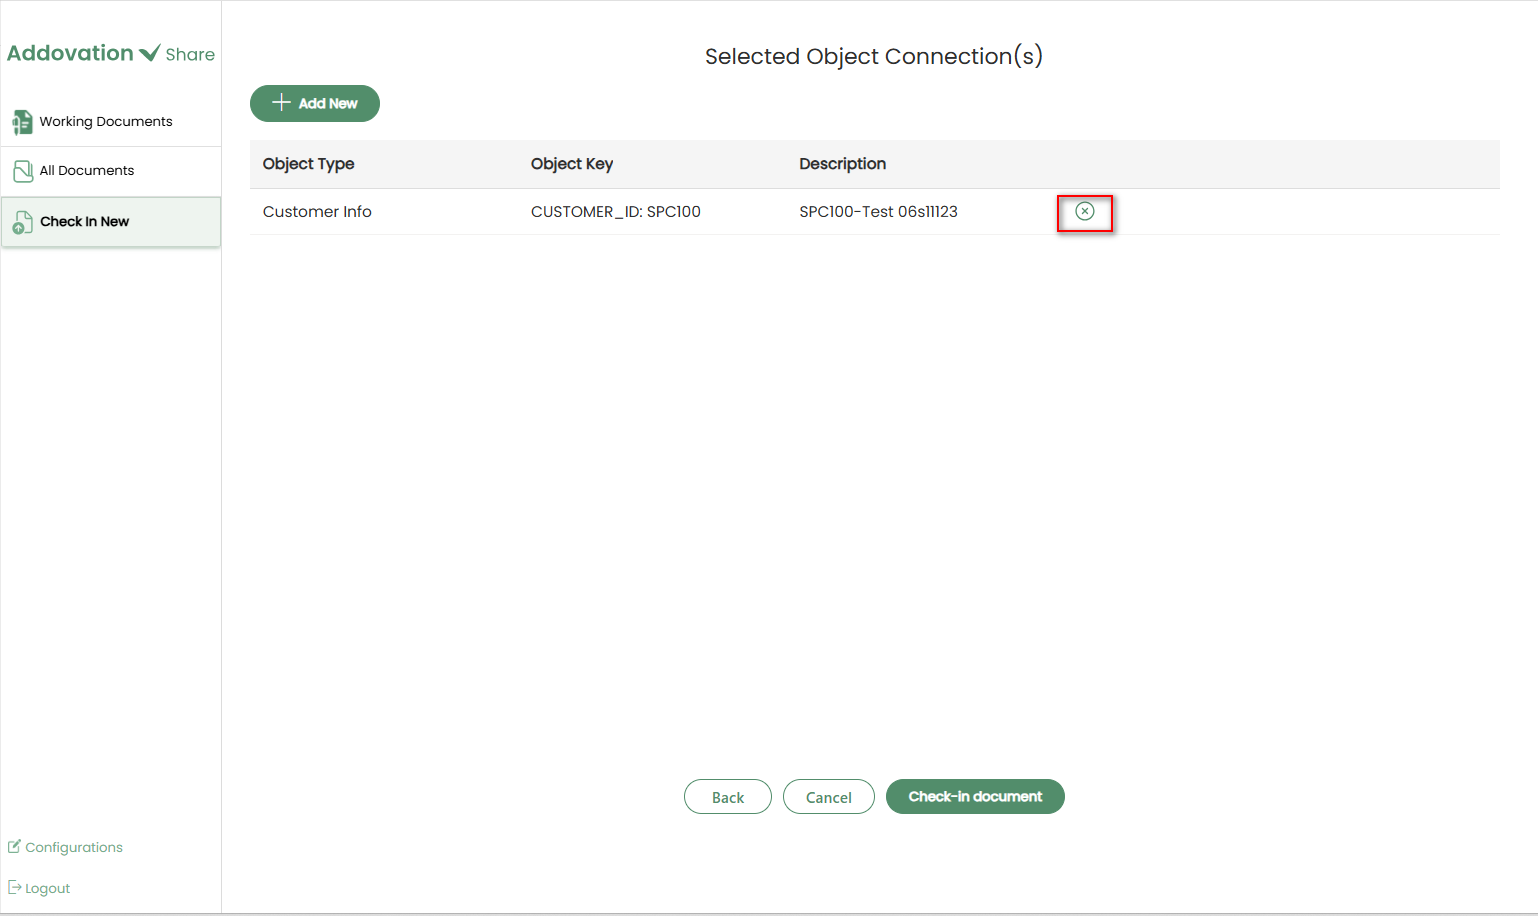
To proceed with the current object connections, click
Check-In Document.To add a new object connection, click the
+ Add Newbutton.
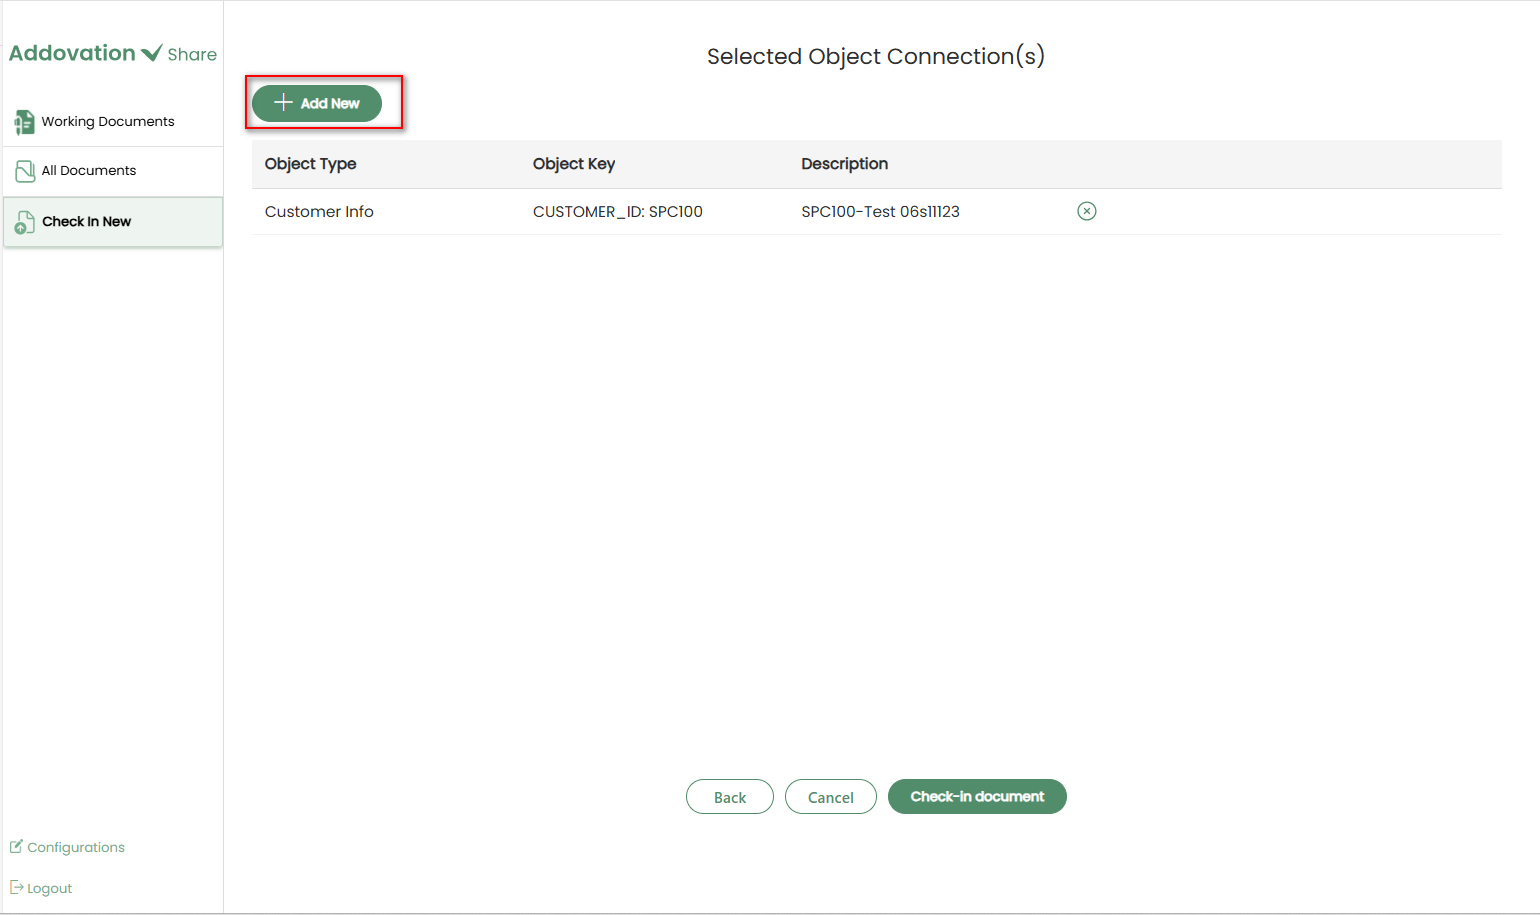
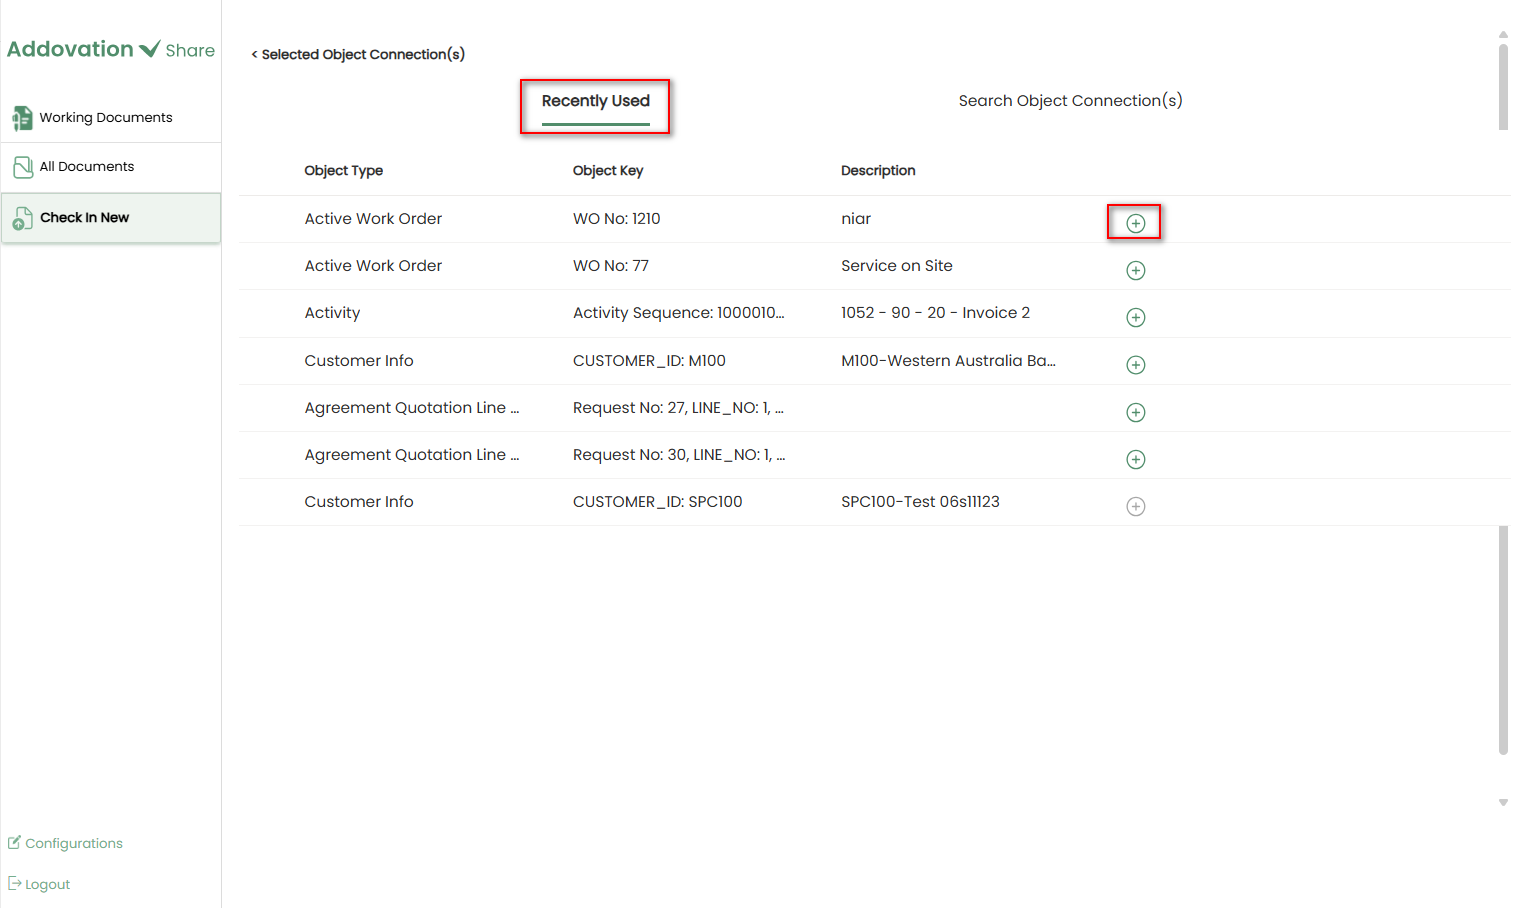
Adding a New Object Connection
Clicking + Add New opens a new window with two tabs:
Recently Used (default tab)
Search Object Connection(s)
In the Recently Used tab, one or more object connections can be added by clicking the
+icon on the far right of the relevant record.
To find specific connections, switch to the
Search Object Connection(s)tab.The Search tab facilitates users in finding object connections.
To search for an object connection, users may select an
object typefrom the dropdown menu.
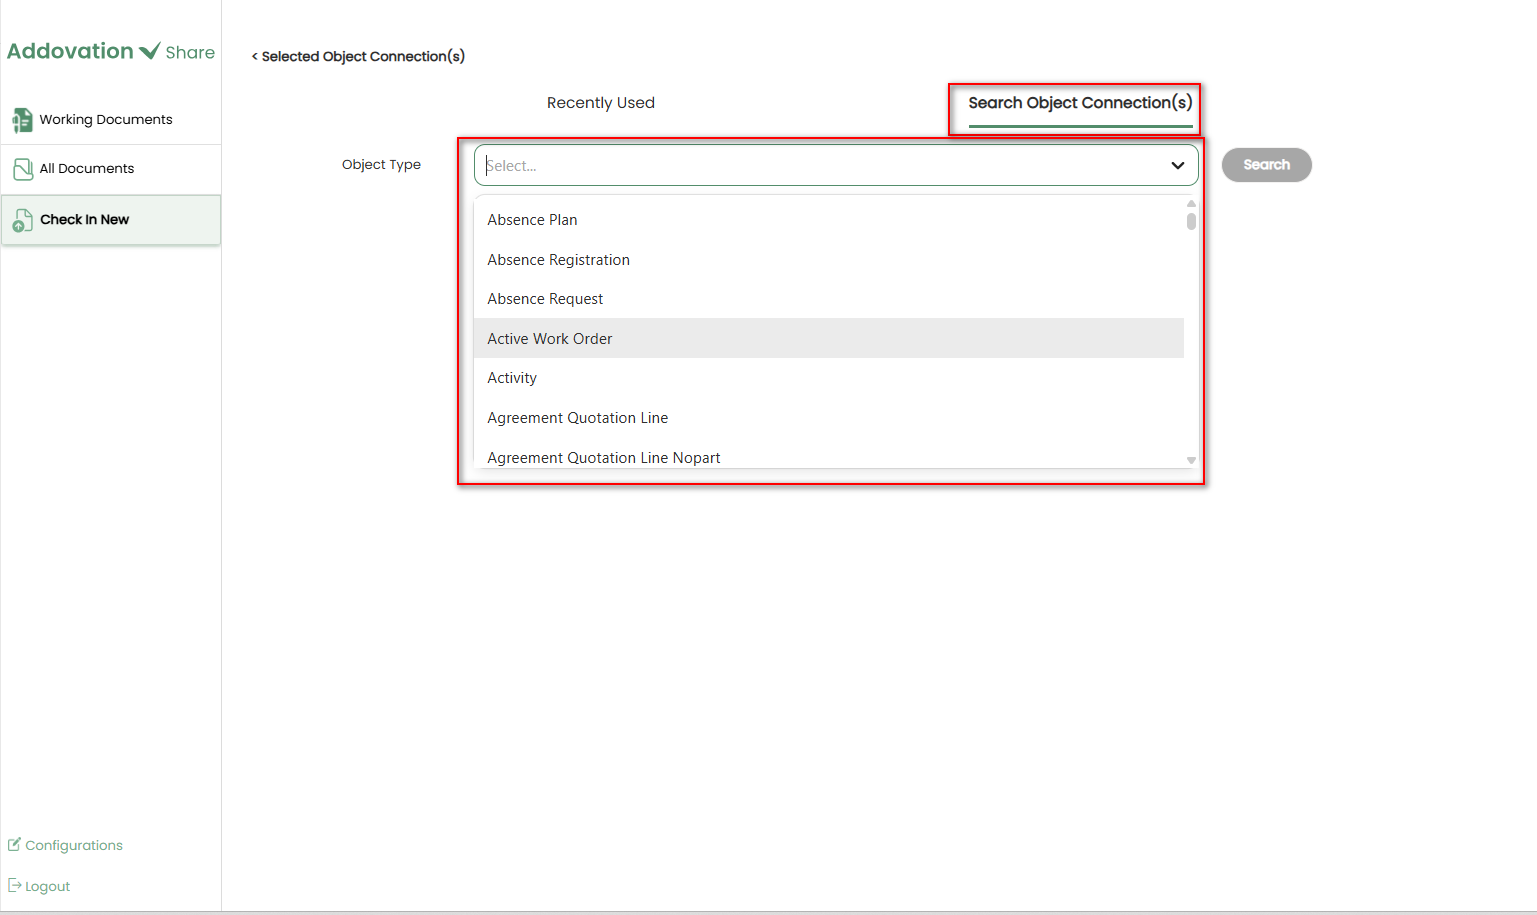
Upon selecting the object type, users should click the
Searchbutton to initiate the search process.The system will then search for object connections corresponding to the selected object type.
Selecting the search option opens the
advanced search window, providing users with additional filter capabilities.
Advanced Search Options
The Advanced Search window opens upon initiating a search.
By default, only primary filters are displayed. Click
See Moreto view additional filters.
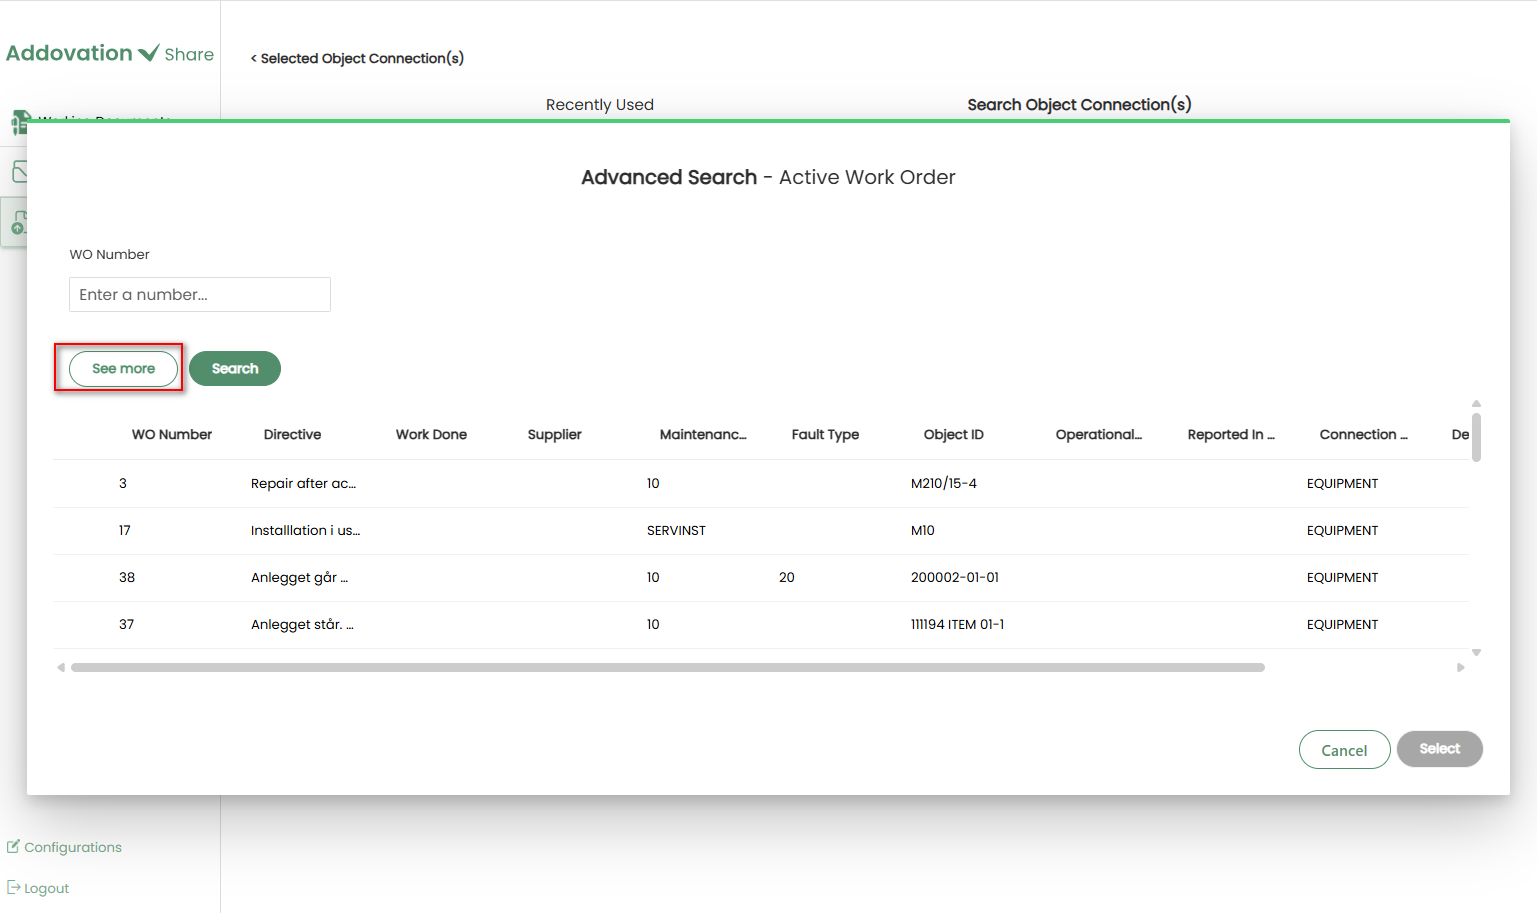
- Click
See Lessto collapse the extra filters if needed.
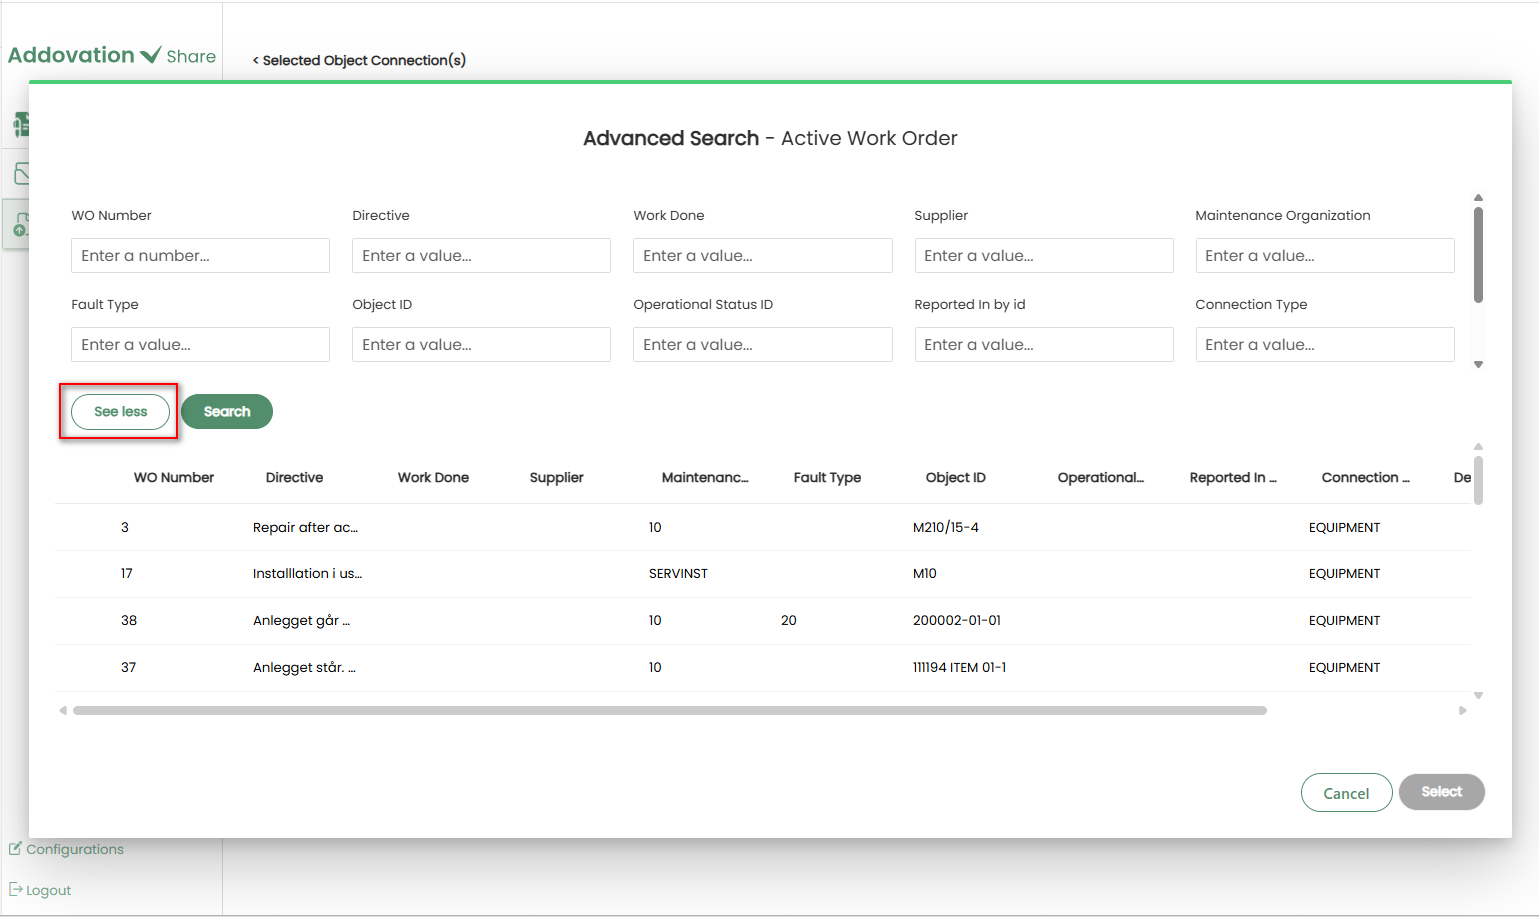
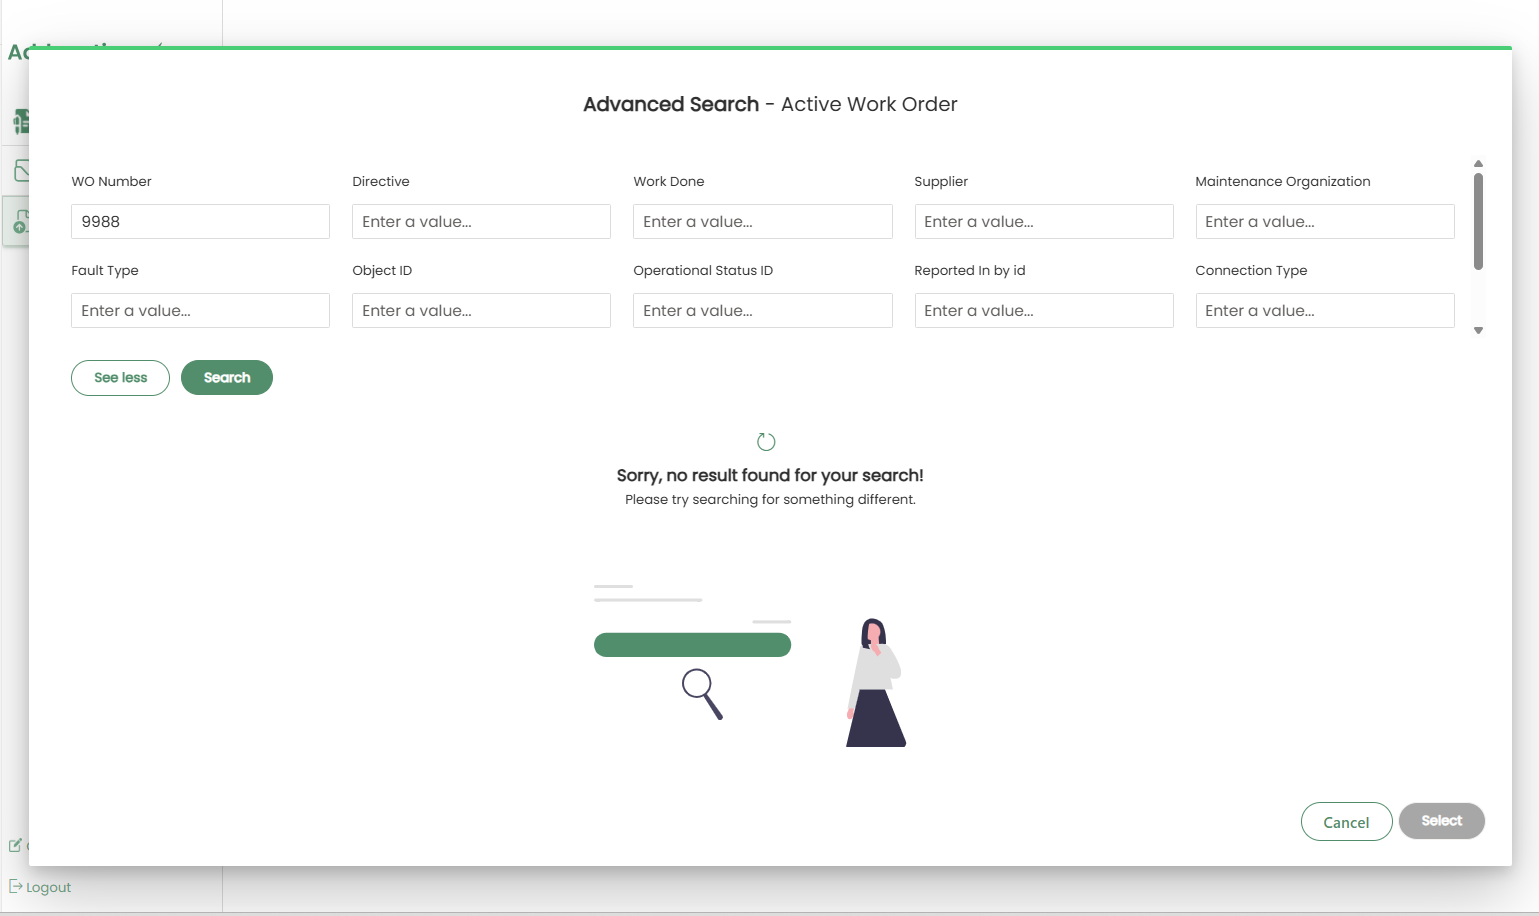
The system will display 25 default records when the Advanced Search window initially opens.
Enter values in the available fields and click
Searchto update the results.

- If no results are found, an error message will appear stating that no matching results were found.
If matches are found, a list of results will appear.
Select one or more object connections using the
checkboxin the first column of each row.To proceed, click the
Selectbutton (enabled only when at least one object is selected).To exit without making changes, click the
Cancelbutton.
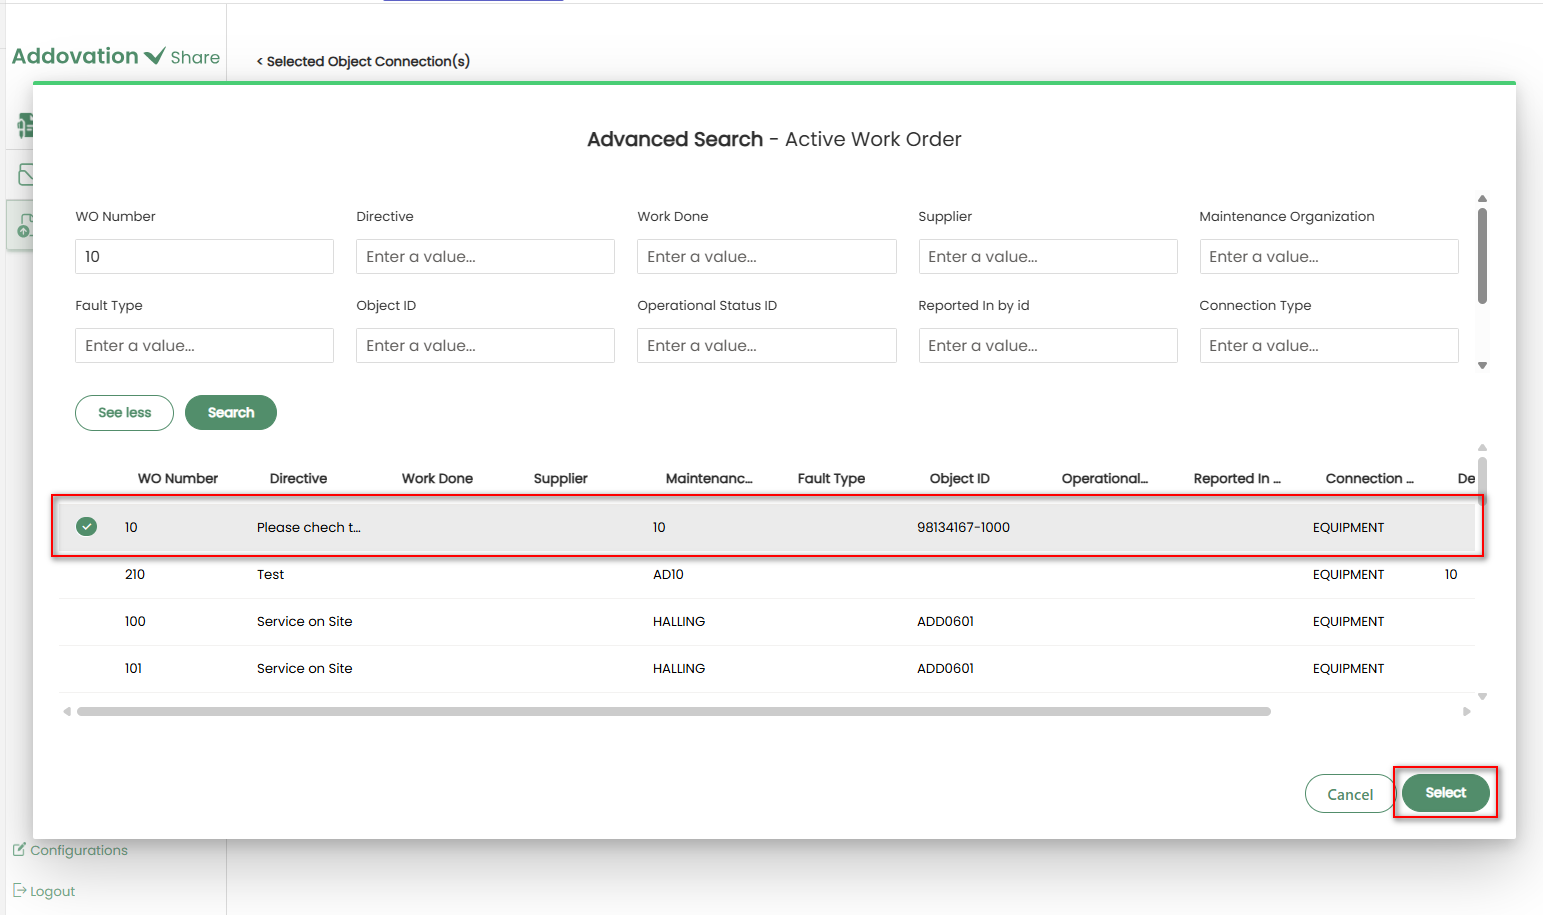
Then you will be directed to Selected Object Connections window.
Note
Documents can be checked-in without associating them with an object connection. However, in specific scenarios, an object connection may be necessary. If it is mandatory and left empty, a required message stating Object Connection(s) is required will be displayed below the object connection section after clicking the check-in button.
Finish Check-in
- Now click
Check-In documentto check-in the file to IFS.
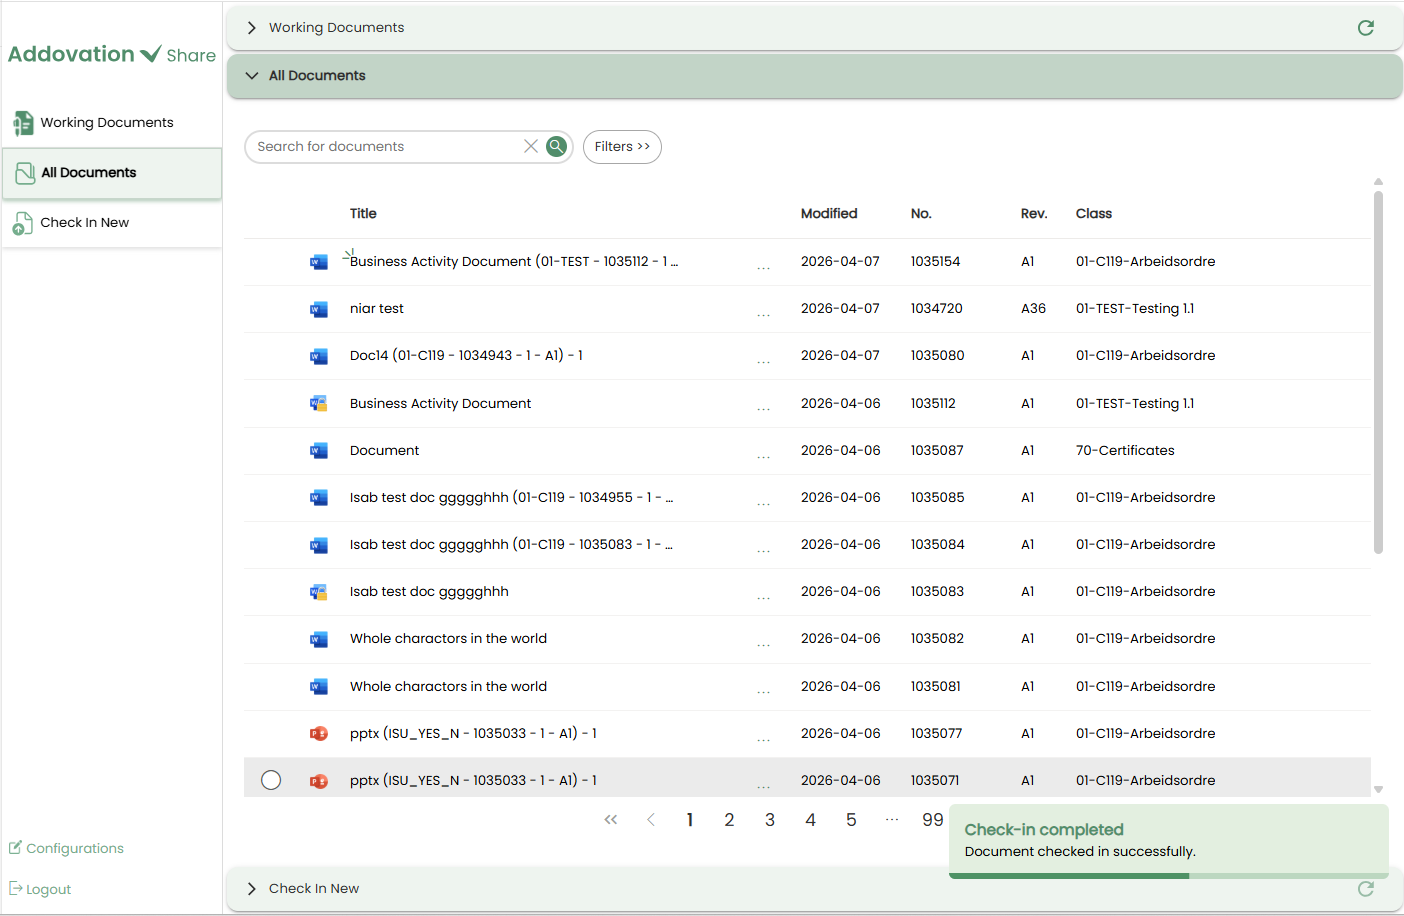
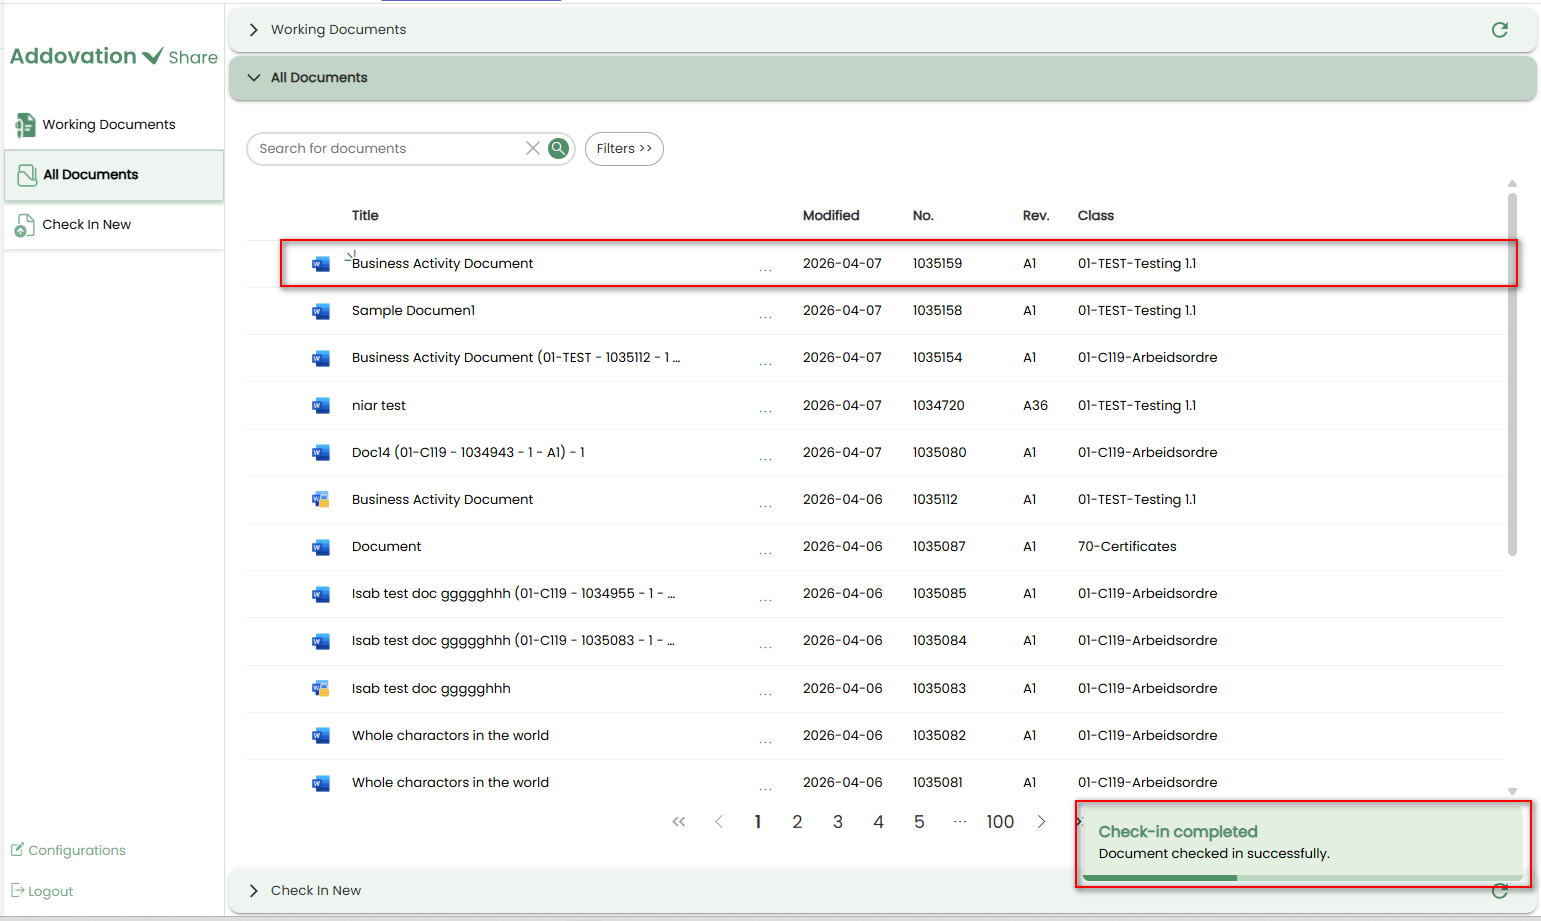
Once the file is successfully checked in to IFS, a confirmation notification will appear in the bottom-right corner of the screen.
The user will be immediately redirected to the All Documents tab without waiting for the notification to disappear.
The notification will remain, floating above the window, and will disappear automatically.
The newly added document will appear at the top of the document list and will be visually highlighted for easy identification.
Delete
- The selected document will be removed from the working documents section.
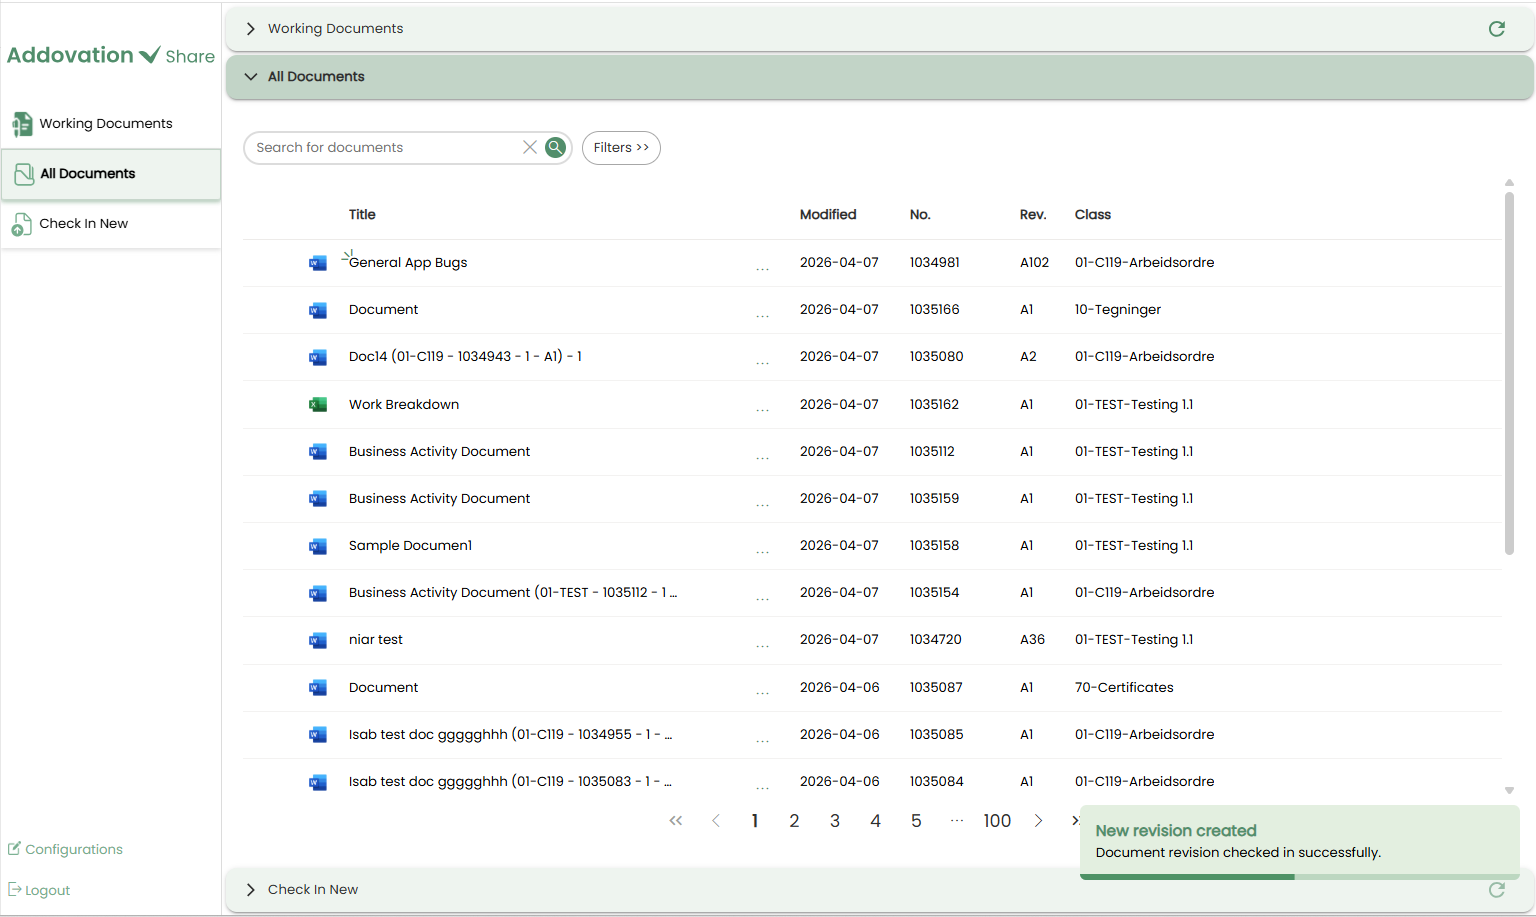
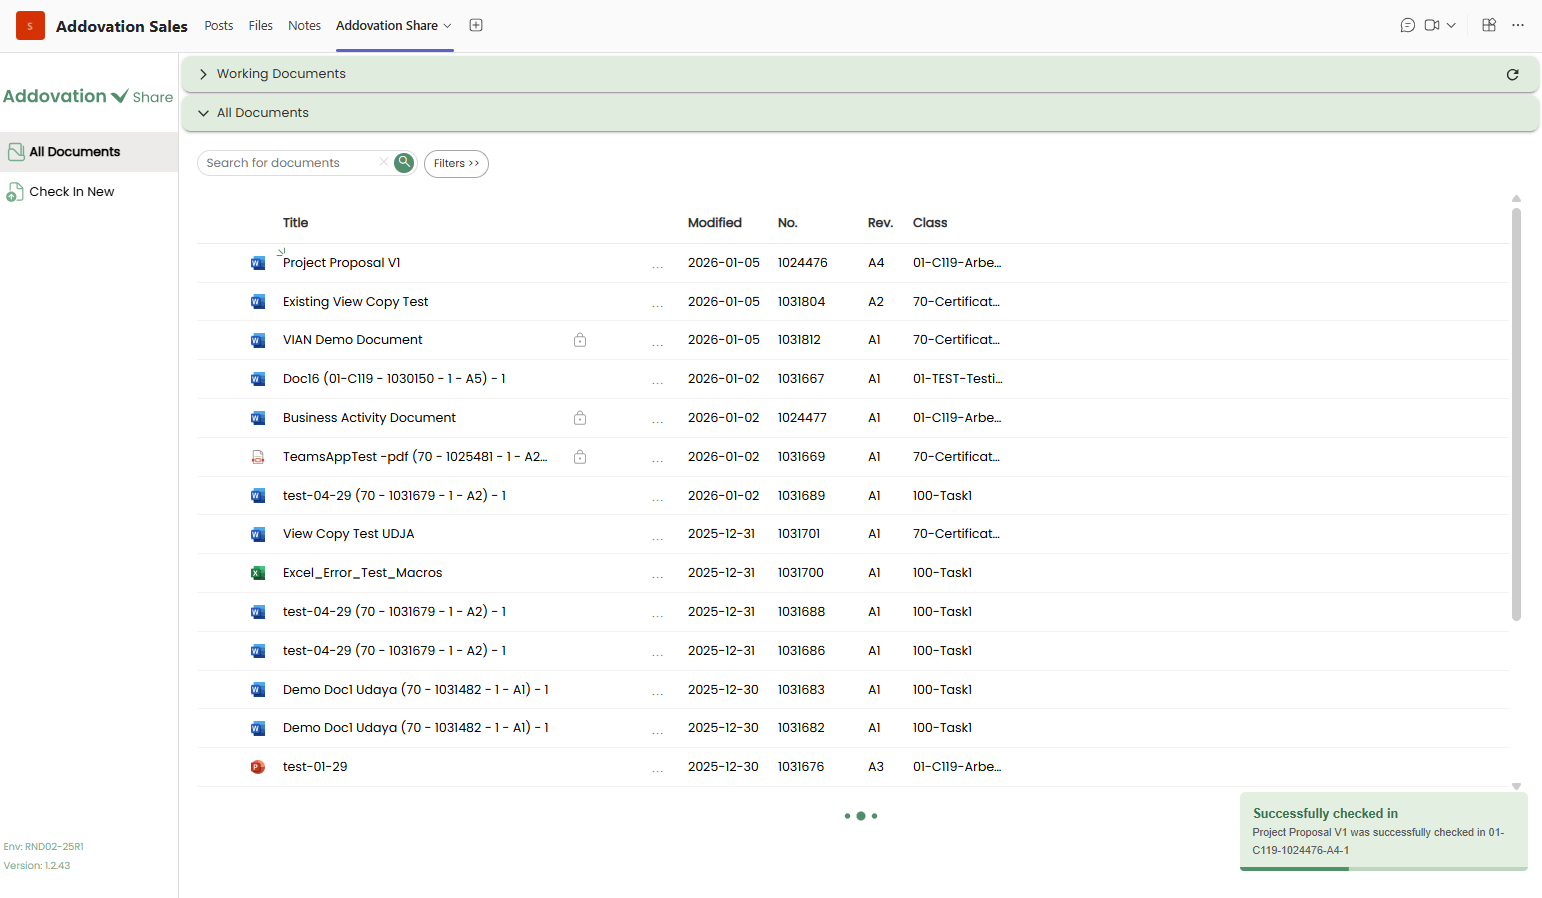
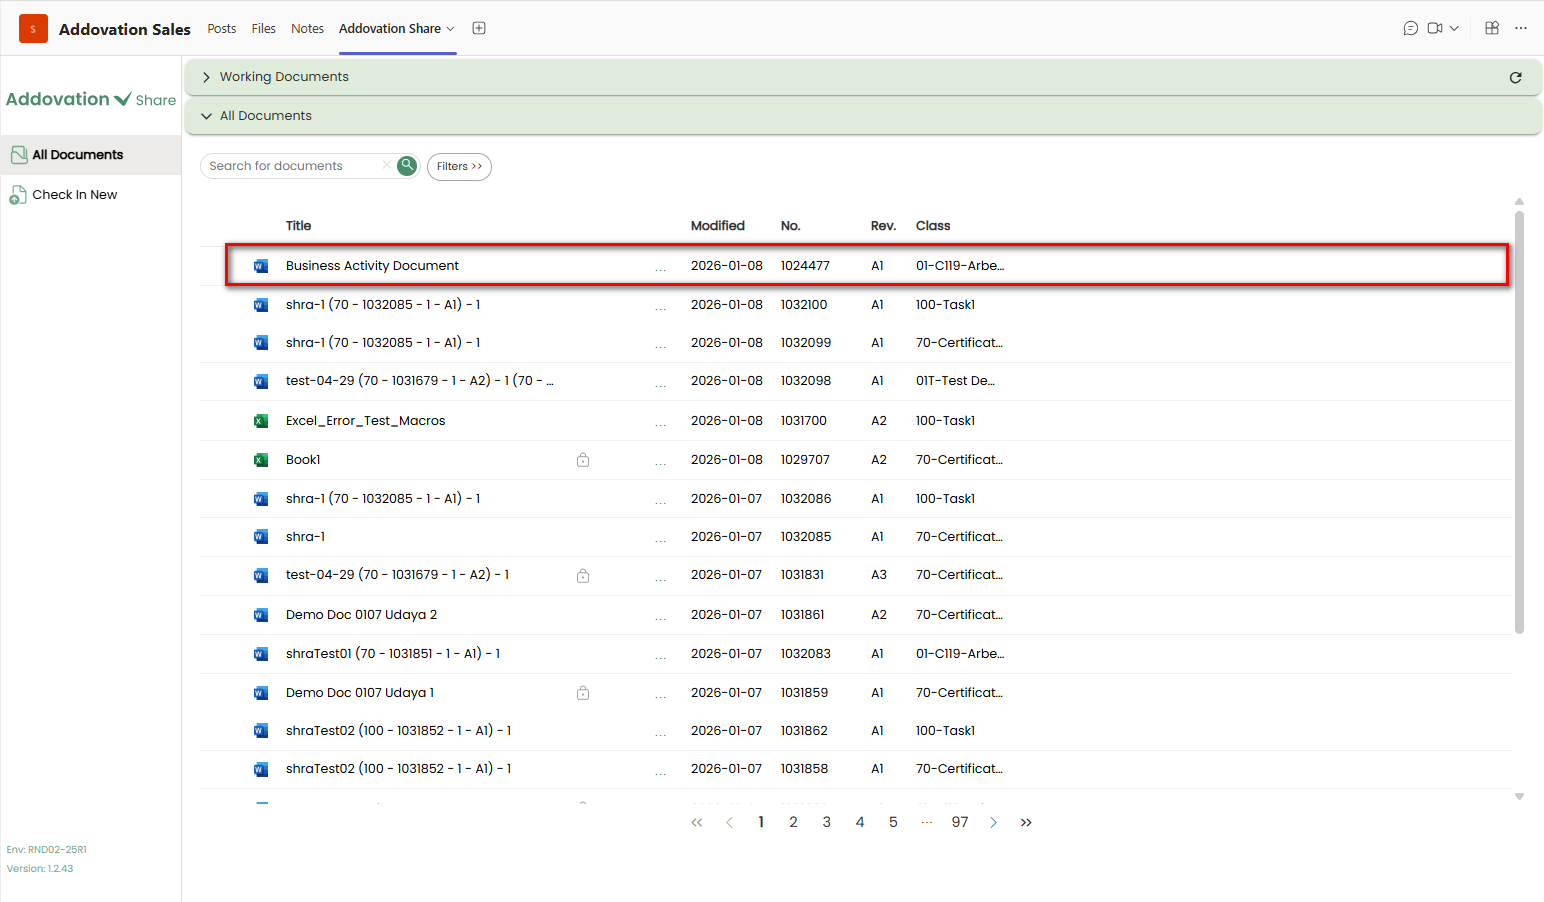
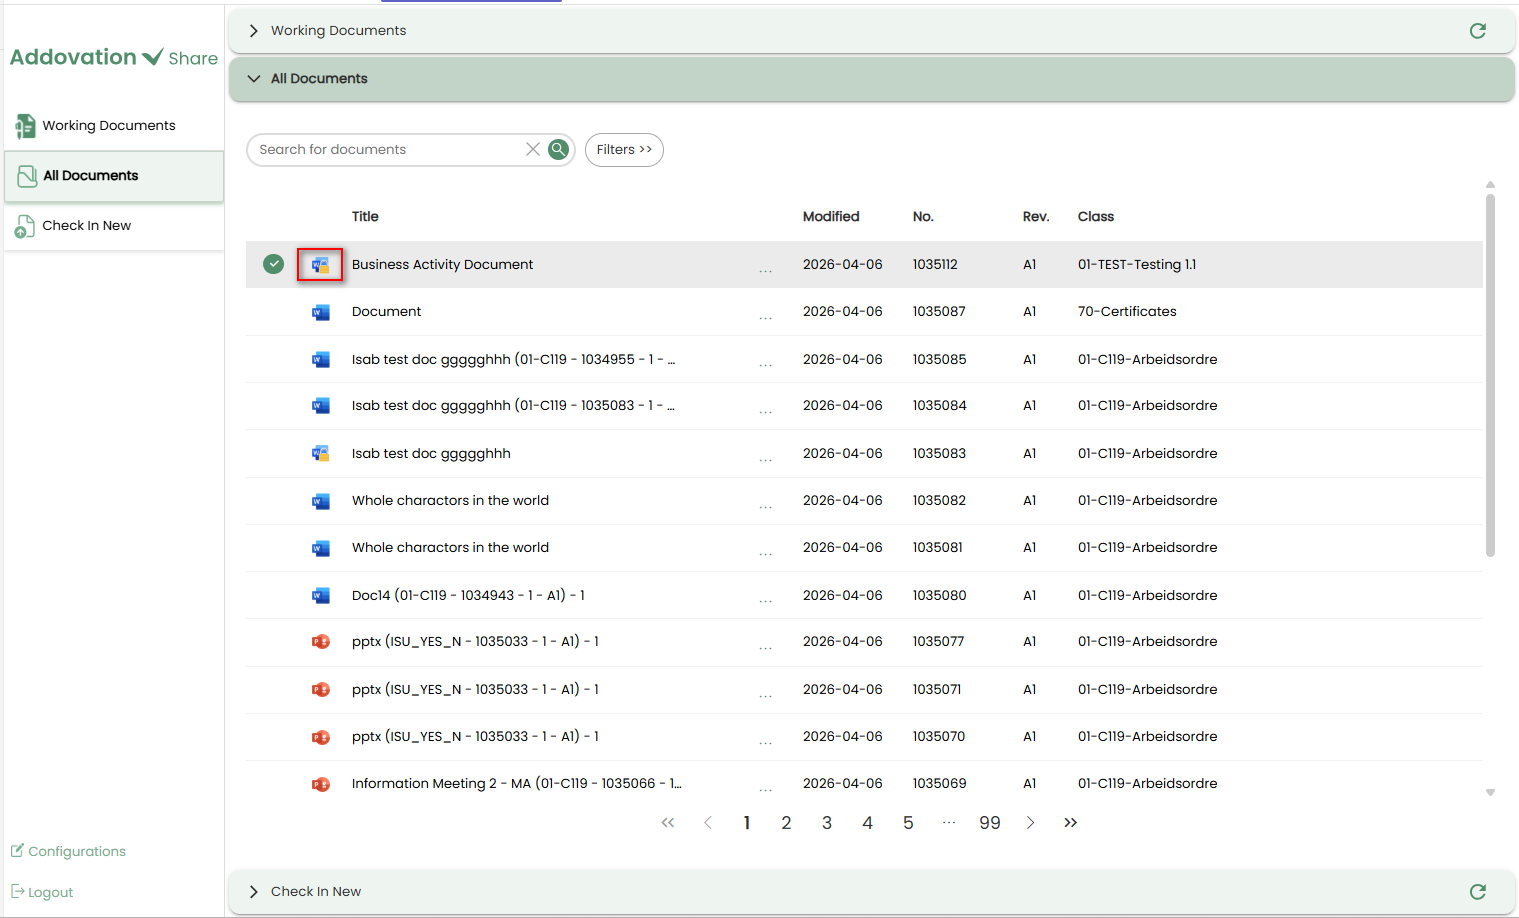
All Documents Section
As explained earlier, this section displays all documents that are connected to IFS and linked to the current channel objects, regardless of their check-out/check-in status.
All users who have access to the channel can view the documents in this section, regardless of which user performed the check-in.
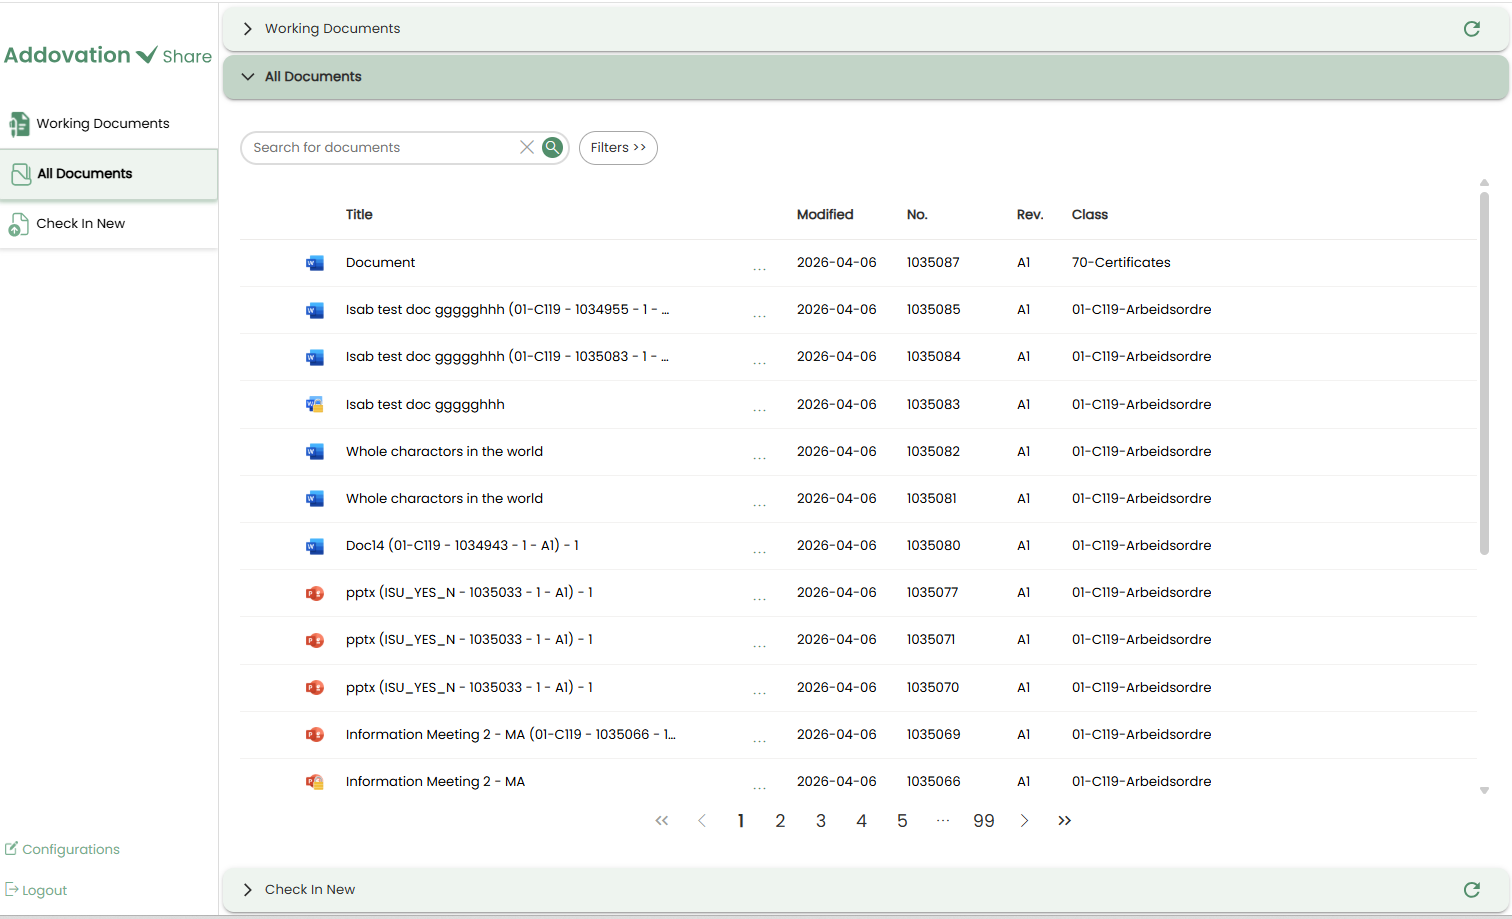
Each document in the list is shown with the following details:
- A file-type-specific icon (there will be lock icon along with the file type icon if the document is checked out)
- Document Title
- Modified Date
- Document Number
- Document Revision
- Class ID – Format Description
- Options menu (accessed via three dots)
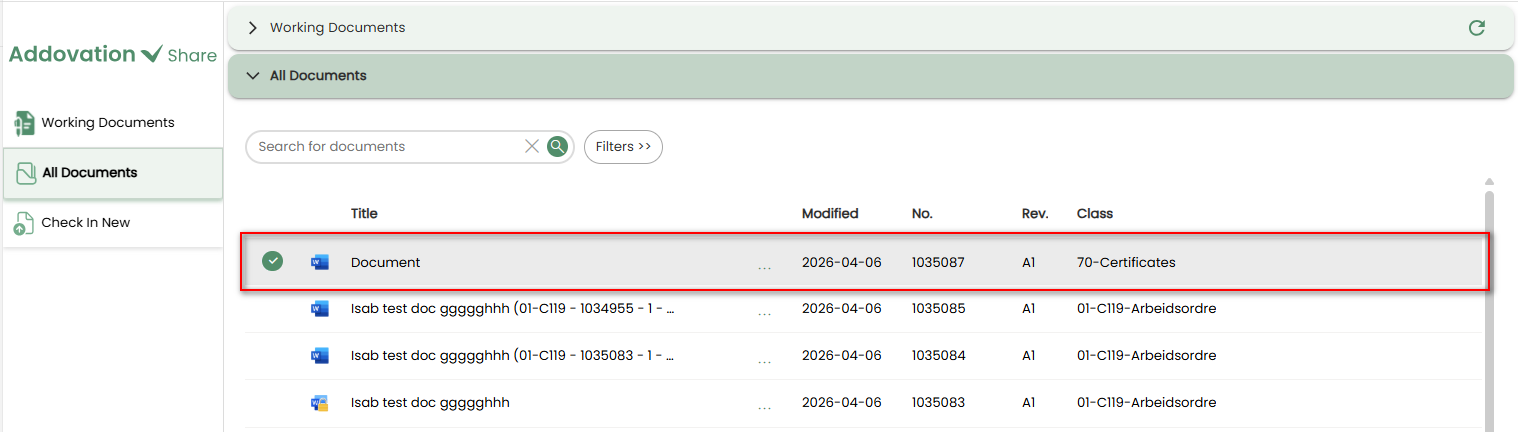
Only one document can be selected at a time.
To select a document, click the
radio buttonlocated to the left of the document title.When you hover over a document, the row is highlighted, and the radio button becomes visible.

- Once selected, the radio button turns green to indicate the active selection.
A maximum of 25 records are displayed per page.
All documents connected to the configured object in IFS are available and can be accessed using pagination controls.
Search Options
A
search baris located at the top of the screen.When the user begins typing, the search is triggered automatically. A
clear (×)icon is provided to quickly remove the entered text.

File Type Filter
- A file type filter is also available on the top bar. By default, it appears collapsed.
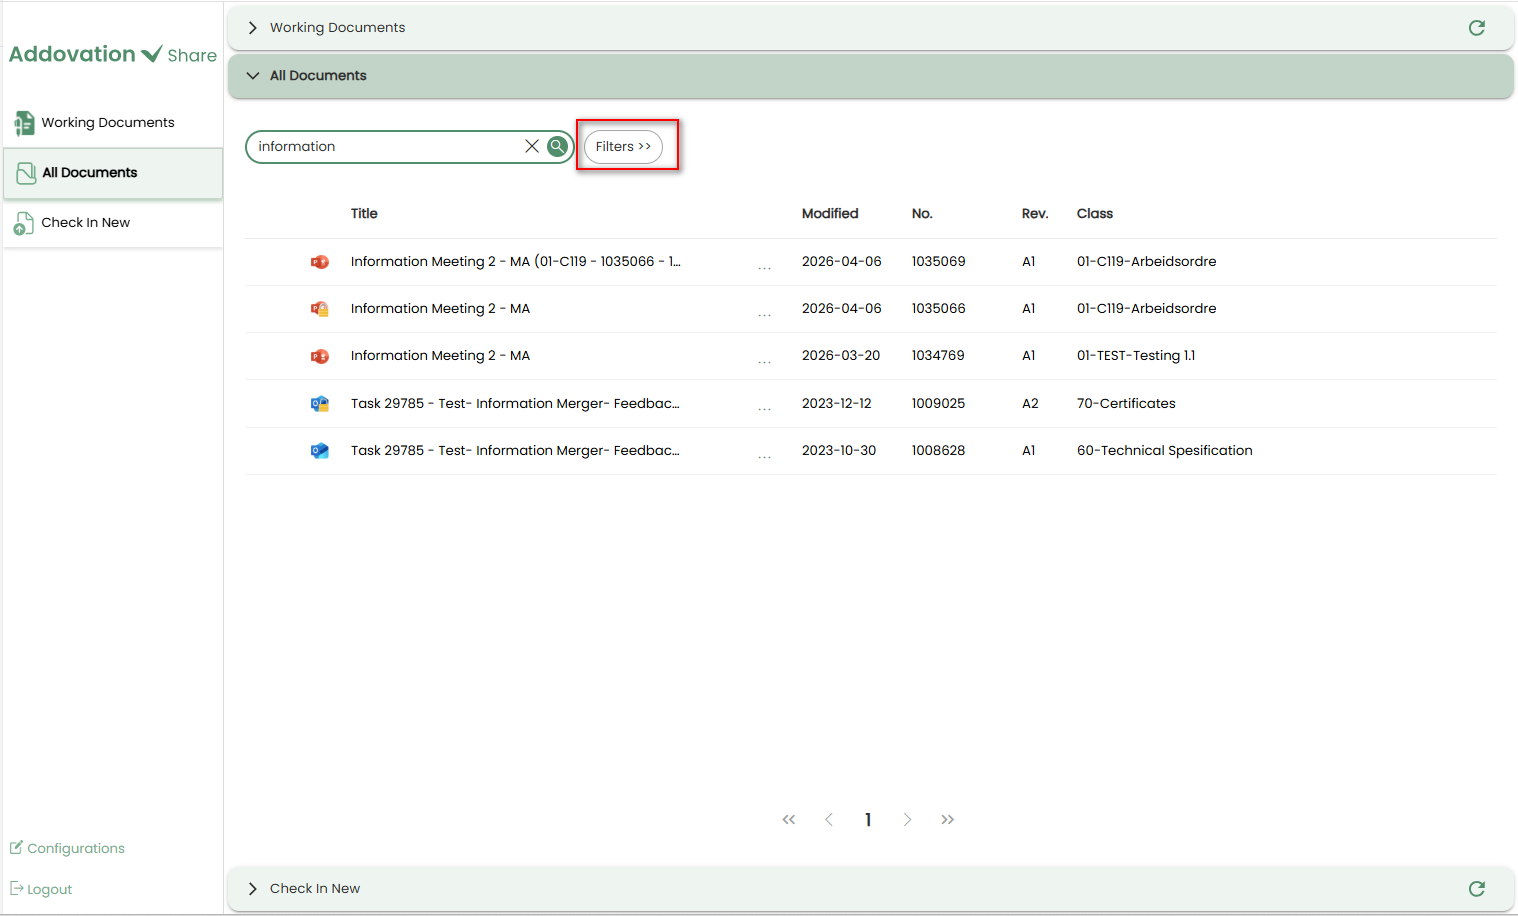
Clicking on it expands the list of file type options. "All Files" is the selected option, highlighted with a black outline.
- All Files
- Word
- Excel
- PowerPoint
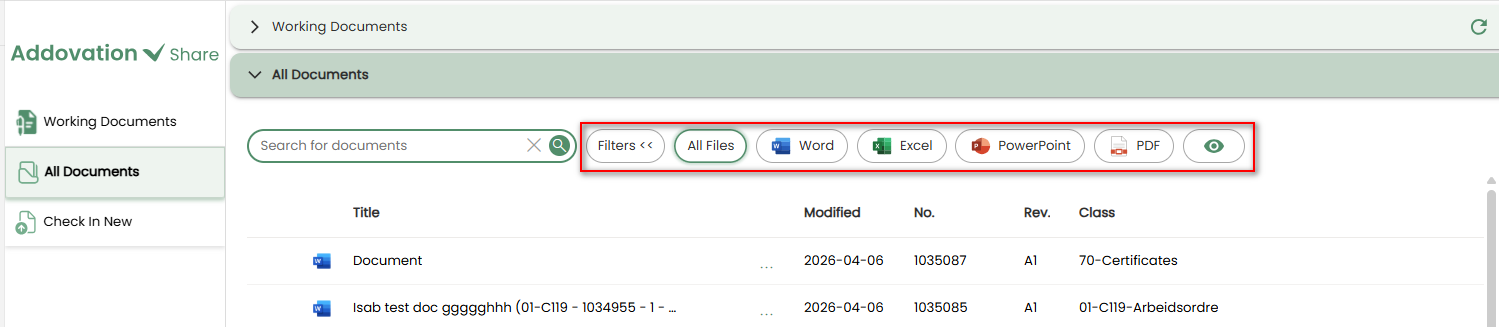
- Selecting a file type filters the document list accordingly. The selected filter will be outlined to indicate the active selection.
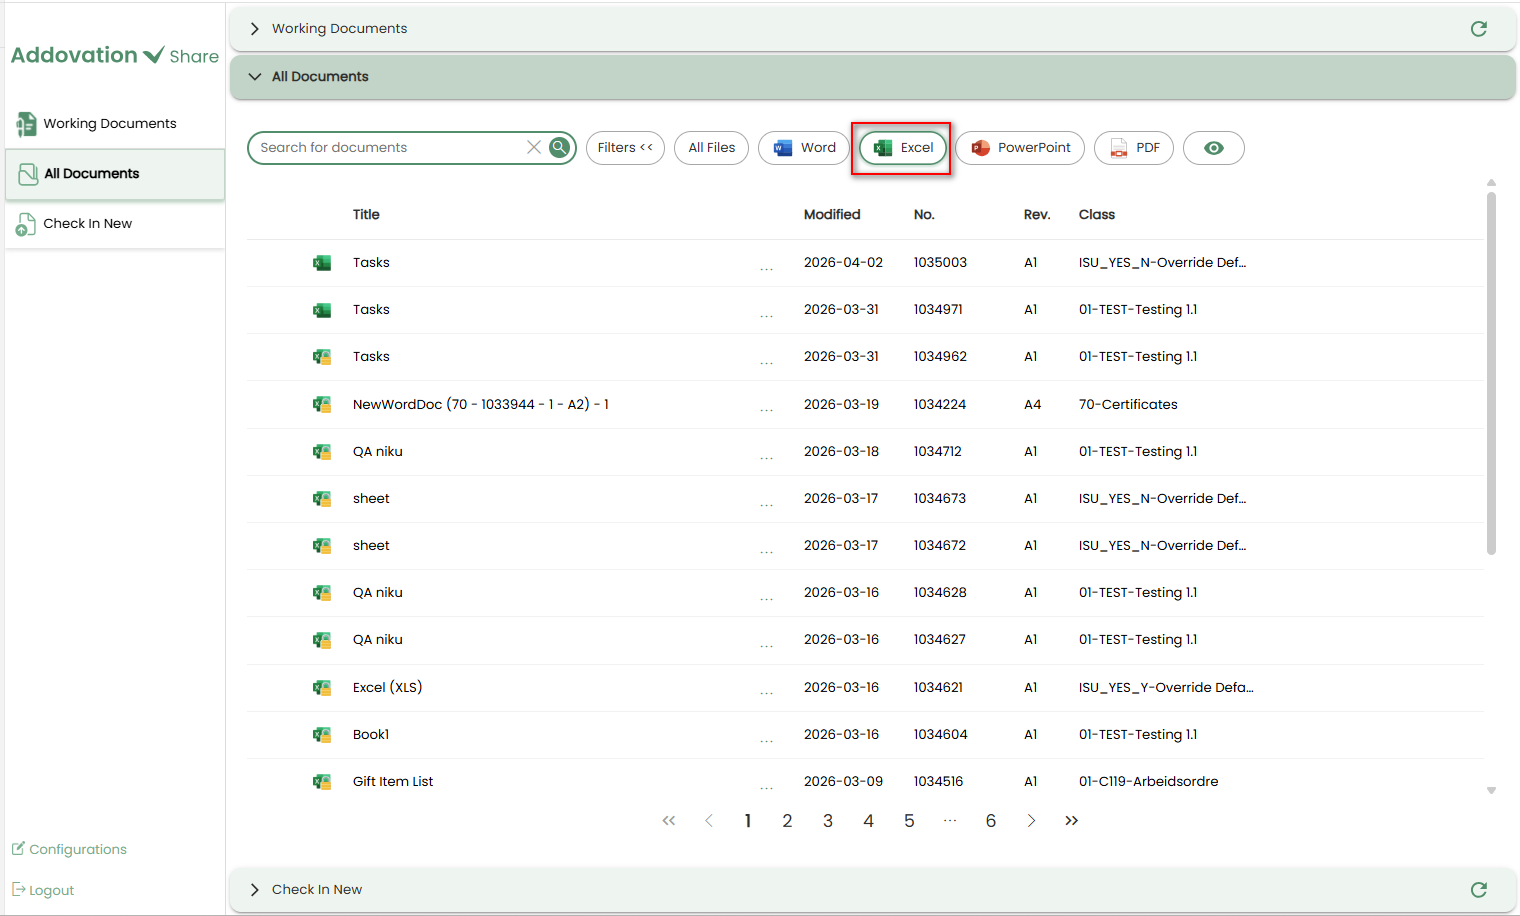
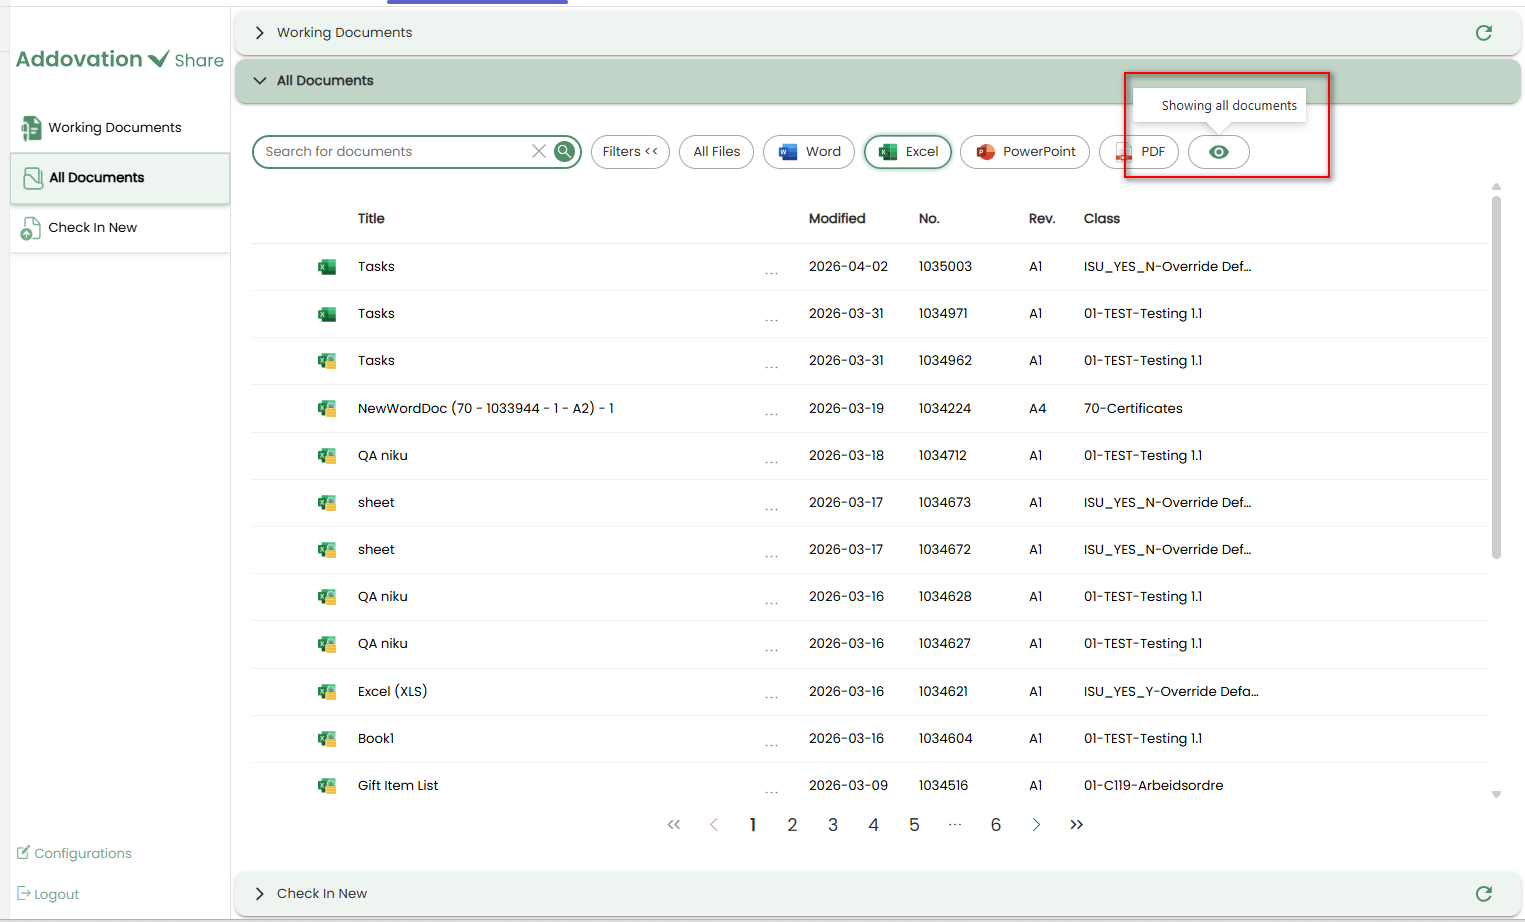
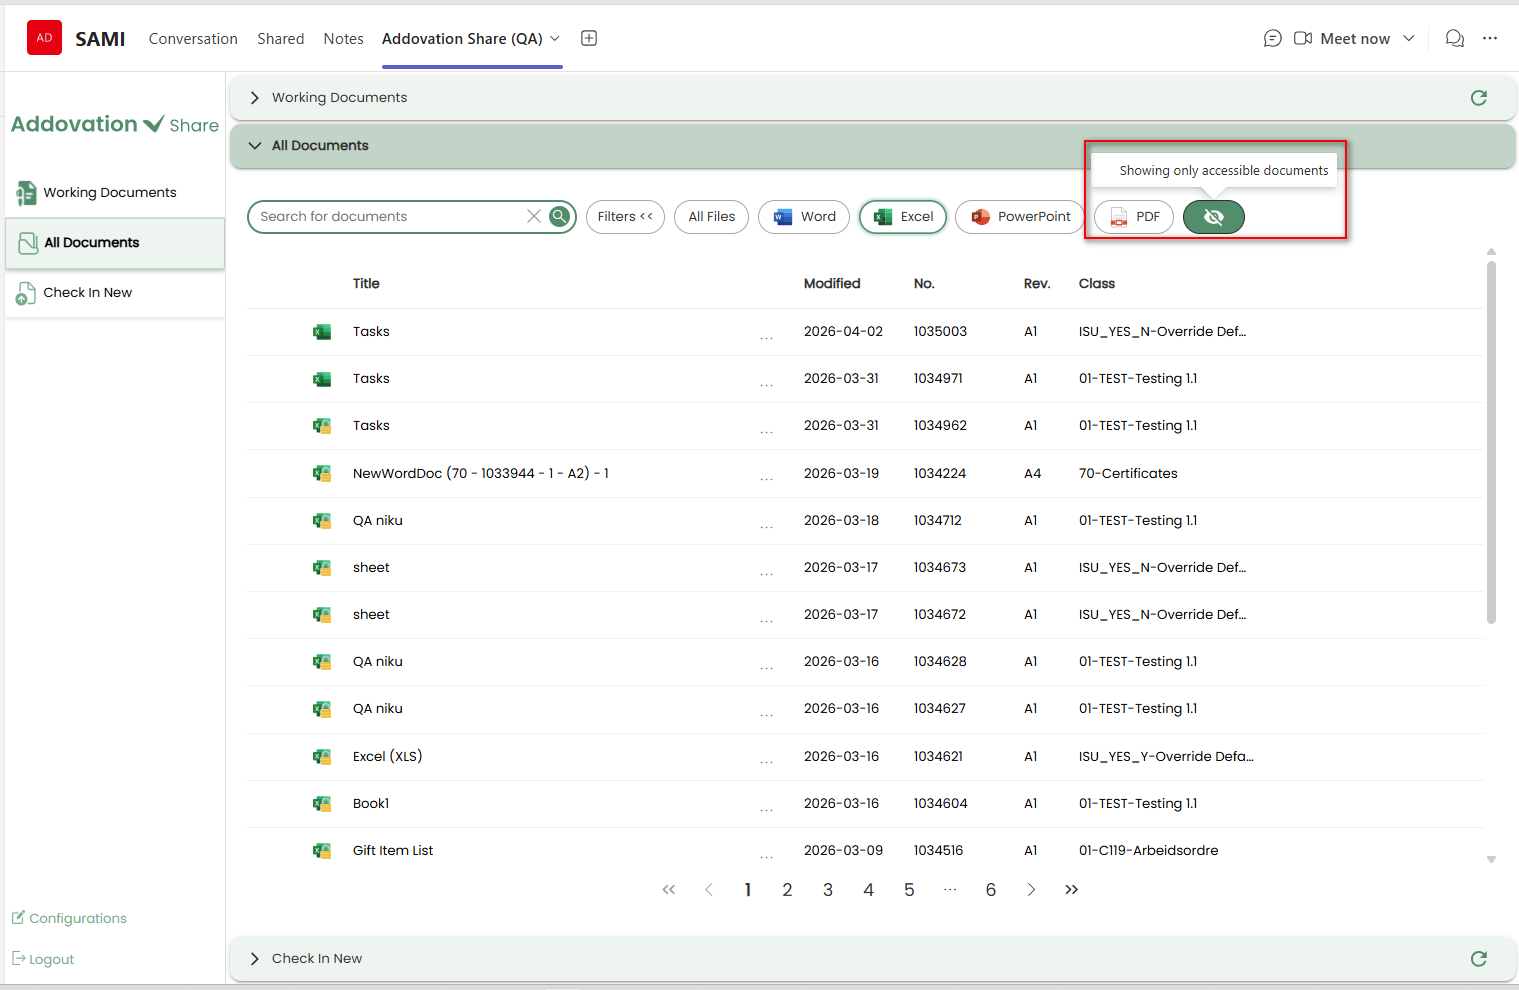
- The
eye iconnext to the file types allows the user to toggle between viewing all documents or only those the logged-in user has access to. Clicking the icon switches between these views.
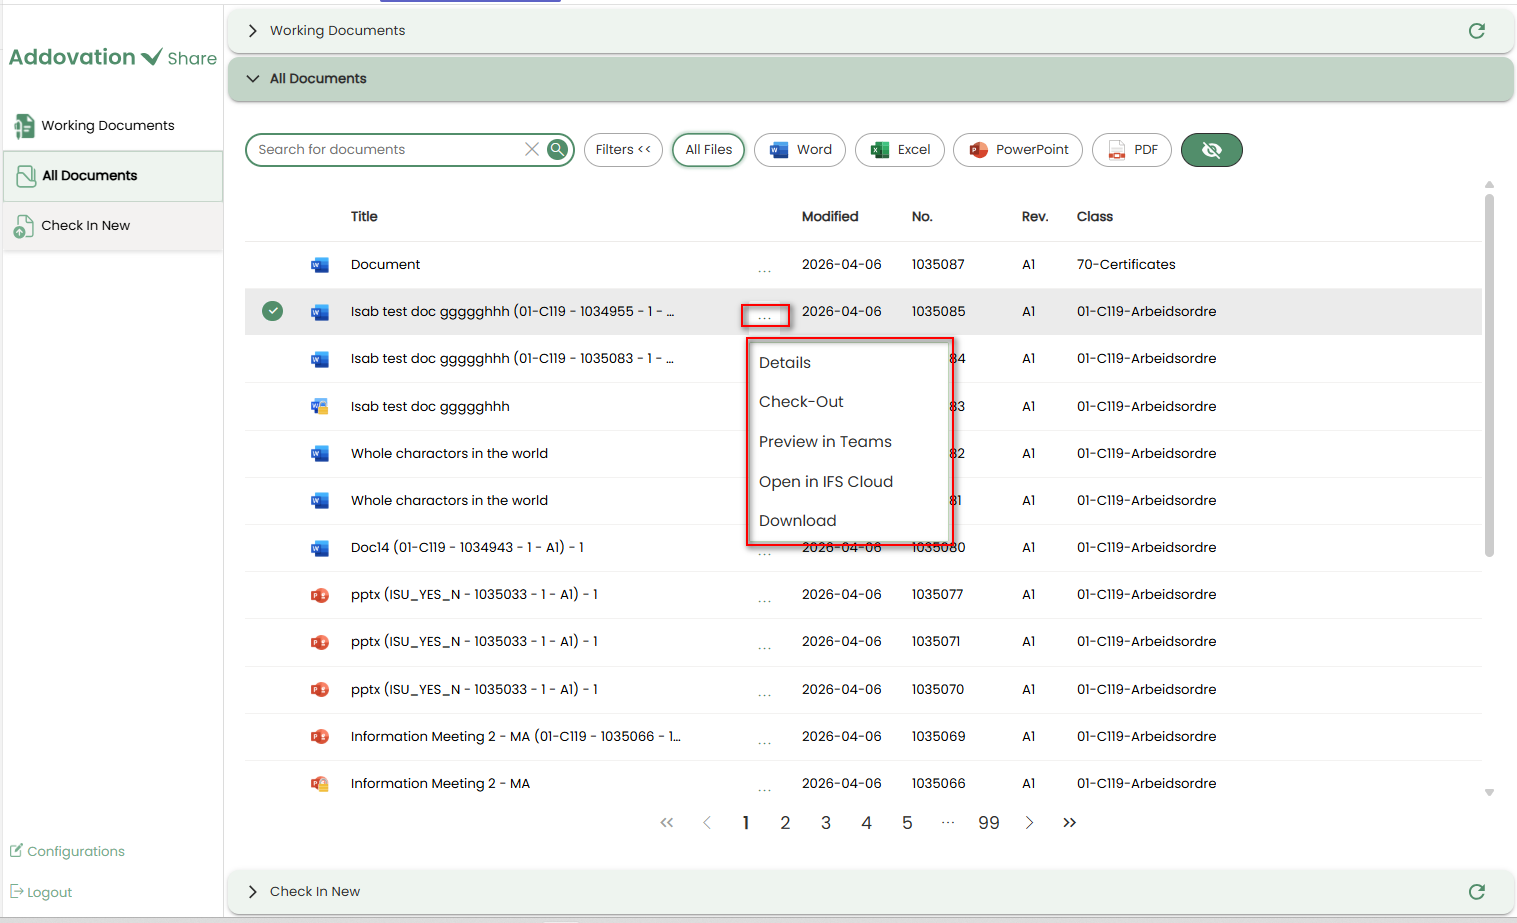
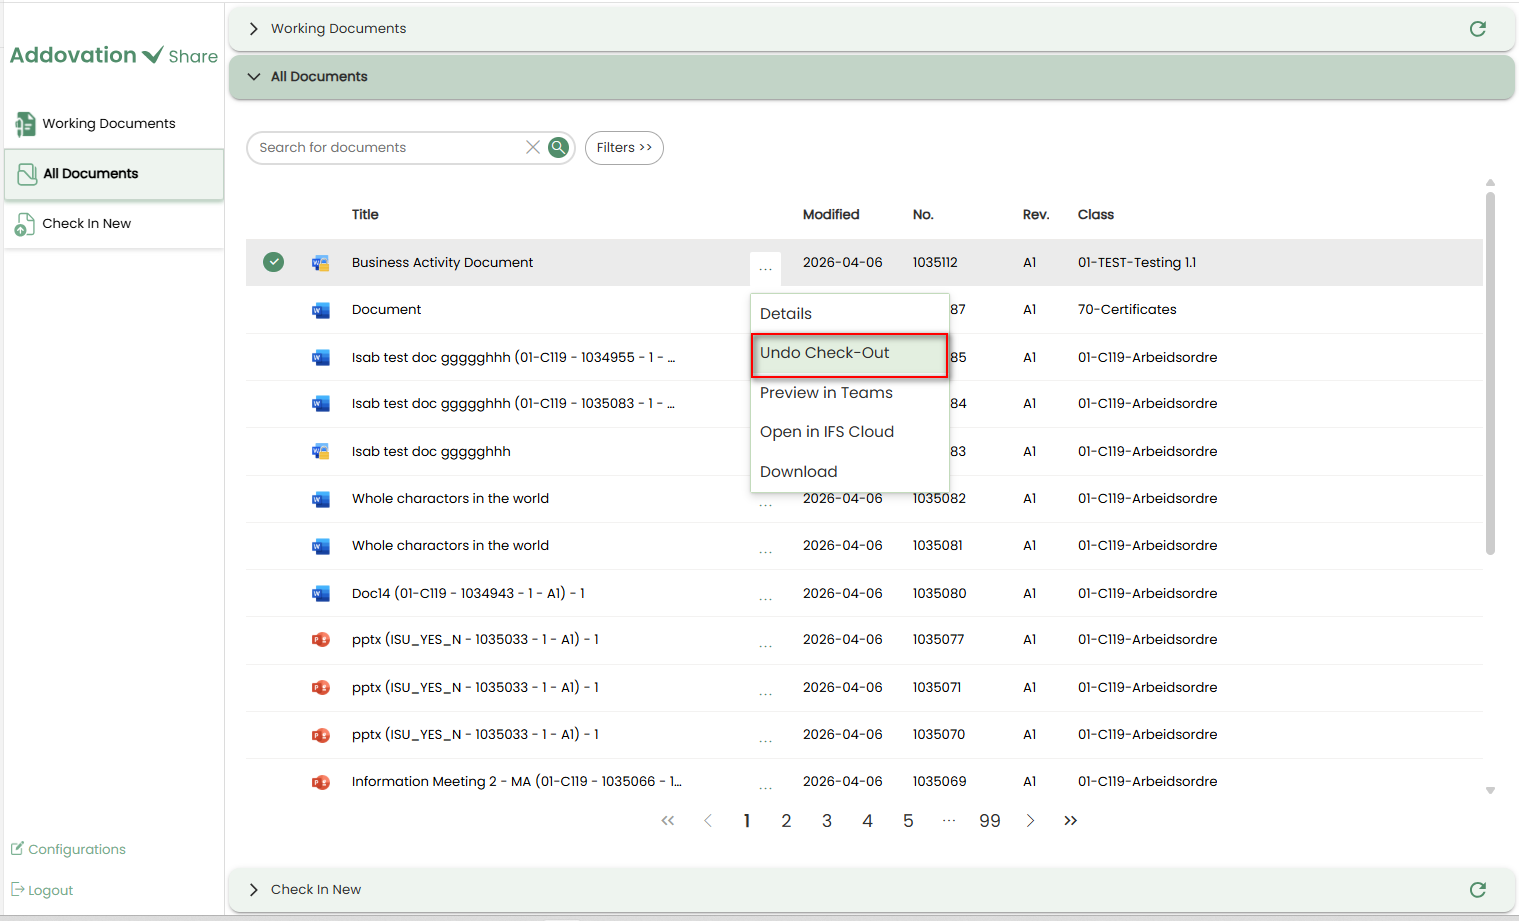
Document Options Menu
To perform actions on a document, click the
three dots (options menu)next to the Document Title.A pop-up menu will appear with the following options:
- Details
- Check-Out
- Preview in Teams
- Open in IFS CLoud
- Download
Details
If you select Details, a new window will open displaying the document’s information.
This option is available to all users, regardless of their document access level.
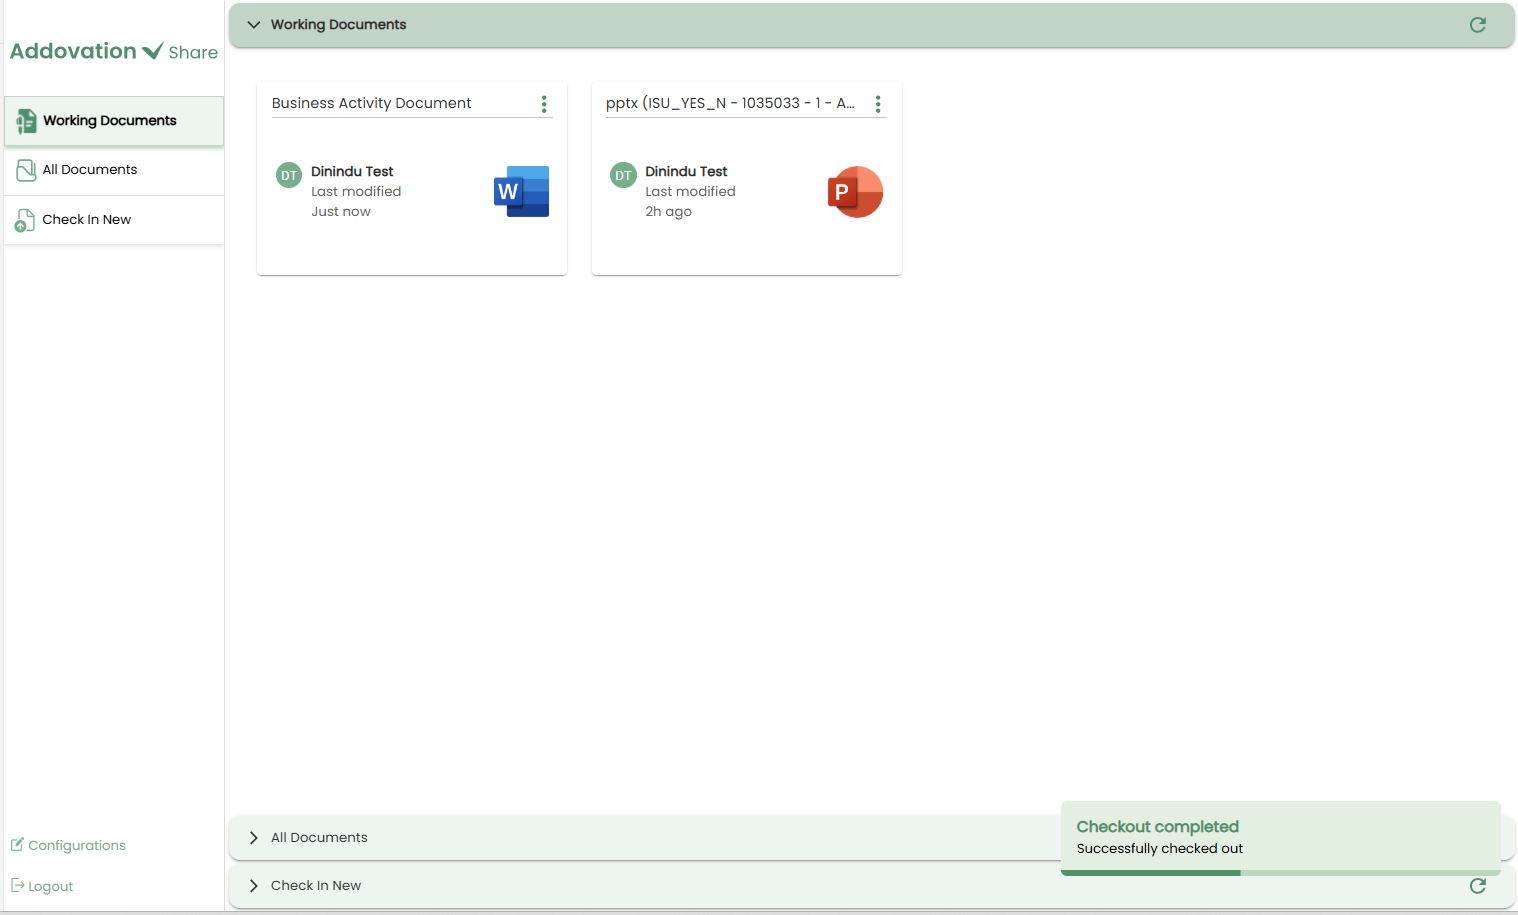
Check-Out
Selecting the
Check-Outoption will check the document out from IFS and move it to the Working Documents tab.This option is available only if the user has
edit accessto the selected document.Once a document is checked out, a loading screen appears briefly before the user is directed to the Working Documents tab.
The newly checked-out document will be visible in the
Working Documentstab, and a toast message will appear in the bottom-right corner confirming that the document was successfully checked out.In the All Documents tab, a
lock iconwill now appear next to the file type icon of the checked-out document.
Undo Checkout
When a document is already checked out, the Check-Out option is replaced with Undo Checkout.
It reverts the check-out action.
This can be performed by any user with
edit accessto the document.
Preview in Teams
- If this option is selected, the selected document will be opened in Teams for preview. Available to all users with view access.
Open in IFS Cloud
- If this option is selected from the menu, the user will be redirected to the IFS Document Revision page in IFS cloud.
Download
Selecting the Download option moves the document to the
Working Documents tab(user’s OneDrive).The downloaded document will appear in the Working Documents tab, and a success message will confirm that the document was successfully checked out.
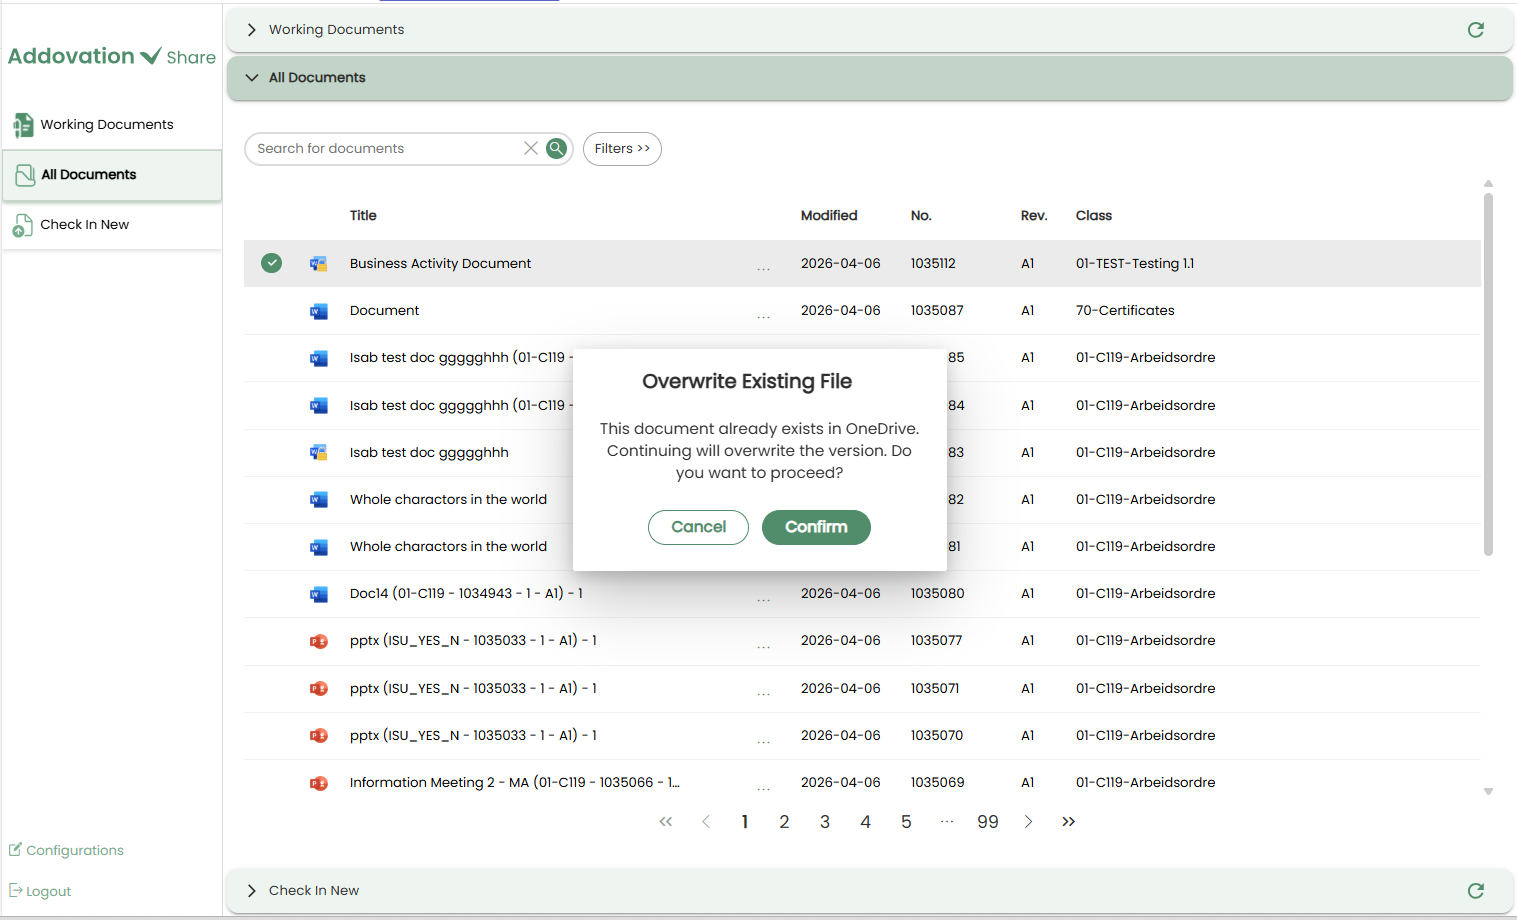
If the document already exists in the user’s OneDrive, the user will be prompted to confirm whether to
overwrite the existing file.

Check in New Section
- The Check in tab displays documents available in the
channel’s OneDrivelocation.
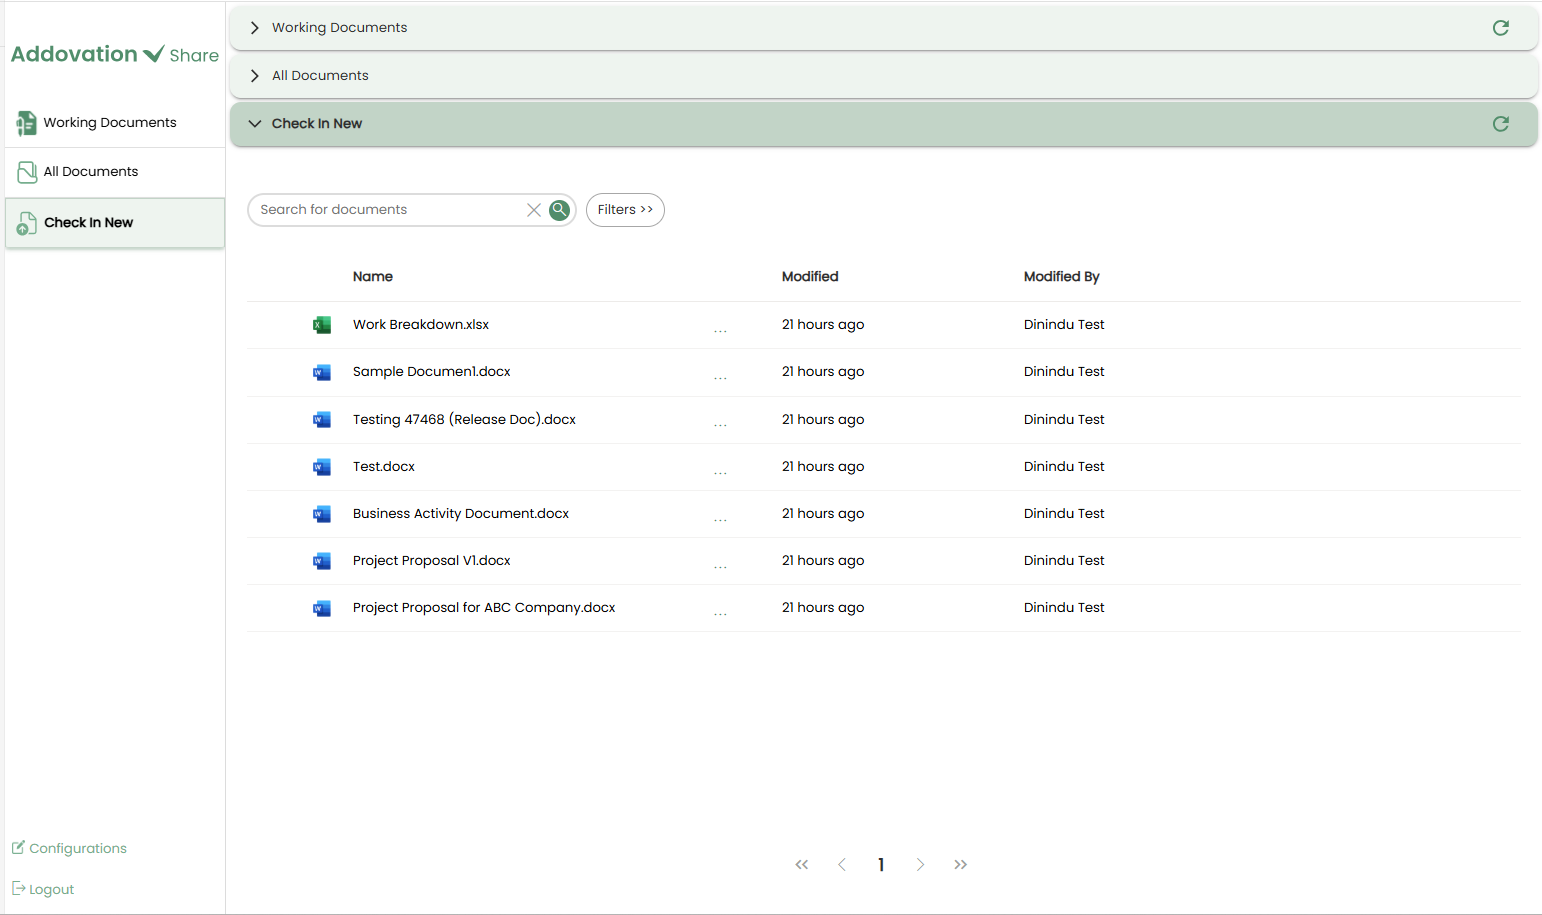
Each document in the list is shown with the following details:
- A file-type-specific icon
- Document Name
- Last Modified Date
- Last Modified Person
- Document Number
- Options menu (accessed via three dots)
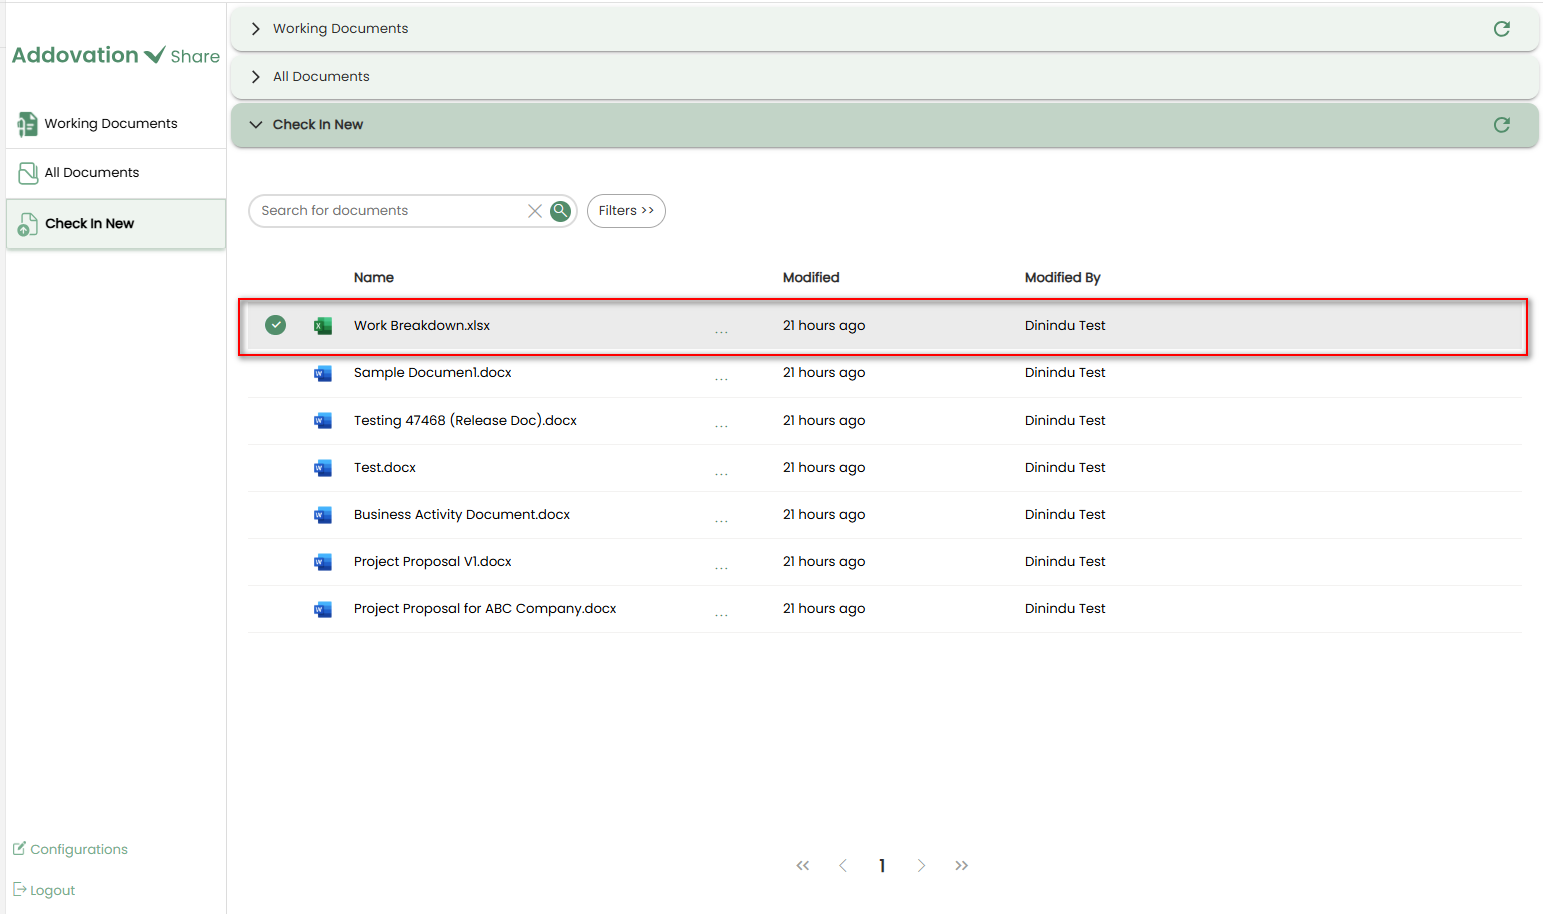
Similar to the IFS Documents tab, only one document can be selected at a time.
Selection is done by clicking the
radio buttonto the left of the document name.
A maximum of 25 records are displayed per page.
All documents from the channel’s OneDrive location are available and can be accessed using pagination controls.
Search and Filter Options
The
search barand filetype filterfunction the same as in the All Documents tab and are available in the top bar.However, the
eye icon, which is used in the All Documents tab to filter out inaccessible documents, is not available here.
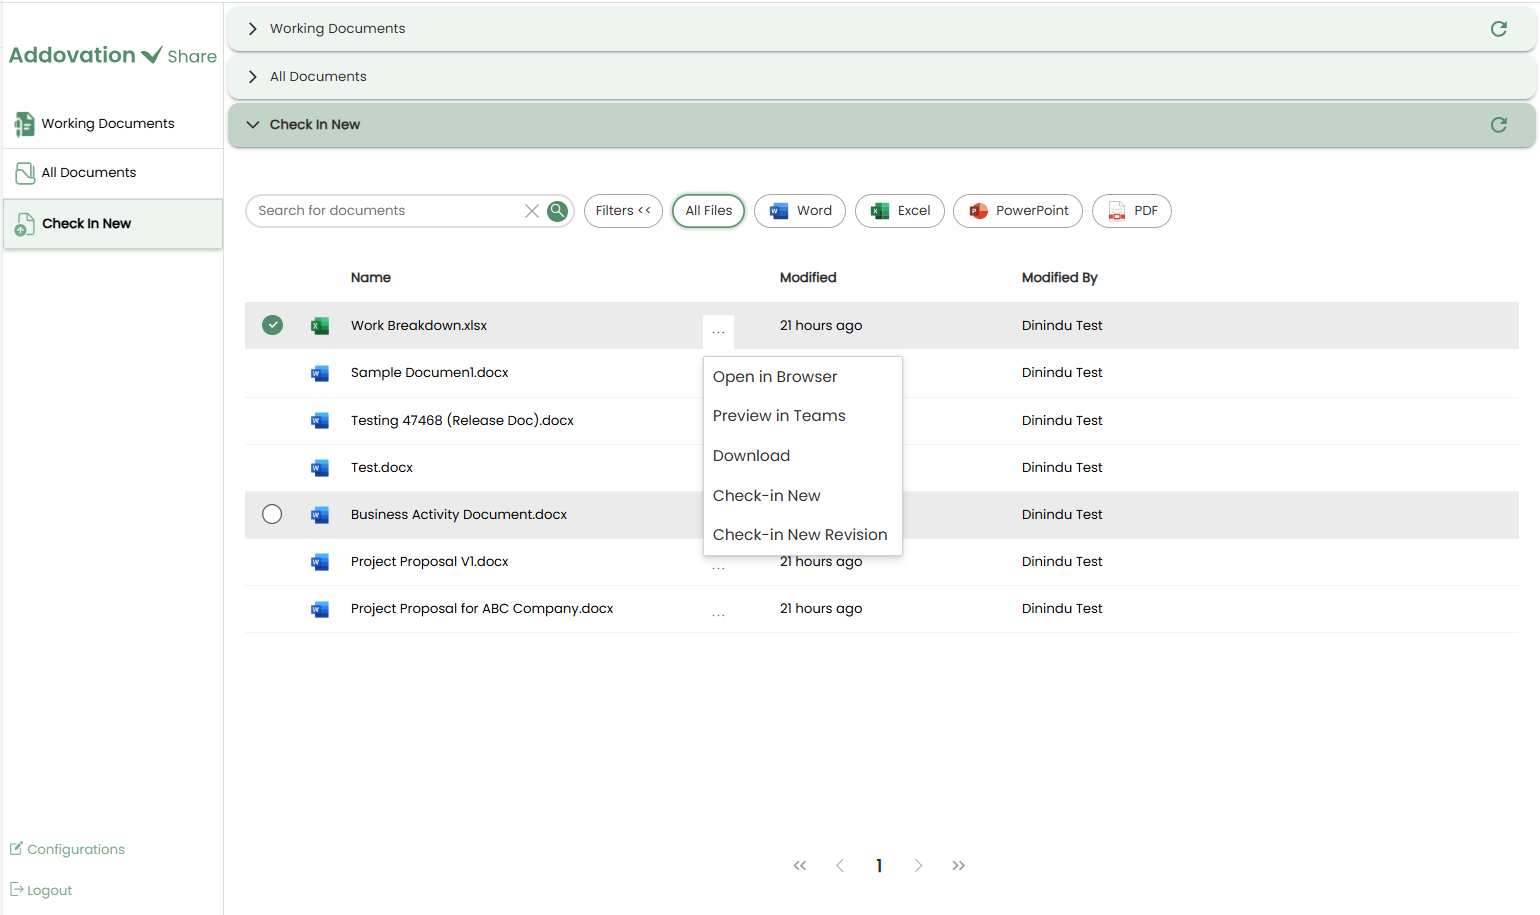
Document Options Menu
To perform actions on a document, click the
three dots (options menu)next to the Document Title.A pop-up menu will appear with the following options:
- Open in Browser
- Preview in Teams
- Download
- Check-in New
- Check-in New Revision
Open in Browser
Selecting Open in Browser opens the document in a web browser for preview and editing.
The document opened in the browser can be edited if required and changes made will be saved automatically to OneDrive.
Preview in Teams
Selecting Preview in Teams opens the document directly within Microsoft Teams for preview and editing.
The document can be edited if required and changes made will be saved automatically to OneDrive.
Download
- Downloads the document to the local device.
Check-In New
A document from the
channel’s OneDrivetab can be checked into IFS as a new document using the Check-In New option.When Check-In is selected from the context menu, a new window will open.
The
Document Titleof the selected file will be automatically populated and can be edited if necessary.
The
Class and Formatselection,Create View Copysection, and theRelease Documentoptions function in the same manner as described in the previous sections of this document.Once the user clicks
Next, they are directed to the Object Connection Selection section.The section displays
Selected Objectsby default based on the channel configuration and also provides an option to add new object connections, either from recently used items or through advanced search, as explained in the previous sections.Finally, the user should click the
Check-in Documentbutton to check in the file to IFS.
Once the file is successfully checked in to IFS, a confirmation notification will appear in the bottom-right corner of the screen.
The user will be immediately redirected to the All Documents tab without waiting for the notification to disappear. The notification will remain, floating above the window, and will disappear automatically.
The newly added document will appear at the top of the document list and will be visually highlighted for easy identification.
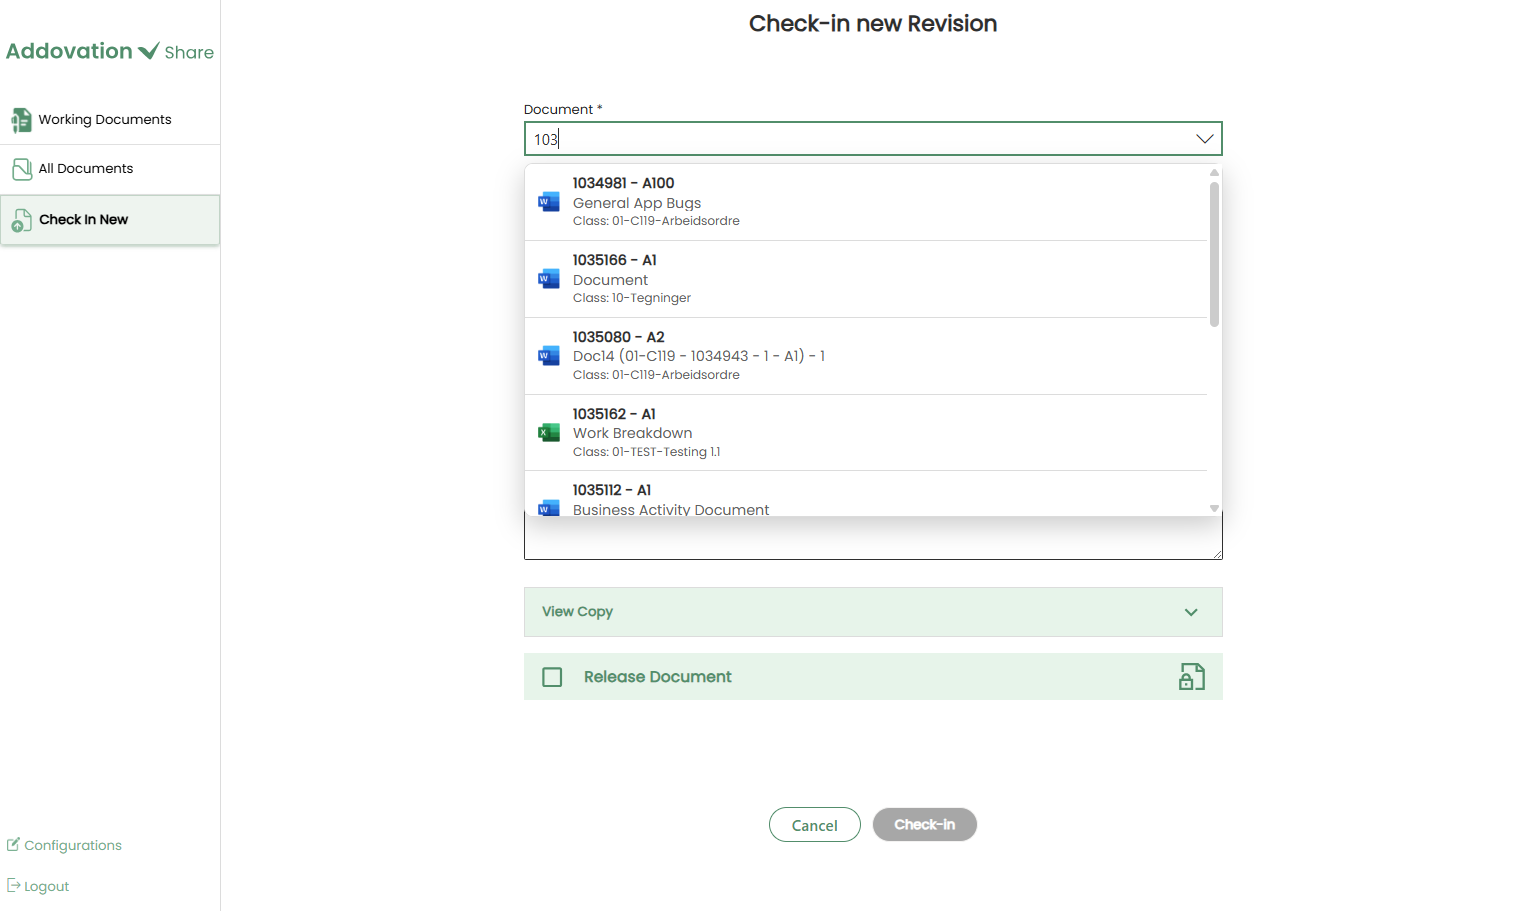
Check-In New Revision
A document from channel’s OneDrive can be checked into IFS as a new revision using the Check-In New Revision option in the context menu.
To begin, open the context menu and select
Check-In New Revision.After selecting Check-In New Revision, a new screen will appear with empty fields.
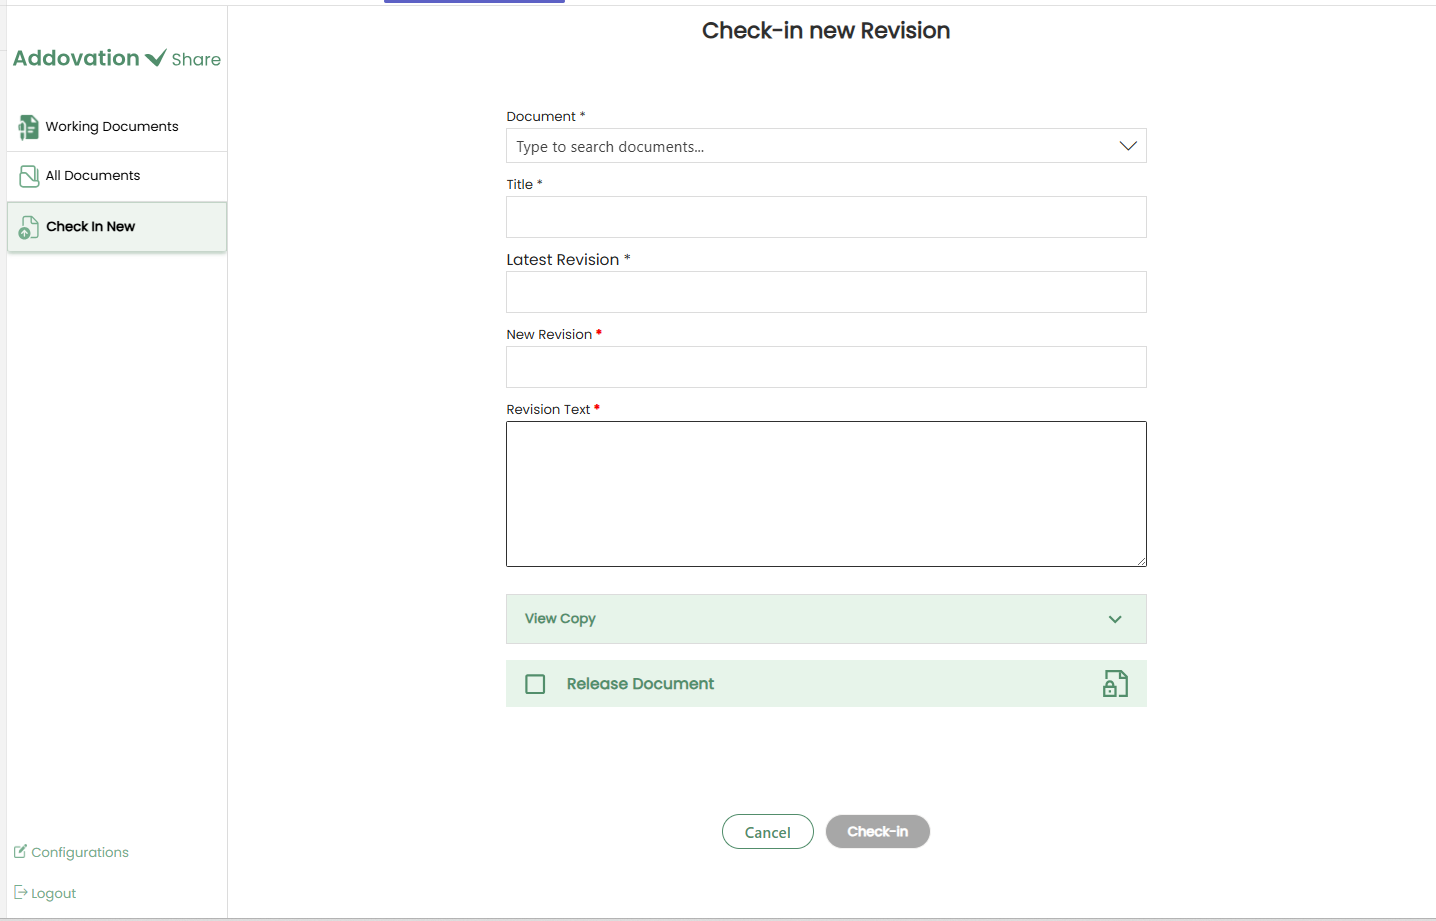
Use the
searchable dropdownto find documents that have been checked into IFS from the current channel and select one as thebase document.The current document will then be checked in as a
new revisionof the selected document.
The
Title,Latest RevisionandNew Revisionfields will be auto-filled based on the selected document.The Title and Latest Revision field will be read-only, but the New Revision number can be modified if needed.
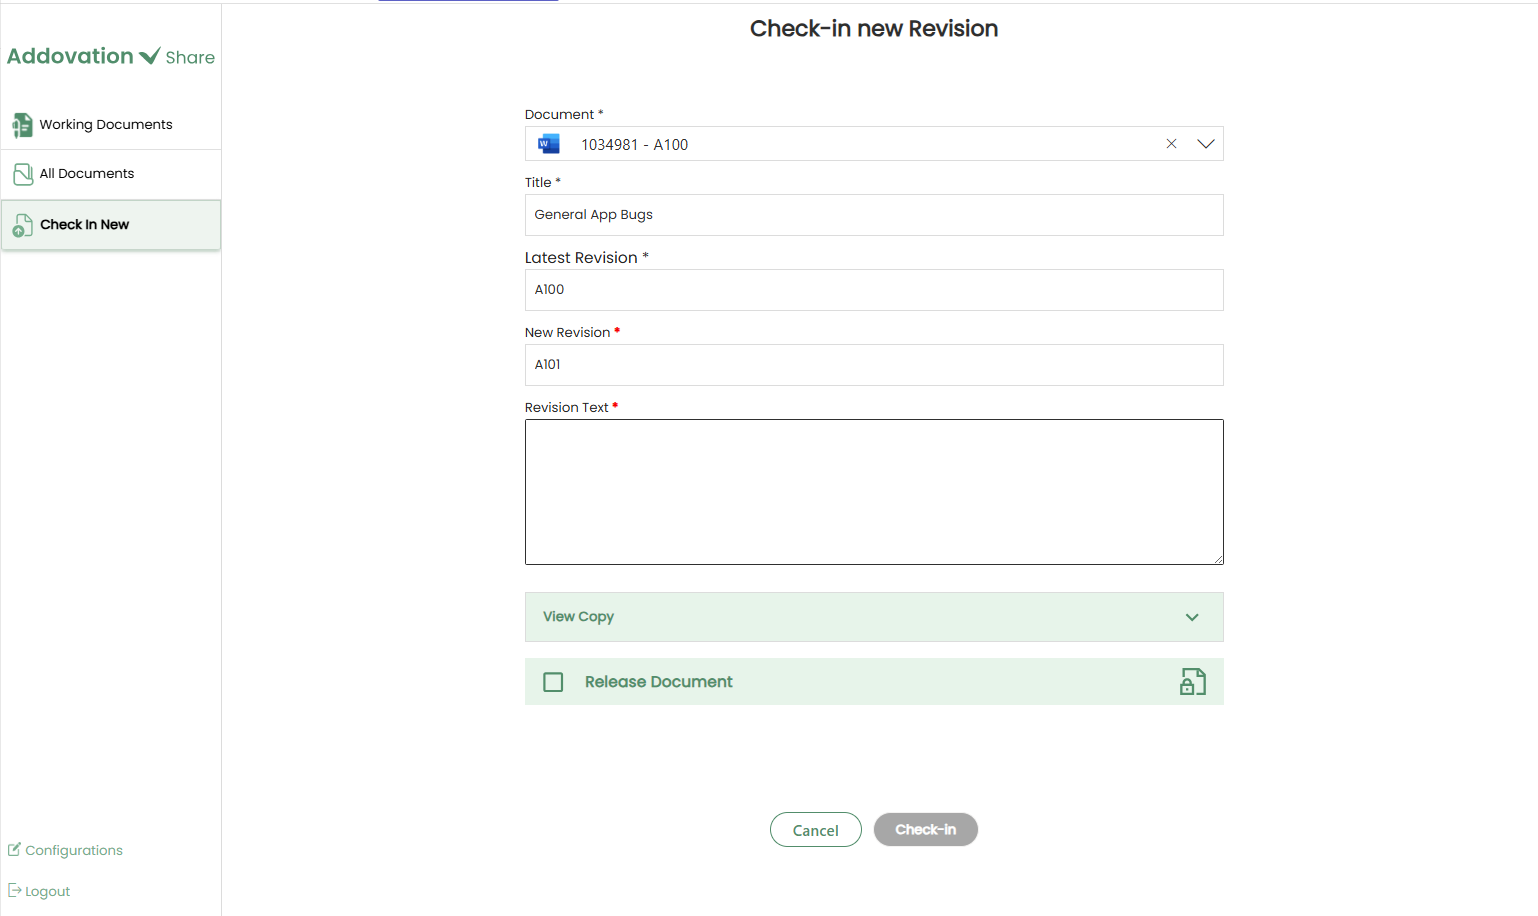
Enter an appropriate
Revision Textand this field is mandatory.The
Create View Copysection and theRelease Documentoptions function in the same manner as described in the previous sections of this document.Once complete, click the
Check-Inbutton to complete the process. The document will be checked into IFS as a new revision.A confirmation notification will appear, and the user will immediately redirect to the “All Documents” tab, similar to the Check-In New flow. The newly checked-in document will be displayed at the top of the list.