Addovation Sync - CRM - Azure Setup Guide (On customer tenant)
Last Updated: 2025-07-21
Architecture
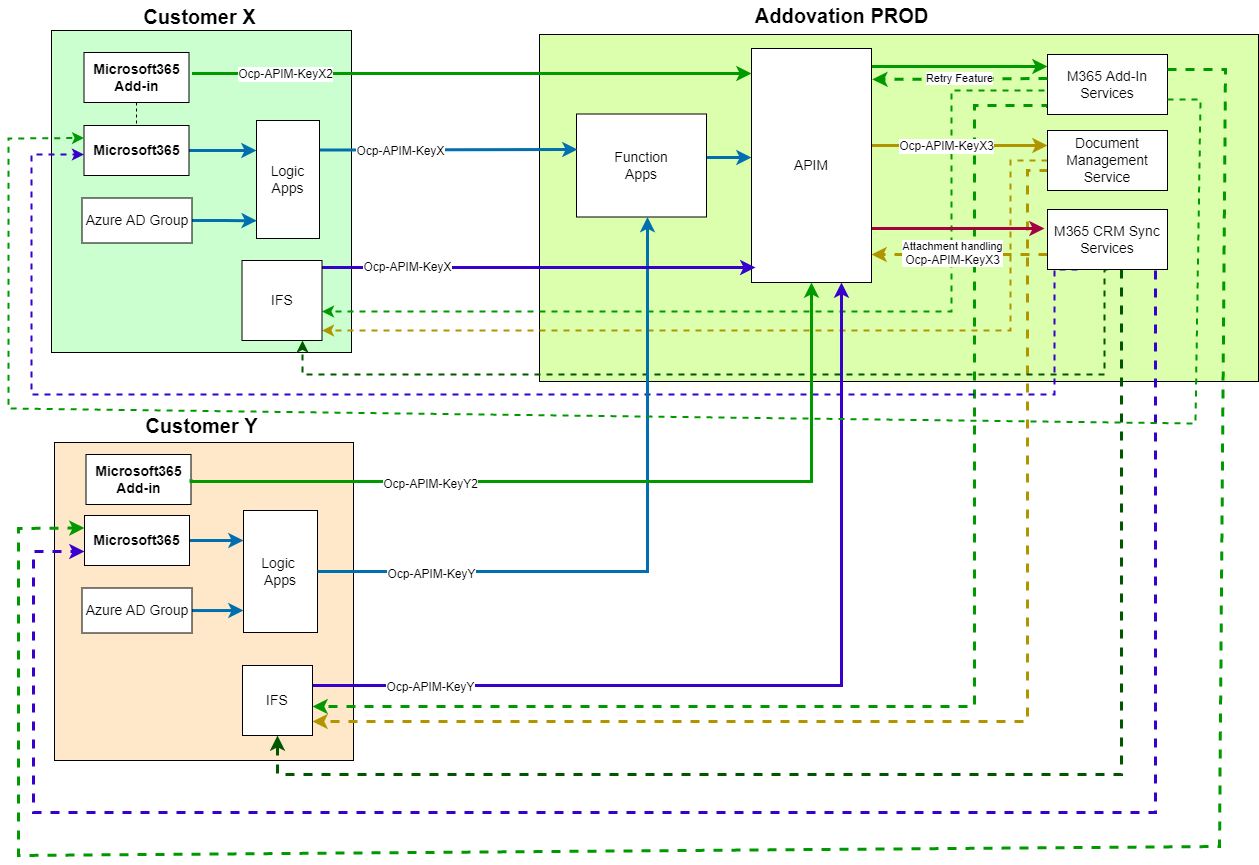
- Azure setup on Addovation PROD - Only
2 function appsshould be deployed. - Azure setup on Customer’s Tenant - Only
3 logic appsshould be deployed, and changes should be redirected to the same function app on Addovation PROD. - Configurations on IFS Applications.
Azure App Registration
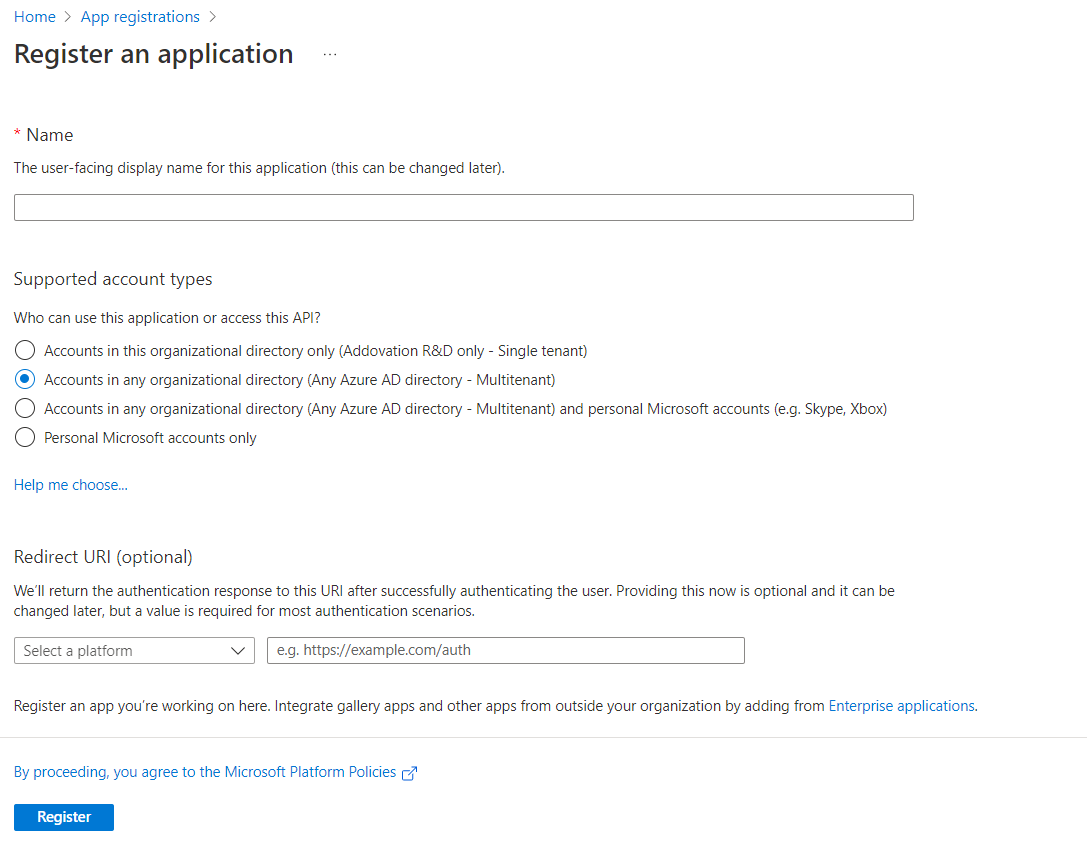
- Log in to Azure portal.
- Select
App Registrationon Home page. - Select
New Registration.


- Provide a Name for the app registration.
- Select Multitenant for supported account types.
- Leave Redirect URI empty.
- Select Register to complete the initial app registration.
- Once the registration is finished, on the app registration's Overview pane, you can see the Application (client) ID, also called the client ID, this value uniquely identifies your application.

- Select Certificates & secrets.
- Select New client secret and create. You can provide a description as you need to identify the details.
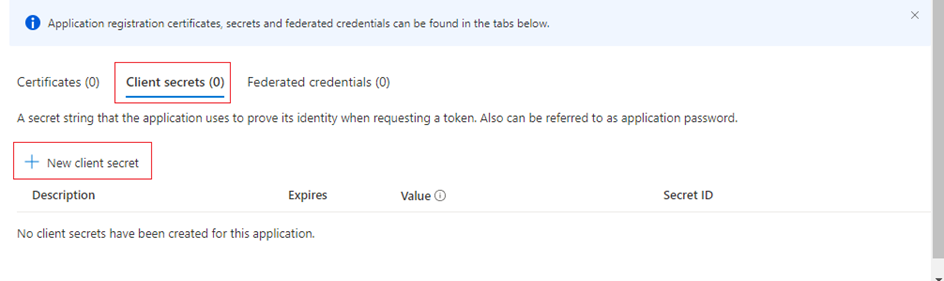
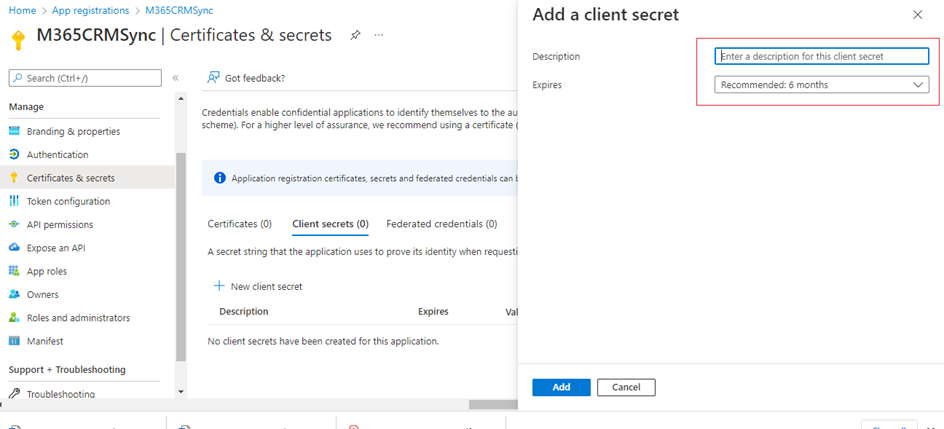
- Make sure to get copied the secret key as depicted below.

- Copy client-id and tenant-id from application overview.
- Select API Permissions -> Add a permission.
- Add following API permissions to the Application and grant tenant-wide admin consent.

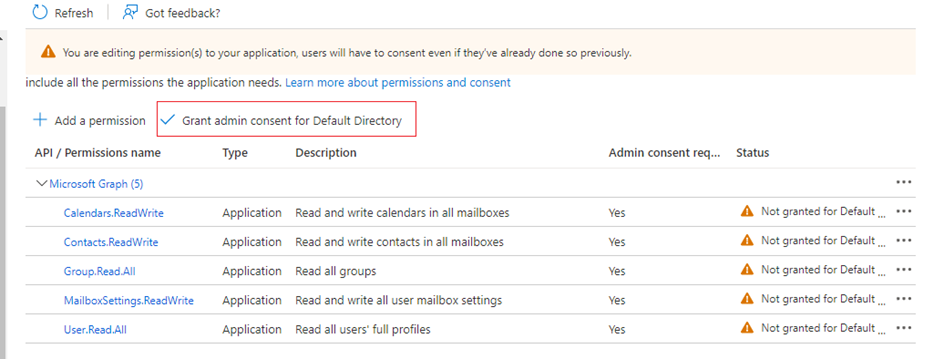
- Select Microsoft APIs -> Microsoft Graph.

- Select Application Permissions , search and add following permissions.

There are two separate ways of providing permissions. The customer may decide which alternative they prefer.
- A single app registration for both the customer’s environment components (logic apps) and services in Addovation’s environment.
OR
- An app registration for the customer’s environment components (logic apps), and another app registration for the services in Addovation’s environment.
Required permissions:
- Permissions required when only one app registration is used to access both the customer’s environment components (logic apps) and services in Addovation’s environment.
API / Permissions name Description |
Type |
Description | Used for |
|---|---|---|---|
| Calendars.ReadWrite | Application | Allows the app to create, read, update, and delete events of all calendars without a signed-in user. | Create, update or delete M365 Events from IFS. |
| Contacts.ReadWrite | Application | Allows the app to create, read, update, and delete all contacts in all mailboxes without a signed-in user. | Create, update, or delete M365 Contacts from IFS. |
MailboxSettings.ReadWrite |
Application | Allows the app to create, read, update, and delete user's mailbox settings without a signed-in user. Does not include permission to send mail. | Absence Calendar sync, Automatic Reply setup for synced information from IFS. |
| User.Read.All | Application | Allows the app to read the full set of profile properties, group membership, reports and managers of other users in your organization, without a signed-in user. | Read user details in Logic Apps/ function apps. |
| Group.Read.All | Application | Allows the app to read memberships for all groups without a signed-in user. Also allows the app to read calendar, conversations, files, and other group content for all groups. Note: Not all group APIs support access using app-only permissions. |
Read group members(users) in the groups in Logic Apps/ function apps. |
| Files.ReadWrite.All | Application | Allows the app to read, create, update, and delete all files in all site collections without a signed in user. | To download a OneDrive attachment of an event and to upload to an event. |
- Permissions required when using two separate app registrations. An app registration for the customer’s environment components (logic apps), and a second app registration for the services in Addovation’s environment.
- API permissions for 1st app registration-> For logic apps to manage subscriptions at customer's
(not necessary to grant permissions for Addovation services. These permissions will be applicable to the components deployed on Customer tenant).
API / Permissions name Description |
Type |
Description | Used for |
|---|---|---|---|
| Calendars.Read | Application | Allows the app to read events of all calendars without a signed-in user. | Access the events in M365 in order to trigger the subscription. |
| Contacts.Read | Application | Allows the app to read all contacts in all mailboxes without a signed-in user. | Access the contacts in M365 in order to trigger the subscription. |
| User.Read.All | Application | Allows the app to read the full set of profile properties, group membership, reports and managers of other users in your organization, without a signed-in user. | Access the users in order to get user details when accessing the trigger. |
| Group.Read.All | Application | Allows the app to read memberships for all groups without a signed-in user. Also allows the app to read calendar, conversations, files, and other group content for all groups. Note: Not all group APIs support access using app-only permissions. |
Access the user group in order to get user details when accessing the trigger. |
- API permissions for the 2nd app registration -> For the services in Addovation’s environment.
API / Permissions name Description |
Type |
Description | Used for |
|---|---|---|---|
| Calendars.ReadWrite | Application | Allows the app to create, read, update, and delete events of all calendars without a signed-in user. | Create, update, or delete M365 Events from IFS. |
| Contacts.ReadWrite | Application | Allows the app to create, read, update, and delete all contacts in all mailboxes without a signed-in user. | Create, update, or delete M365 Contacts from IFS. |
| User.Read.All | Application | Allows the app to read the full set of profile properties, group membership, reports and managers of other users in your organization, without a signed-in user. | Access the user details. |
MailboxSettings.ReadWrite |
Application | Allows the app to create, read, update, and delete user's mailbox settings without a signed-in user. Does not include permission to send mail. | Absence sync, Automatic Reply from IFS. |
| Files.ReadWrite.All | Application | Allows the app to read, create, update, and delete all files in all site collections without a signed in user. | To download a OneDrive attachment of an event and to upload to an event. |
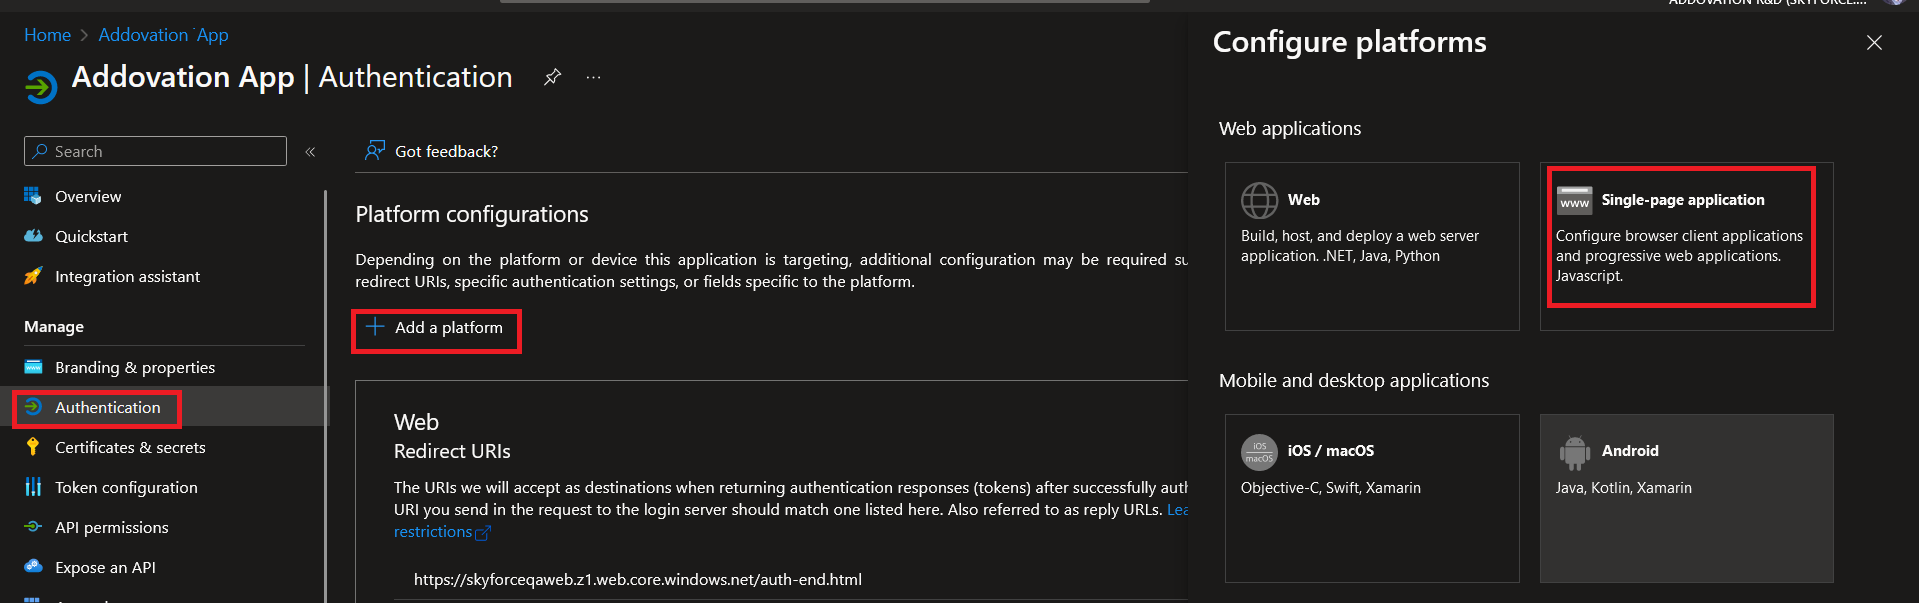
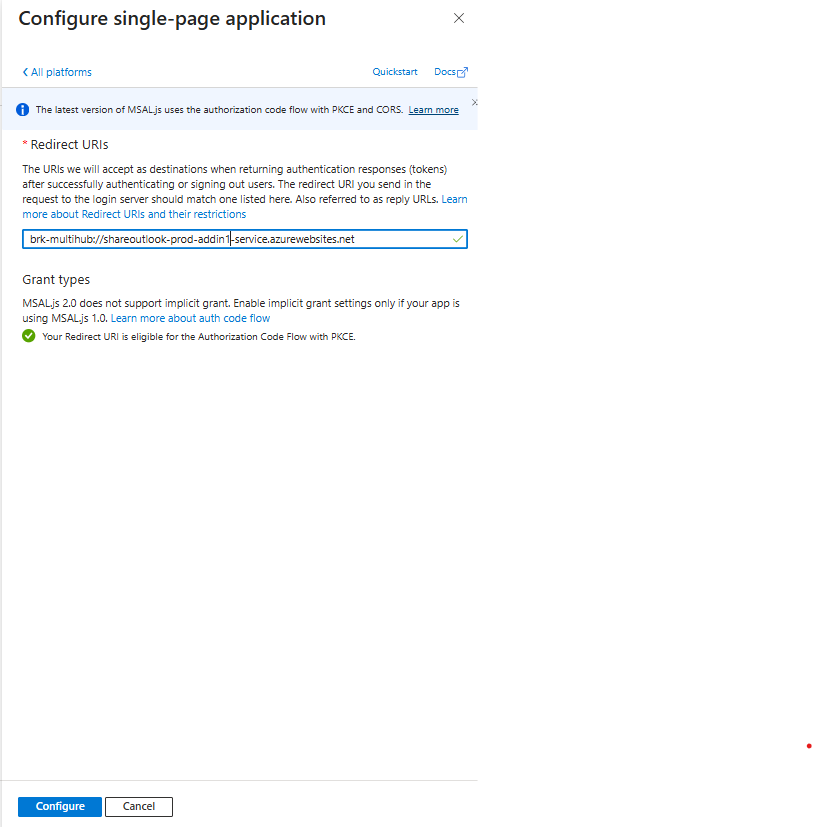
Select Authentication -> Add a platform -> Single-page application
and add the Urls as "brk-multihub://sync-meetings-addin-a2efehhpemgqdafm.norwayeast-01.azurewebsites.net" and "brk-multihub://sync-contact-addin-bagzcbg5brergpcr.norwayeast-01.azurewebsites.net" and click on 'Configure'.
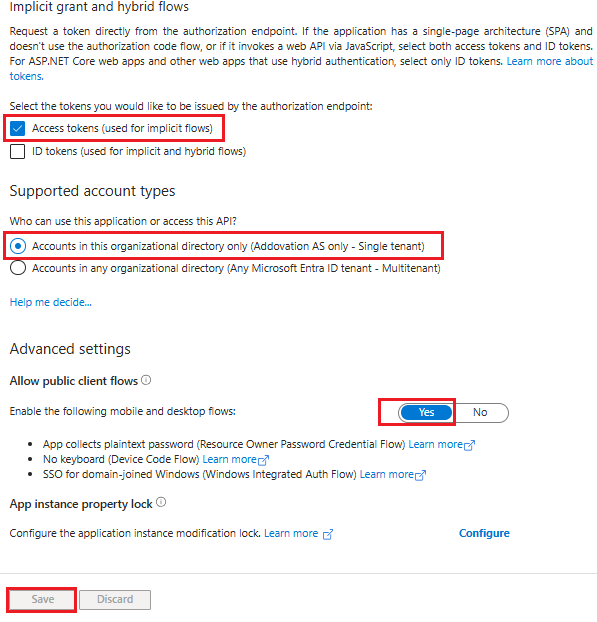
- Select the tokens you would like to be issued by the authorization endpoint: select Access tokens (used for implicit flows).
- Supported account types: Select 'Accounts in this organizational directory only (Addovation AS only - Single tenant)'.
- Enable the following mobile and desktop flows:: select 'Yes'and click on 'save'.
Important
- The application registrations should only be used for Addovation Sync - CRM.
- Make sure to inform your Addovation consultant, whenever the permissions in the used App Registration are changed (added or removed).
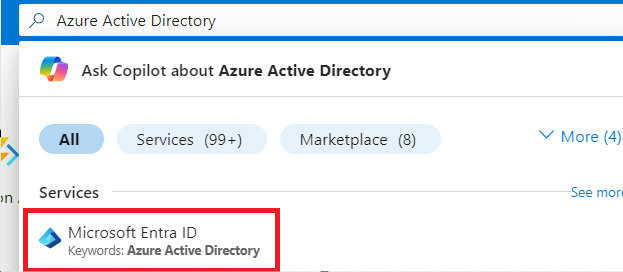
Azure AD Group
- Select or search Azure Active Directory/Microsoft Entra ID -> Select Groups -> Add New Group.

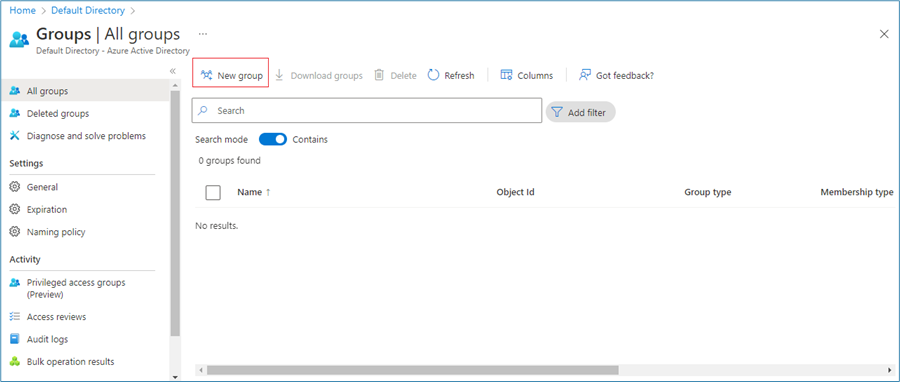
- Group Type: Microsoft 365.
- Group name: Provide a meaningful name. ex: M365CrmSync.
- Create the group.

- Go to overview and Copy the Object Id.

- Adding new members in ‘Members’ to the created group should be done after running the step 7.1 Logic App to create subscription for Add/Remove users to/from the Group.
Resource group
A resource group is a container that holds related resources for an Azure solution. The resource group can include all the resources for the solution, or only those resources that you want to manage as a group.
Sign into the Azure portal with your Azure account.
Select Resource groups and then select Create.
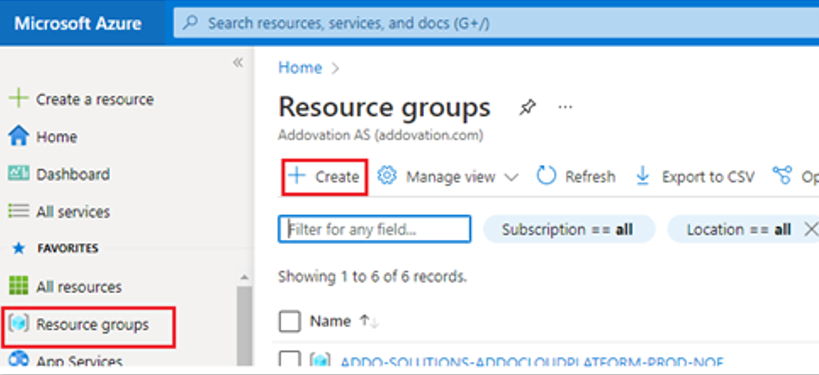
Enter the following values:
Subscription: Select your Azure subscription.
Resource group: Enter a new resource group name.
Region: Select an Azure location, such as Norway East.
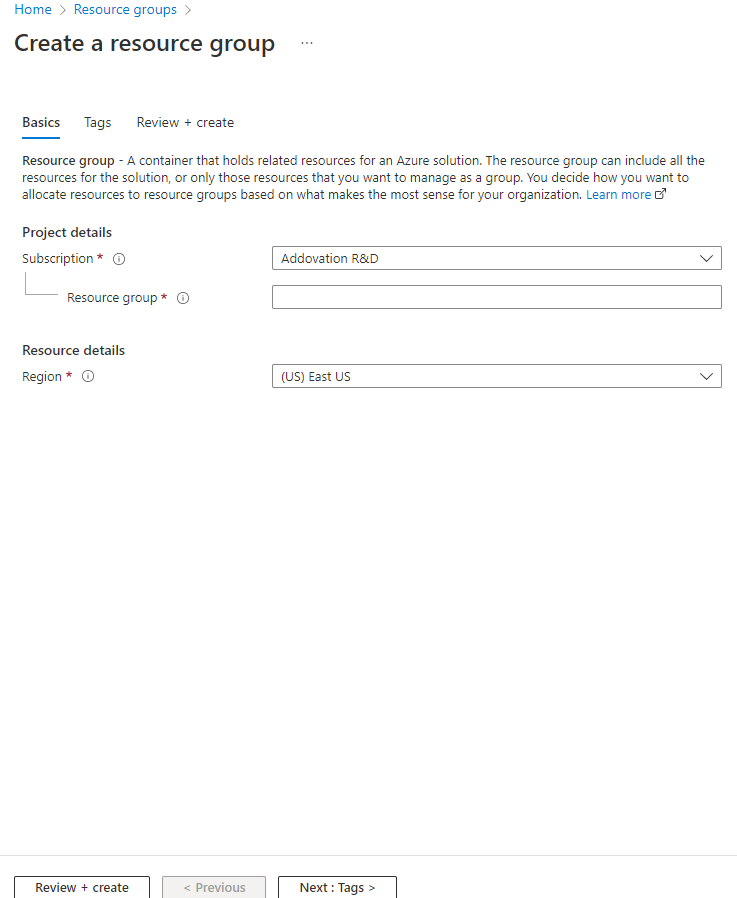
- Select Review + Create
- Select Create. It takes a few seconds to create a resource group.
- Select Refresh from the top menu to refresh the resource group list, and then select the newly created resource group to open it. Or select Notification (the bell icon) from the top, and then select Go to resource group to see the newly created resource group.
Log Analytics Workspace
Log Analytics workspace is the environment for Azure Monitor log data. Each workspace has its own data repository and configuration, and data sources and solutions are configured to store their data in a particular workspace.
- Now go to app portal main page and click Log Analytics Workspaces or you can type on search field and find.

- Click on Create and fill the mandatory fields in ‘Basics tab’ as below and click on Review + Create.

- Subscription: Select the subscription you use.
- Resource group: Create Resource group by clicking ‘Create new’ and enter a proper name for the resource group and click ‘OK’
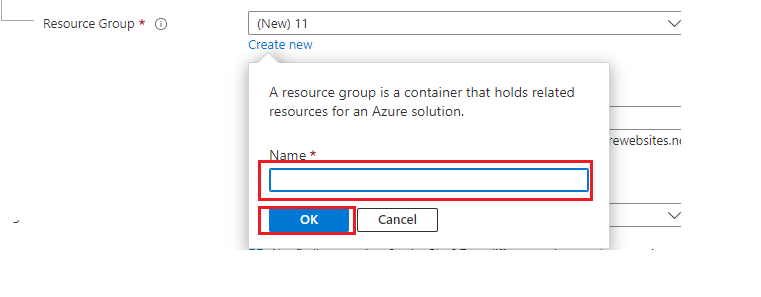
- Or else
- select the resource group which has created in step Resource group. (Resource group should be the same for other resources as well).
Instance Name: Provide the name which between 4 and 63 characters and name can contain only letters, numbers and '-'. The '-' shouldn't be the first or the last symbol. This name must be unique per resource group.
Region: Use the same region which is going to be used in Application insight.
- Click go to resources and the Log Analytics Workspace is ready to use.
After the Application Insight setup is completed (after the next step), logs can be retrieved using queries.
Search using the search bar and open Log analytics workspace created and click Logs.
In the query window you can write queries to view data.

Azure Application Insight
Application Insights is a feature of Azure Monitor that provides extensible application performance management (APM) and monitoring for live web apps.
- Go to the Azure Portal’s main page and click Application Insights.

- Create New.

- Create an application insight using Azure Application Insights.

- Fill the required fields in ‘Basics tab’ tab and click on ‘Review + Create’.
- Subscription: Select the subscription you use.
- Resource group: Create Resource group by clicking ‘Create new’ and enter a proper name for the resource group and click ‘OK’
- Or else
- select the resource group which has created in step Resource group. (Resource group should be the same for other resources as well).
Name: Provide a name which contain between 1 to 255 characters inclusive, and the name only allows alphanumeric characters, periods, underscores, hyphens and parenthesis and cannot end in a period. The name must be unique in the current resource group.
Region: Use the same region which is going to be used in function apps.
Resource Mode: Use the resource mode as workspace-based and provide appropriate ‘WORKSPACE DETAILS’.
Subscription: Select the subscription.
Log Analytics Workspace: Select the created Log Analytics Workspace created in previous step.

Note
Make sure the correct workspace is selected.
Copy ‘Instrumentation Key’ from application overview.
This ‘Instrumentation Key’ will be used in the customer configuration in cloud platform. Get it copied since it needs to be shared with the person who configures the cloud platform subscription.
Important
For more information about InstrumentationKey, please contact your Addovation KAM/consultant.

Azure Logic Apps
- 4 logic apps should be created to generate subscription for
Adding/Removing users to/from the Group and to renew created groups subscriptions, forgetting changes on create/update/delete event or contact,renewing the MS Graph API subscriptionsand granting permissions for SharePoint site.

Logic App to create subscription for Adding/Removing users to/from the Group and to renew created groups subscriptions.
- Select Logic Apps

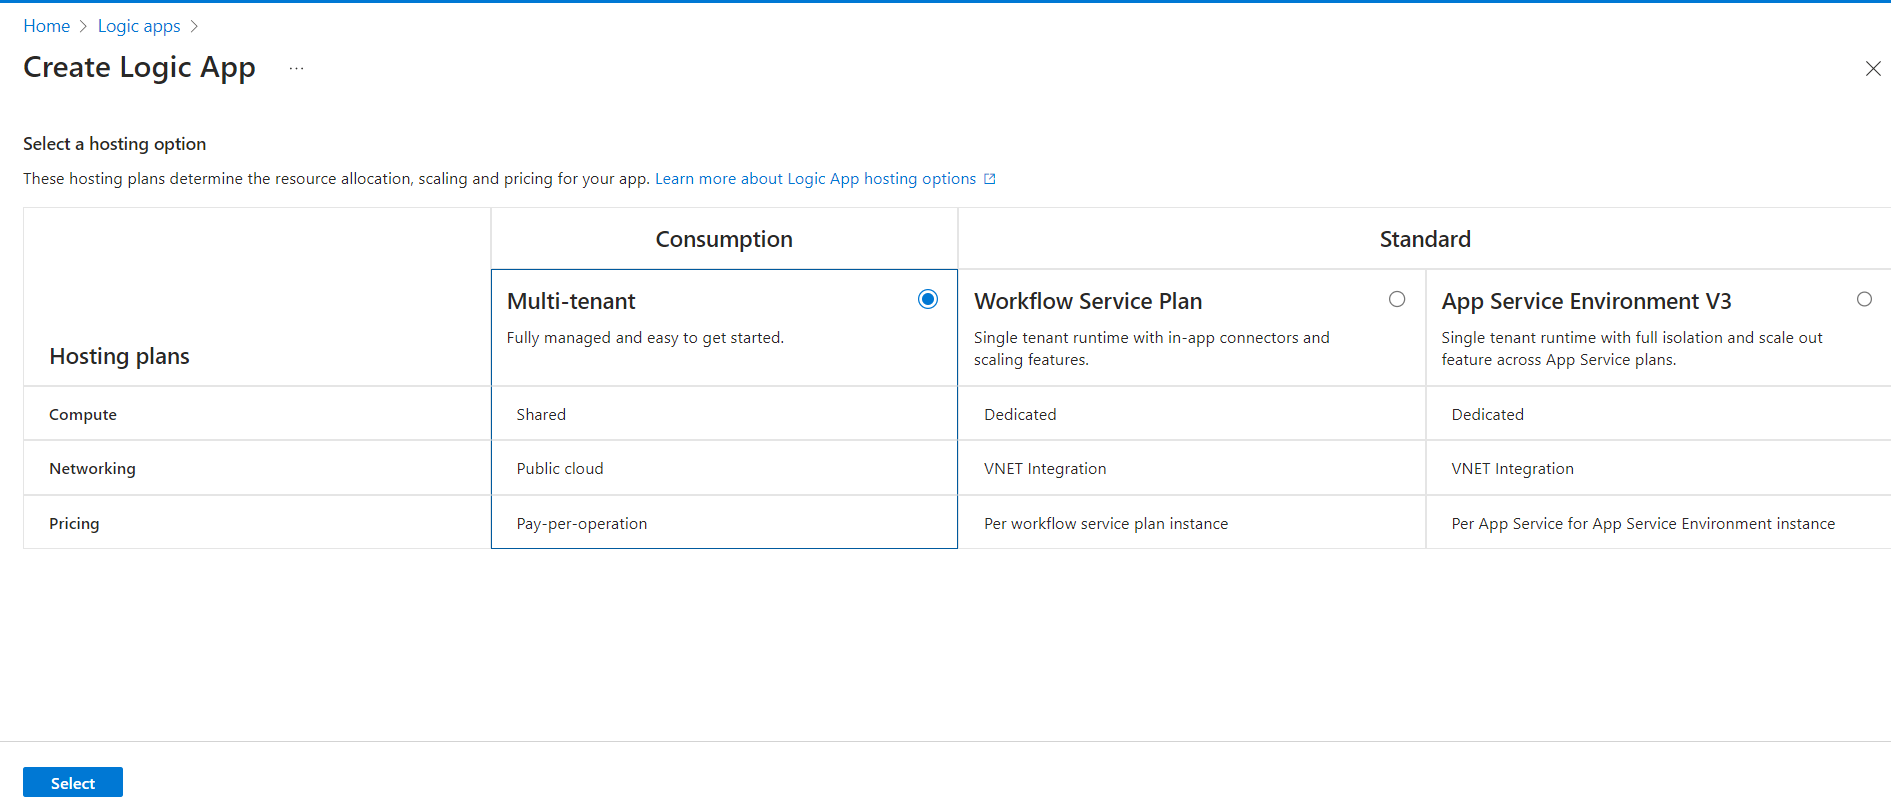
- Add new Logic App.

- Select Consumption Hosting Plan and click Select.
- Enter required fields and click on create button.
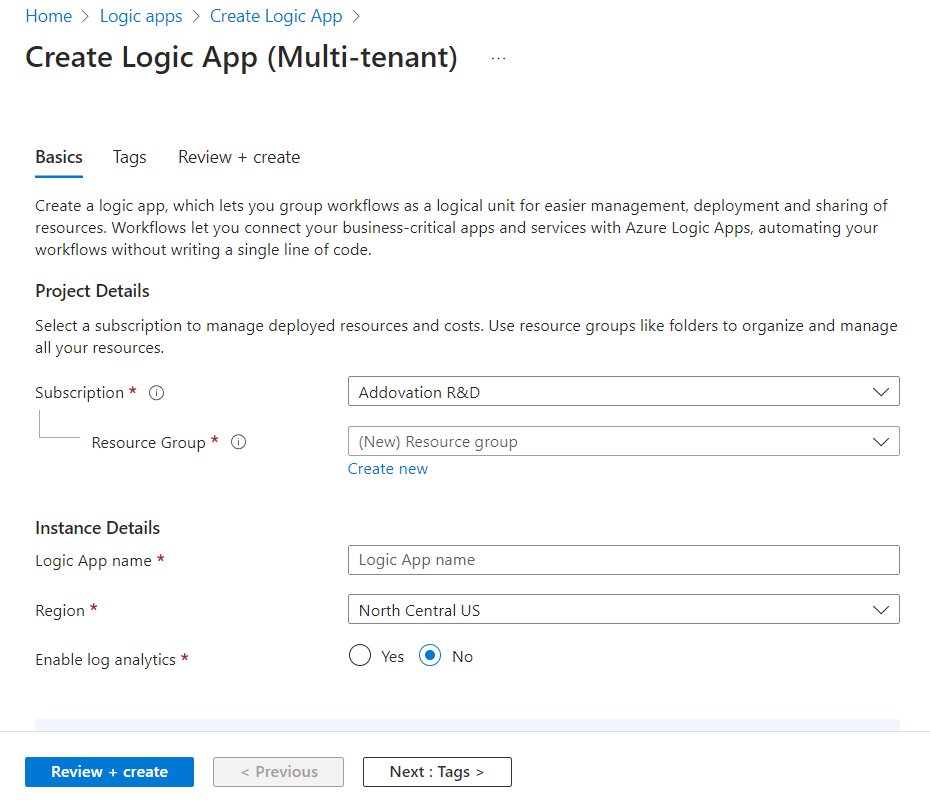
- Subscription: Select the subscription you use.
- Resource group: Create Resource group by clicking ‘Create new’ and enter a proper name for the resource group and click ‘OK’
- Or else
- select the resource group which has created in step Resource group. (Resource group should be the same for other resources as well).
- Logic App name: give the app name as “HandleGroupSubscriptions”.
- Region: use same region ad in created function app - AzureGroupTrigger.
- Enable log analytics: select ‘No’ for Enable log analytics.
- After logic app is created successfully -Click on “go to resources”, this will redirect you to Logic App designer page.

- Select Blank logic App.
- Click on ‘code View’ and delete existing content.

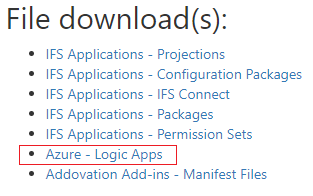
- Go to Azure - Logic Apps from the
File download(s).
- Copy the content of HandleGroupSubscriptions.txt,
- And change the content as below.
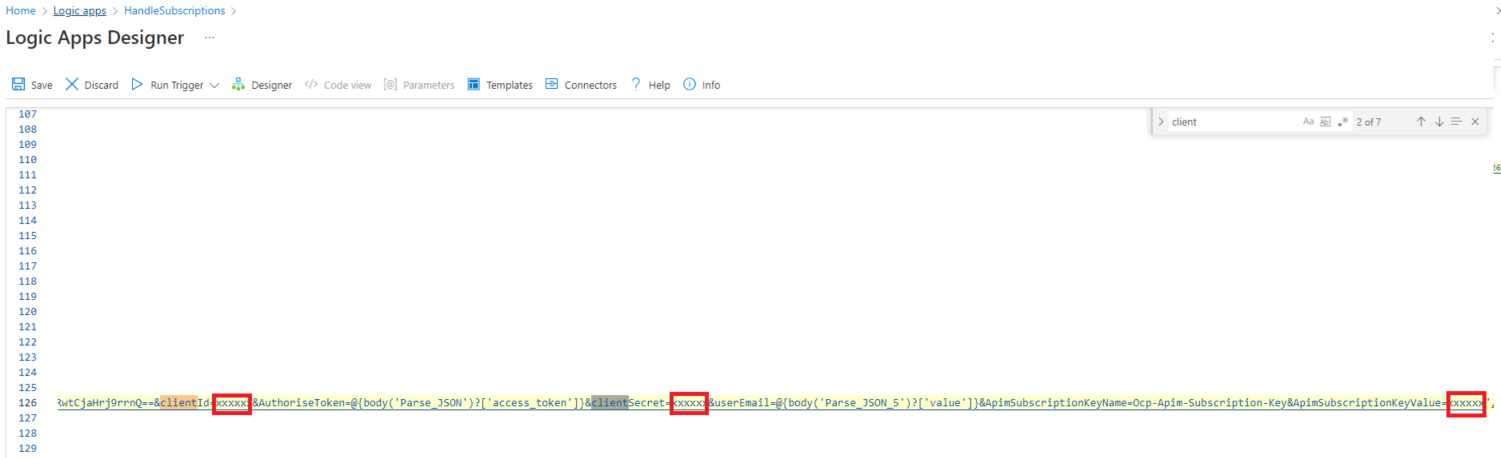
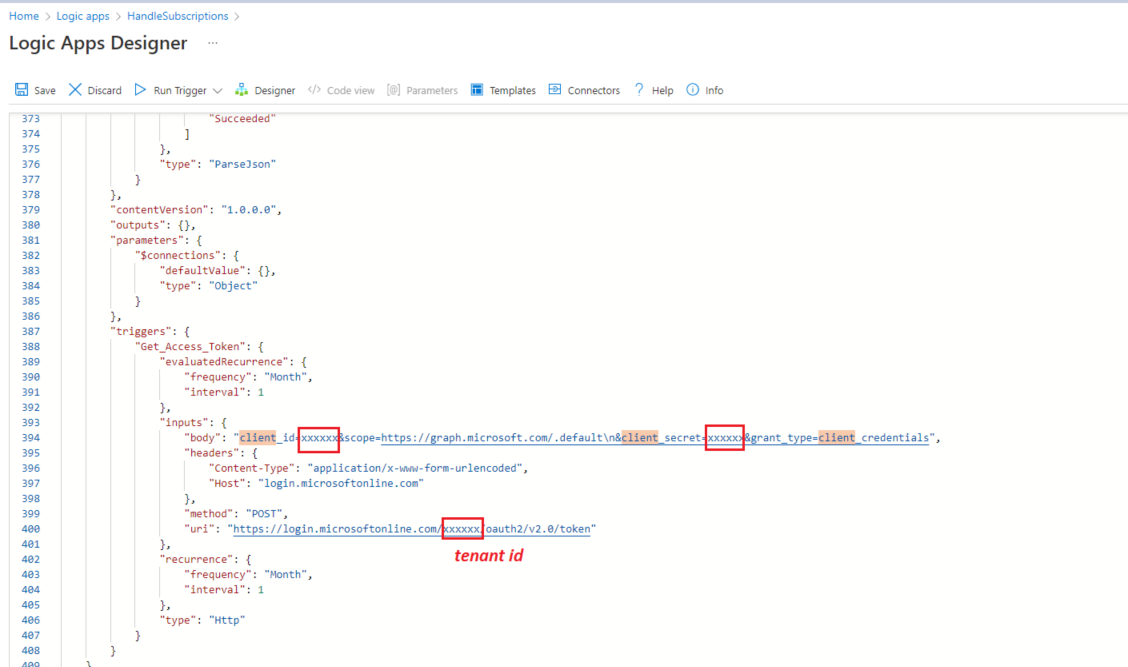
- Give the copied Azure App Registration client id, client secret values for client_id / client_secret each place in code view and tenant value as below.
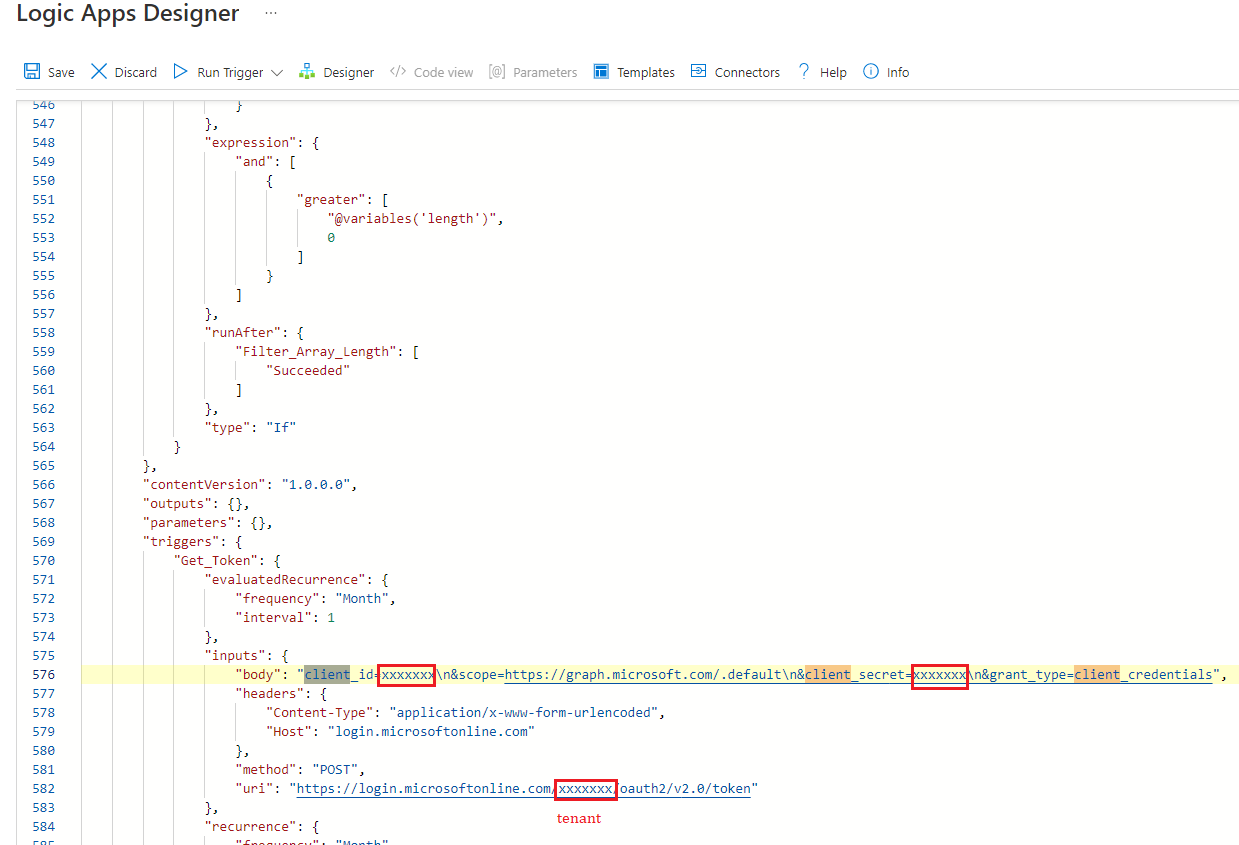
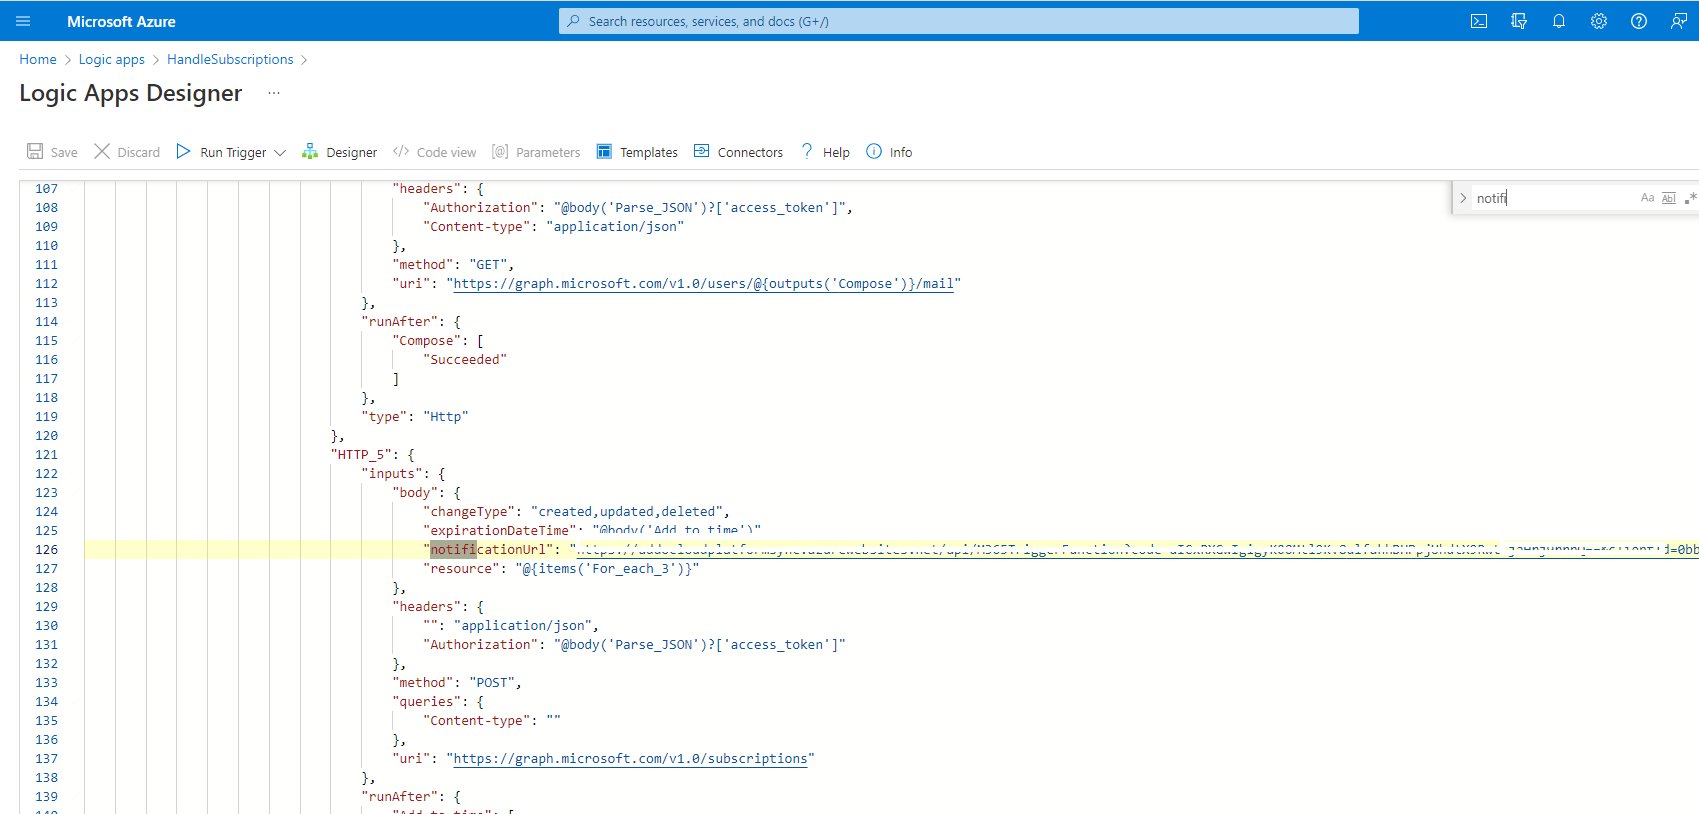
- Change the ‘notificationUrl’ by adding this default host key URL. copy the default (Host key) from created Function app for retrieving change notifications on create/update/delete M365 event or contact in
Step 1.5.1. ex:https://crmsync-prod-function.azurewebsites.net/api/M365TriggerFunction?code=tOK2YMKiTALtYZHMdyiWqvbRQlE3McDQJ3CrMrUCcLVUAzFuPnWp0Q==
And place the client id, secret, tenant id values after ‘=’ as in places below and then replace the correct values for ‘ApimSubscriptionKeyName’, ‘ApimSubscriptionKeyValue’ and ‘CustomerId’.
Ex:
ApimSubscriptionKeyName= Ocp-Apim-Subscription-Key,ApimSubscriptionKeyValue=XXXXXXXXXXXXXXXXXXXXXXXXX,CustomerId= XXXXXXXOcp-Apim-Subscription-Keyshould be retrieved from Addovation Cloud platform, whenever the customer subscription is created.
Note
To get more information about APIM Subscription Key values, please contact your Addovation KAM/consultant.
- And paste the group object id (for the group created in previous step).
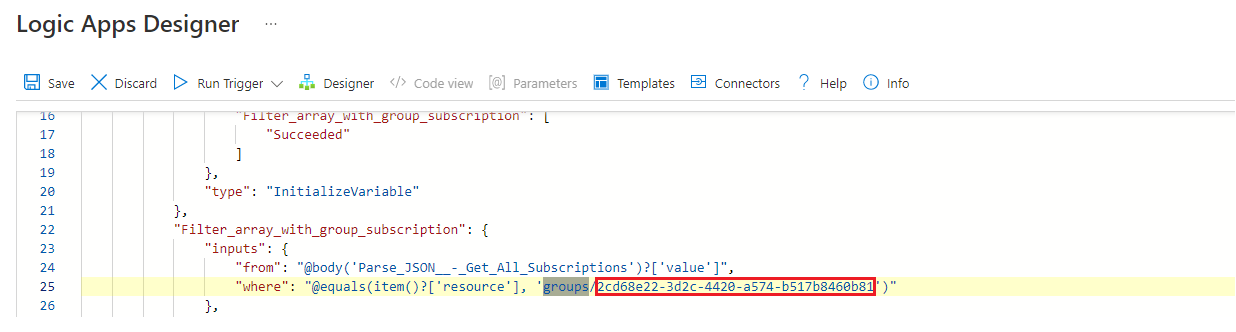
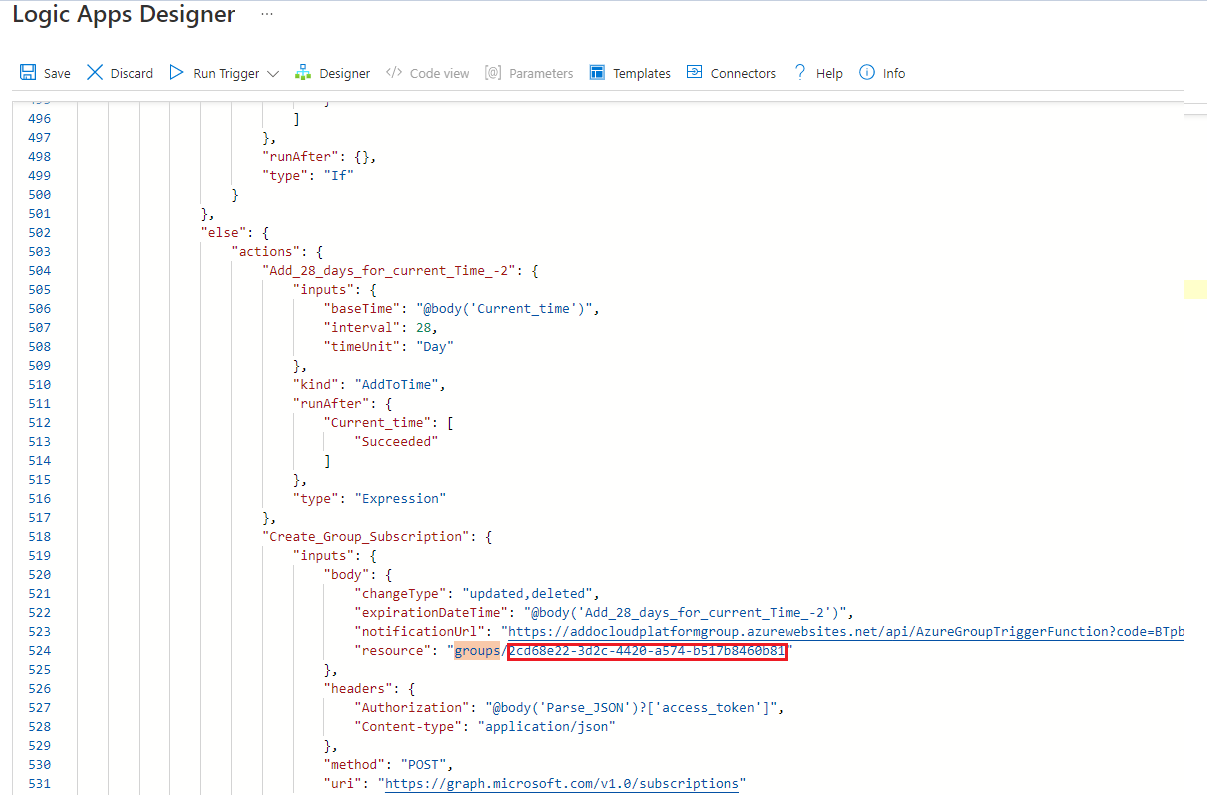
Important
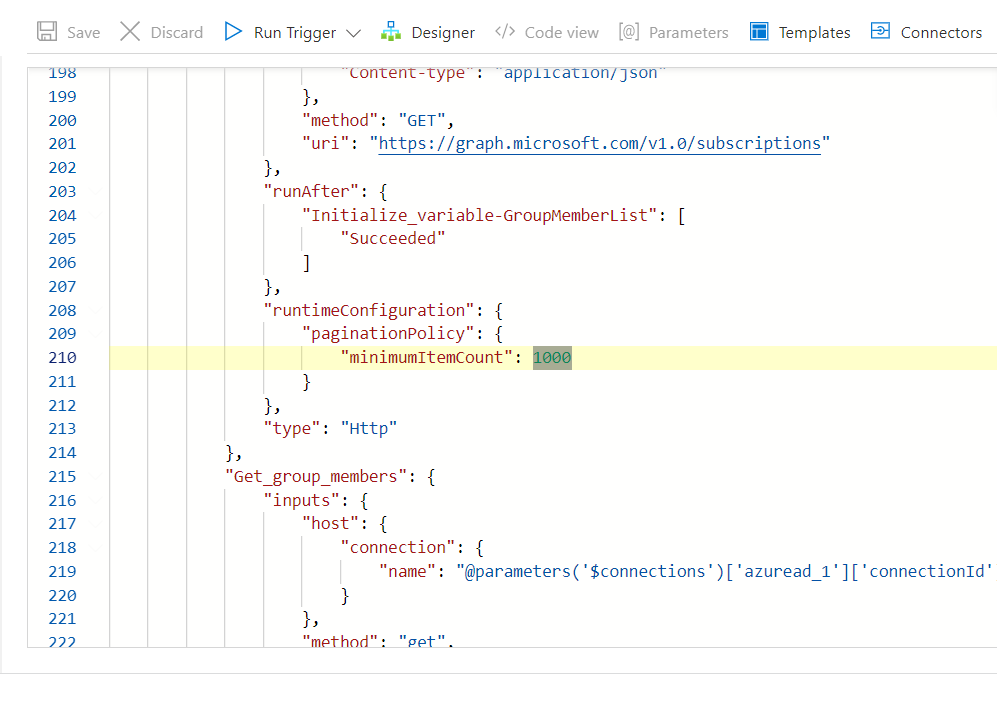
change the minimumItemCount as number of users in Azure Ad Group created * 2
- Save the changes and run the logic App by clicking on Run trigger icon and check whether all steps succeeded.
Important
This Logic app must run before user added or removed to/from the created group in Chapter 3- AZURE AD GROUP (On Customer Tenant).
- Add members to the created group in Chapter 3- AZURE AD GROUP (On Customer Tenant) above then the new subscriptions for retrieving change notifications (for evets and contacts) will be created for newly added users.
Members should have license to access M365 Calendar, M365 outlook and M365 People.
Go to Azure Active Directory/Microsoft Entra ID-> Click on Members -> Click on Add Members -> Search and Select members.

- Remove members from the created group in Chapter 3- AZURE AD GROUP (On Customer Tenant) above, then the subscriptions created for retrieving change notifications (for evets and contacts) will be deleted for removed users.
Important
It takes several minutes to add/remove subscriptions after user/s are added or removed.
Important
The group logic app should be executed once, and then it should be disabled.
Logic app for creating subscriptions for create/update/delete
MS Graph subscriptions should be available for receiving changes on created/updated/deleted events and contacts in M365 triggered by the user.
This logic app should be triggered manually , whenever a new user is added to the Group in Azure AD.
- Create a logic app as above with the Logic App name: HandleSubscriptions.
- Go to Azure - Logic Apps from the
File download(s).
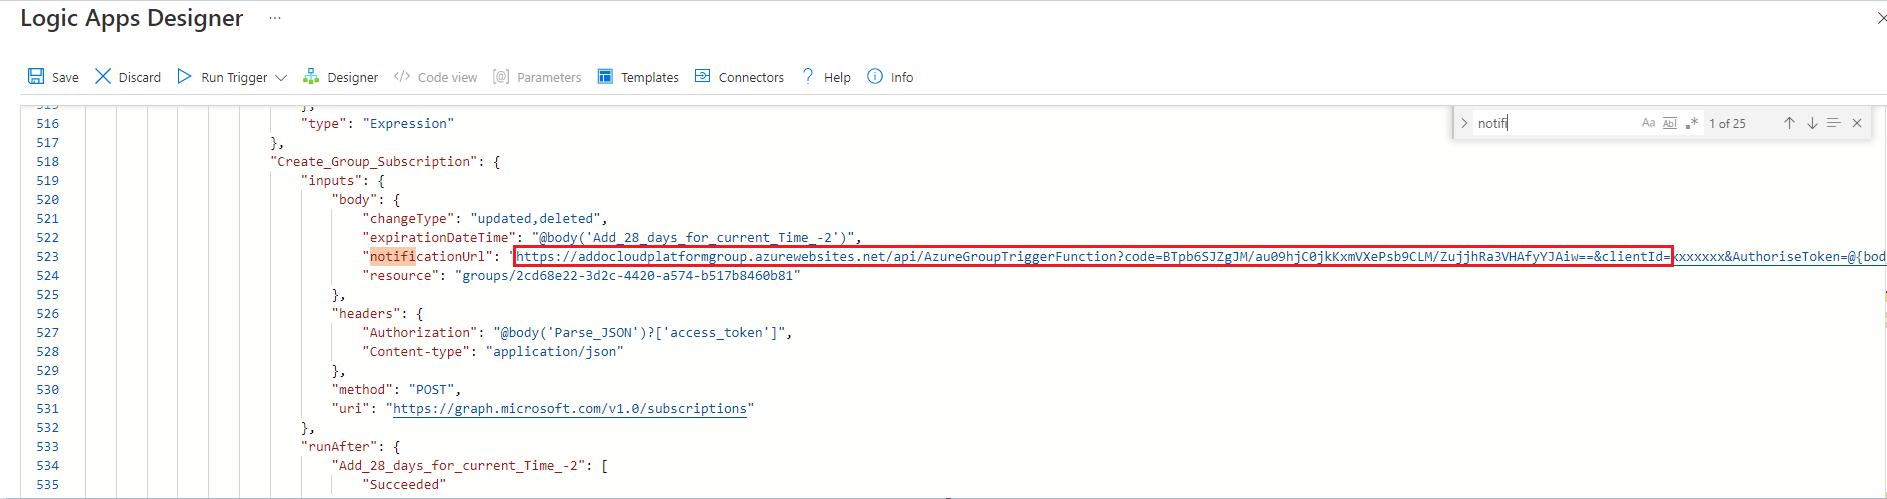
- Copy the content of HandleSubscriptions.txt, do bellow changes.
- Change the ‘notificationUrl’ by adding this default host key URL. copy the default (Host key) from created Function App for retrieving change notifications on Adding/Removing users to/from the Group of customers environments in
Step 1.5.2. ex:https://azuregrouptriggerfuncapp.azurewebsites.net/api/AzureGroupTriggerFunction?code=82ZYBtyD_9EEU9U9zzGPn8TOPqRjXUMfAqQ0rwlsbp0OAzFuzE1B4A==
- add
client id,secretandtenant idas described above then replace the correct values forApimSubscriptionKeyName,ApimSubscriptionKeyValueandCustomerId.
- Add client_id, client_secret and tenant id of Azure AD.
- Save the app and go to the designer of the app.
- In design Delete the existing Get Group Member by clicking on ‘delete’. (Since we have not passed any default value here).

- Click on + after For each 2 step and click on Add an action as below.

- Search for Azure AD in open window and select ‘Azure AD’, then select Get Group members in the action list as below.

Important
Make sure you do not use Private Browsing
- Click on change connection & Add New or sign-in and login to the azure user you need to set up.

- Add copied AD-Group Object Id as Group id in this step.


- Then select the Group Members from the side pop-up for the below places for the next For each action as mentioned below.

- Expand the Compose 2 , Append to array variable and Append to array variable 2 delete the id s by clicking on x select the Group member id.

Important
change the minimumItemCount as number of users in Azure Ad Group created * 2
- Then
saveand run the logic app.
Note
This logic app will run once a month, for looking any missing graph subscriptions for each user in the group. If user has no subscription for event or contacts, it will create a subscription.
Logic app for renewing the MS Graph API subscriptions.
Subscriptions are expired after a certain defined period. So, we need to renew subscriptions to work with Addovation Sync- CRM service. We deploy a logic app to renew subscription before the expiration.
Create a logic app as above with the Logic App name: RenewGraphAPISubscriptions.
Go to Azure - Logic Apps from the
File download(s).
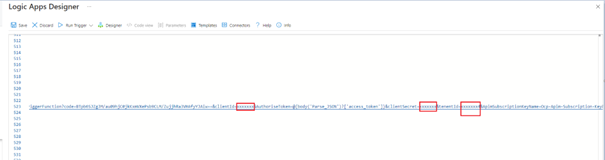
- Copy the content of RenewGraphAPISubscriptions.txt , into the code view and do bellow changes.
- Add selected
client-id,secretandtenant id.
- Add selected

Important
change the minimumItemCount as number of users in Azure Ad Group created * 2
- Save the app and go to the designer of the app
- Then save and run the logic app.
Note
This logic app will run once a day (at UTC 23.59), for looking any graph subscriptions which will expire within defined time period and will update subscription’s expiry date accordingly.
SharePoint configurations
This section applies only if attachments sync is required.
Important
One sharepoint site can be used for multiple domains Or each domain can have one sharepoint site unique to relavant app registration.
Other DB configurations are as follows.
- "syncAttachments" = True - Enable attachment sync
- "syncLargeAttachmentsfromIfsToM365" = True - To sync attachments larger than 39MB from IFS to M365. Synced documents will be saved in the created shared folder in SharePoint.
- "syncAttachmentsfromIfsToM365"= True - Enable attachments sync from IFS to M365
- "syncAttachmentsfromM365toIfs" = True - Enable attachments sync from M365 to IFS
- "syncSharedAttachmentsfromM365toIfs" = True - will sync shared attachments (for attachments only in “attachments” folder in OneDrive) from M365 to IFS
- "sharePointSiteId" -The siteId of the created SharePoint site. Following request can be used in Postman to find the id.
If syncAttachmentsfromIfsToM365 or syncAttachmentsfromM365toIfs or both set to False , synchronizing deleted attachments will not be supported from IFS to M365. But if the activity is already synced to IFS, detached attachments in IFS will be removed from M365 as well.
Important
To sync files larger than 39MB, a SharePoint site should be created using a M365 Admin account and required to provide the SiteID of the created site to the consultant for including it in the database.
Create a site
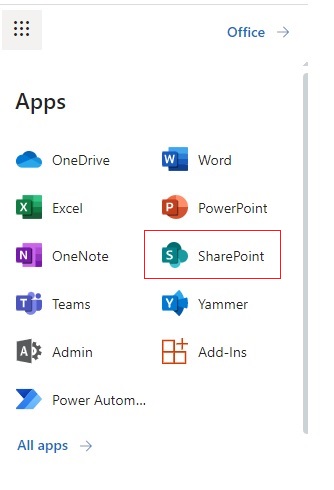
- Go to the SharePoint app in M365
- Select + Create site
- Select Team site
- Enter the name (and a description, if you want) for the site
- Select private level for the site
- Select a default language for your site and then click Next
- Select Finish
A modern SharePoint site is created and ready for use in few minutes. If you selected a team site, a Microsoft 365 group is also created.
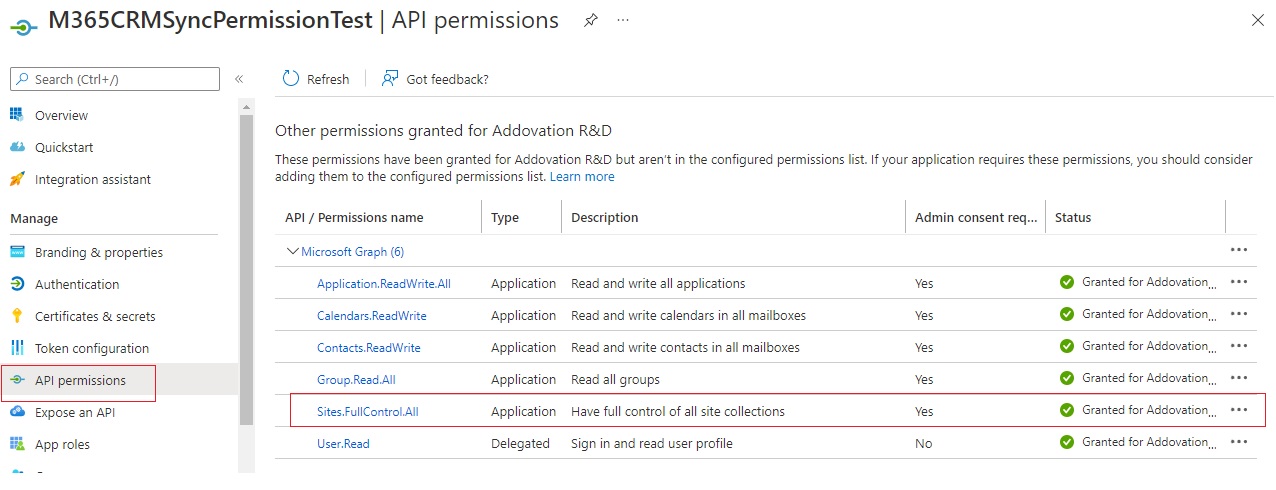
- To grant permissions to the Site on behalf of the App , Site.FullControl permission should be granted in the App Registration first. After all permissions are granted,
Site.FullControlpermission should be removed. Please refer following steps.
Get the Site ID
Following request can be used in Postman to find the SiteId.
Important
Once the site is created, it will take some time to process it, so try sending following requests after few minutes.
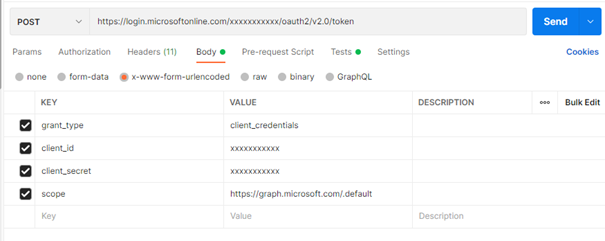
- To Get the token:
- Open Postman , and open a new blank request and provide details.
- Method: POST
- URI: https://login.microsoftonline.com/{tenantID}/oauth2/v2.0/token
- In the Body section:
- Select x-www-form-urlencoded`
- Then provide values for followings.
- grant_type: client_credentials
- client_id : {clientID of the app registration}
- client_secret : {clientSecret of the app registration}
- scope: https://graph.microsoft.com/.default
Please refer the following image for more information.
Then you will get an access token. Ex:

Get the token copied.
- To Get the SiteID
Open another new request in postman and provide following URI with the created site name.
- Method: GET
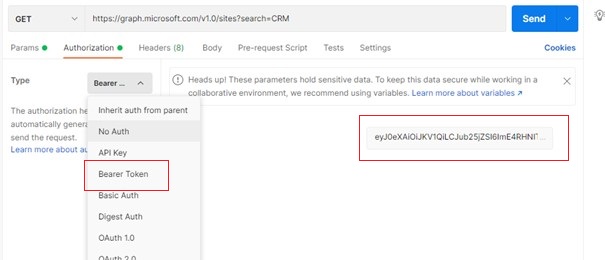
- URI : https://graph.microsoft.com/v1.0/sites?search={siteName}. Ex: If site name is CRM then, https://graph.microsoft.com/v1.0/sites?search=CRM
- Then in Authorization tab, select Bearer Token and provide the copied token here. And Send the request. You will get the siteID and other details.
Set Permissions for created site
There are two ways of setting permissions for the created site. If you are familiar using Postman software, you can run following commands, or else the given logic app can be triggered to add permissions to the site.
As menioned above, to grant permissions to the Site on behalf of the App, Site.FullControl permission should be granted in the App Registration first. After all permissions are granted, Site.FullControl permission should be removed.
- Use Postman
Read, Write permissionsshould be granted for the created site only, using the AppID (App registration).Get the Bearer Token as described in the above section.
Use the token for the following request.
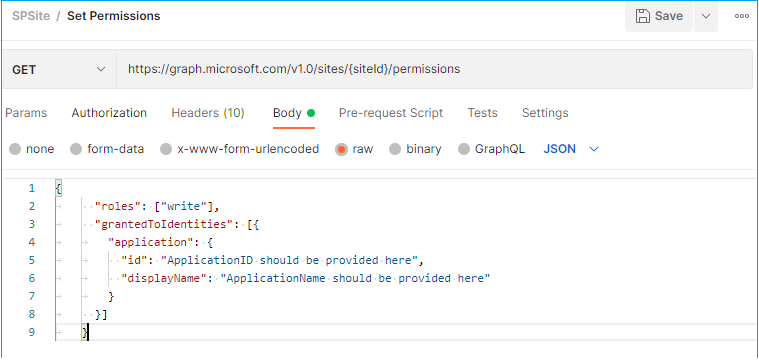
Postman Request:
Method: POST
URI: https://graph.microsoft.com/v1.0/sites/{siteId}/permissions
Headers: Content-Type: application/json
Body:
{ "roles": ["write"], "grantedToIdentities": [{ "application": { "id": "ApplicationID should be provided here", "displayName": "ApplicationName should be provided here" } }] }- Authorization: Bearer : paste the access token
- Then remove the Site.FullControl permission and add Microsoft Graph Sites.Selected Application Permission which will result in only those sites that have permission granted being accessible.
- Use a Logic App
- Refer Here to create a new logic app.
- Go to Azure - Logic Apps from the
File download(s).
- Copy the content of GrantAppPermForSharePointSite.txt , into the code view and do the changes.
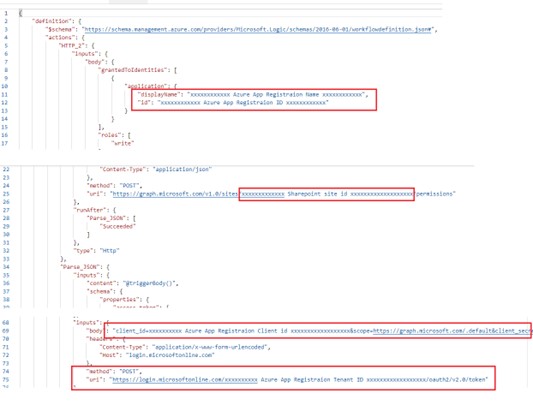
Then go to the Designer, Save and Run trigger.
Important
If the trigger executed successfully, you can disable or remove the logic app.
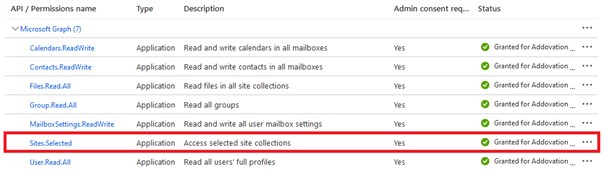
- Set Site.Selected permission
- Then user should remove the Site.FullControl permission from app registration.
- And Microsoft Graph Sites.Selected Application Permission should be granted and click Grant Admin Consents which will result in only those sites that have permission granted above being accessible.
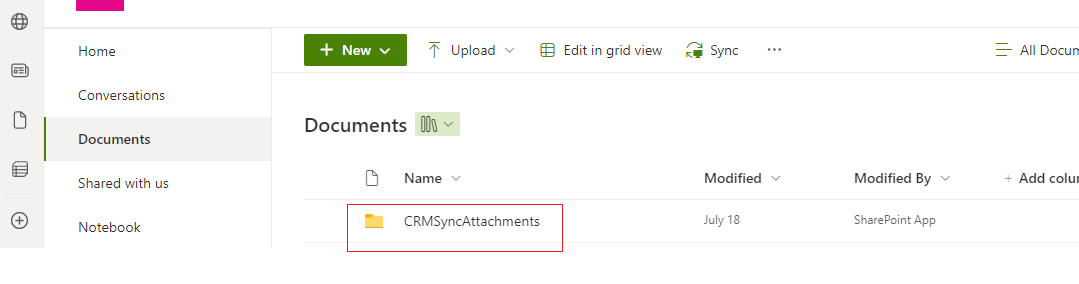
Once all permissions are granted, Addovation Sync - CRM service will create the document folder called CRMSyncAttachments inside the created site and files (larger than 39 MB) synced from IFS will be saved to that the created document folder.
Note
Depending on the file size, it will take some time to sync and display the link in the meeting in M365.
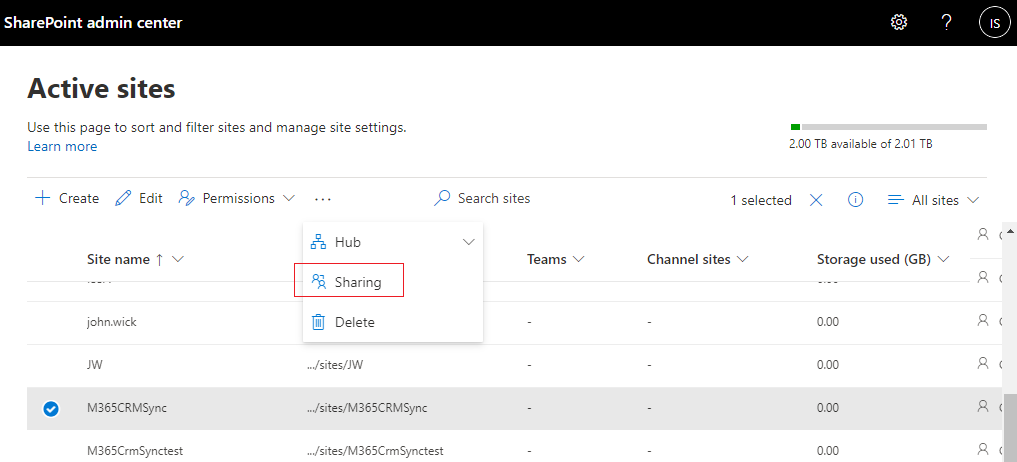
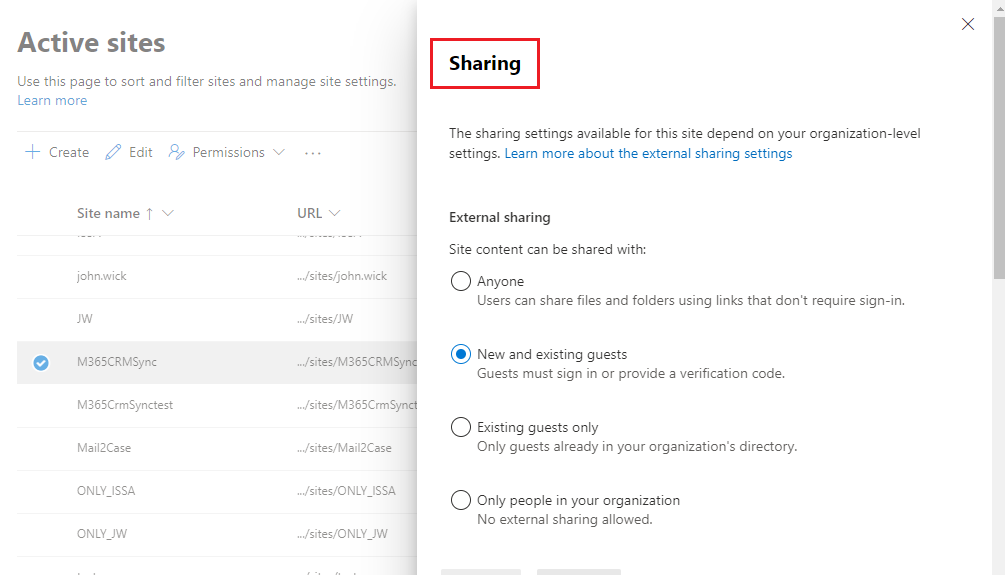
Access to the site can be given according to the organization requirement using ‘Sharing option’ as below and attendees of a meeting will have the access to attached files according to the given permissions.
To sync documents from IFS to M365, Original File Name in IFS will be used and documents will be refered with that name.
Saved file will have the IFS business activity number at the end. If the file exists, then the file will be renamed with the business activity no. Ex: Planning_BA52452
If file name is identical yet, the file will not be synced.
Note
Please refer the user guide, to get more information on attachment sync process.
Integration with Platform
After the Azure setup and IFS Application configuration, customer subscription/s should be created in Addovation Cloud Platform and values for the db configuration should be provided according to the customer’s requirement. There are set of values that should be needed from customer to set up the subscription so please refer Addovation Sync - CRM - setup guide – On Addovation for details.
If the ApimSubscriptionKeyValue is changed for a customer, all the graph subscriptions created using the Logic app, should be deleted and create new graph subscriptions with new ApimSubscriptionKeyValue key for each user.
Note
To get more information, please contact your Addovation KAM/consultant.